Shipments
This section describes how to use the Shipment Tracking solution to create shipments (individually or in bulk), search and filter shipment data, preview and monitor shipment status and sensor events, manage shipment details, and export shipment reports.
Shipments are the focal point of the Platform and provide ways to gain insight into historical trends or active transportation of your goods. This topic provides all the necessary steps to start creating, tracking, and gaining visibility into your shipments.

Shipments
This section is designed to manage and monitor shipment activities. It provides various options for searching, filtering, viewing, creating, and exporting shipment(s) data.
Create Shipment
The Shipment module in the Platform allows you to create new shipments. You can create shipments in two ways:
- Individual Shipments: Create a single shipment at a time using a guided, multi-level template.
- Bulk Shipments: Create multiple shipments at once by uploading shipment data.

Create Shipment - Individual
Creating Individual Shipments
To create an individual shipment:
- From the main navigation, select Shipments.
- Click + Create Shipment.
- In the dropdown, select Individual to start creating a individual shipment.
Basic Details
The first step is to provide essential shipment details.
Create Shipments - Basic Details
Template Selection
Select a shipment template from the Template dropdown. The template determines the workflow, fields, and features available for the shipment.
Important: You cannot change the template after you select Next. Make sure you select the correct template before you continue.
Shipment Details
- Shipment ID — Enter a unique identifier for the shipment.
- Tracker — Select the tracker device to monitor the shipment. The tracker provides real-time location and sensor data.
Note: For more information, see section Devices.
- Parcel Tracking (Optional): Toggle the Parcel Tracking if you have a carrier name and tracking number. When Toggled:
- Carrier updates appear in the Parcel Tracking tab on the Shipment Details Page.
- You can monitor carrier status without going to external tracking websites.
- All tracking sources appear in one place.
Next Steps
After you complete all required fields:
- Select Next to continue to the next step.
- Select Cancel to return to the Shipments list without saving.
Important: Complete all required fields before you select Next. If any required fields are missing, you'll see validation errors.
Legs Tab
The Legs tab is where you define the physical route that a shipment will follow from its starting location to its final destination.
Think of a leg as one segment of a journey. A shipment may consist of a single leg (for example, a truck moving directly from a warehouse to a customer location) or multiple legs (for example, truck → airport → aircraft → destination warehouse).
Before shipment tracking can begin, at least one shipment leg must be configured.
Understanding Shipment Legs
Each shipment leg contains:
- A transportation mode (Road, Air, or Ocean)
- An Origin (Ship From) location
- A Destination (Ship To) location
- An optional Carrier
The map on the right side of the screen provides a visual representation of the selected locations and route.
Using a Predefined Lane
If your organization has already configured commonly used routes, you can use a Lane instead of manually entering all locations.
For example:
- Hyderabad Warehouse → Mumbai Airport
- Los Angeles Port → Singapore Port
- Chicago Distribution Center → Dallas Hub
To use a predefined lane:
- Click the Lane drop-down field.
- Select the required lane.
- The system automatically populates the route details.
Using predefined lanes helps ensure consistency and reduces data entry effort.
Tip: Use predefined lanes whenever possible to minimize manual configuration errors.
Configuring a Shipment Leg
If a predefined lane is not available, you can manually configure the shipment route.
Step 1: Select the Transportation Mode
Under Leg 1, select the transportation mode for the shipment segment.
Available options include:
| Mode | Description |
|---|---|
| Road | Truck, van, or other road transportation |
| Air | Commercial or cargo aircraft transportation |
| Ocean | Sea freight and port-based transportation |
The selected mode determines how the shipment is expected to travel and helps users choose the most appropriate origin and destination types.
Configuring the Origin (Ship From)
The Origin represents the location where the shipment journey begins.
Depending on the shipment requirements, select one of the following location types:
- Site
- Airport
- Port
- Manual
Site
Select Site when the shipment originates from a predefined location that already exists within the platform.
Examples:
- Warehouse
- Distribution Center
- Manufacturing Facility
- Customer Site
To select a site:
- Choose Site from the location type drop-down.
- Click the Origin field.
- Search for and select the required site.
This is the most commonly used option for road shipments.
Airport
Select Airport when the shipment originates from an airport.
Examples:
- Rajiv Gandhi International Airport
- Chicago O'Hare International Airport
- Frankfurt Airport
To select an airport:
- Choose Airport from the location type drop-down.
- Click the Origin field.
- Search for the airport by name or code.
- Select the required airport.
This option is commonly used when configuring air freight shipments.
Port
Select Port when the shipment originates from a seaport or marine terminal.
Examples:
- Port of Los Angeles
- Port of Singapore
- Port of Rotterdam
To select a port:
- Choose Port from the location type drop-down.
- Search for the required port.
- Select the correct location.
This option is typically used for ocean freight shipments.
Manual Address Entry
If the required location does not exist as a Site, Airport, or Port, you can manually enter the address.
This option is useful for:
- Temporary project locations
- Customer delivery locations
- Remote facilities
- New sites not yet configured in the platform
To manually enter an address:
- Select Manual from the location type drop-down.
- Click Add Address.
The Select Origin Address window opens.
Adding a Manual Address
The address search feature allows users to search using:
- Complete address
- Partial address
- Landmark
- Latitude and Longitude coordinates
Searching for a Location
- Begin typing in the Search Location field.
As you type, the platform automatically displays matching address suggestions.
For example:
- T-Hub Hyderabad
- Airport Road
- 17.4458, 78.3497
- Select the correct location from the suggested results.
The system automatically populates the available address details.
Verifying Address Information
Before confirming the address, verify that the following fields are accurate:
- Address Line 1
- City
- State/Province
- Country
- Zip/Postal Code
Accurate address information improves:
- Route visualization
- ETA calculations
- Geofence monitoring
- Shipment tracking accuracy
Zip Code Requirements
Some locations may not have an applicable postal or zip code.
If a Zip/Postal Code is not available:
- Select the Not Applicable checkbox.
- Continue with the address confirmation.
Confirming the Address
After verifying the address information:
- Click Confirm.
The address is saved and displayed within the shipment leg.
The location is also displayed on the map.
If the wrong address was selected:
- Click Cancel.
- Search again and select the correct address.
Changing an Existing Address
If you need to update a manually entered address:
- Click Change Address.
- Search for the new location.
- Verify the address details.
- Click Confirm.
The shipment leg is updated immediately.
Configuring the Destination (Ship To)
The Destination (Ship To) location represents where the shipment is expected to arrive for the current leg.
The destination can be configured using the same methods available for the Origin (Ship From) location.
Users can select one of the following destination types:
- Site
- Airport
- Port
- Manual Address
Site
Select Site when the shipment is being delivered to a predefined location that already exists in the platform.
Examples:
- Warehouse
- Distribution Center
- Customer Facility
- Manufacturing Plant
To select a site:
- Choose Site from the destination type drop-down.
- Click the Destination field.
- Search for and select the required site.
Airport
Select Airport when the shipment destination is an airport.
To select an airport:
- Choose Airport from the destination type drop-down.
- Click the Destination field.
- Search for the airport by name or code.
- Select the required airport.
Port
Select Port when the shipment destination is a seaport or marine terminal.
To select a port:
- Choose Port from the destination type drop-down.
- Search for the required port.
- Select the appropriate port.
Manual Address Entry
If the required destination is not available as a Site, Airport, or Port, you can manually enter the address.
To add a manual destination address:
- Select Manual from the destination type drop-down.
- Click Add Address or Change Address.
- Search using an address, landmark, or latitude and longitude coordinates.
- Select the correct address from the suggestions.
- Verify all populated address details.
- If a Zip/Postal Code is not applicable, select the Not Applicable checkbox.
- Click Confirm to save the address.
The destination location is displayed on the map once confirmed.
Note: The process for configuring a destination address is identical to configuring an origin address.
Creating Multi-Leg Shipments
Some shipments require multiple transportation stages before reaching their final destination.
For example:
Warehouse → Airport → Destination Airport → Customer SiteIn this scenario:
- Leg 1 moves the shipment from the warehouse to the origin airport.
- Leg 2 moves the shipment from the origin airport to the destination airport.
- Leg 3 moves the shipment from the destination airport to the final customer location.
Adding Additional Legs
To add another transportation stage:
- Click + Add Leg.
- Select the transportation mode for the new leg.
- Configure the destination location for the new leg.
- Repeat the same location selection process used in the Ship From and Ship To sections.
For each leg, the destination can be configured using:
- Site
- Airport
- Port
- Manual Address
How Origins Are Assigned for Additional Legs
When a new leg is created, the system automatically uses the previous leg's destination as the origin of the next leg.
Example:
| Leg | Origin | Destination |
|---|---|---|
| Leg 1 | Hyderabad Warehouse | Hyderabad Airport |
| Leg 2 | Hyderabad Airport | Chicago Airport |
| Leg 3 | Chicago Airport | Customer Site |
Notice that:
- The destination of Leg 1 automatically becomes the origin of Leg 2.
- The destination of Leg 2 automatically becomes the origin of Leg 3.
As a result, users only need to configure the destination for each new leg, reducing manual data entry and preventing route configuration errors.
Tip: Review all legs carefully before proceeding. The final shipment route will follow the exact sequence of locations defined in the Legs tab.
Selecting a Carrier
After configuring all shipment legs:
- Navigate to the Carrier field.
- Search for the required carrier.
- Select the carrier from the available list.
Examples:
- FedEx
- DHL
- UPS
- Internal Fleet Carrier
Carrier information can be used for shipment visibility, reporting, and operational workflows.
Best Practice: Before proceeding to the next step, verify that all transportation modes, origins, destinations, and carrier selections are correct. Incorrect route information may impact shipment tracking, alerts, ETA calculations, and reporting.
Proceeding to the Next Step
Once all shipment legs have been configured and verified, review the following information before proceeding:
- Transportation mode for each leg
- Origin (Ship From) locations
- Destination (Ship To) locations
- Additional legs, if applicable
- Carrier selection
The map on the right side of the screen provides a visual representation of the configured route and can be used to verify that the shipment path is correct.
Navigate to the Manifest Step
After verifying all route information:
- Click Next.
The system proceeds to the Manifest tab, where shipment contents and package details can be configured.
Tip: Ensure all shipment legs are configured correctly before proceeding, as route information is used throughout the shipment lifecycle for tracking, alerts, ETA calculations, and reporting.
Return to Shipment Details
If you need to modify shipment information entered during the initial shipment creation process:
- Click Back.
The system returns to the previous shipment setup screen, allowing you to update shipment details such as shipment information, template selections, or other configuration settings before continuing.
Cancel Shipment Creation
To exit the shipment creation process without proceeding:
- Click Cancel.
Any unsaved changes made during the current shipment creation session may be lost.
Manifest Tab
The Manifest tab is used to define the contents of a shipment by creating the shipment hierarchy and assigning assets that will travel as part of the shipment.
A manifest acts as a digital representation of the physical shipment. It allows users to organize pallets, containers, boxes, and individual units into a structured hierarchy and associate tracking devices with those assets.
The information displayed in the Manifest tab depends on the template selected during shipment creation.
How Templates Affect the Manifest
The structure of the Manifest tab is determined by the shipment template selected in the Basic Details step.
Single-Level Templates
For single-level templates, shipment tracking is performed directly on a single asset level.
In these cases:
- No additional hierarchy needs to be created.
- The Manifest tab may contain minimal information or may not require any user input.
- Users can proceed directly to the next step.
Multi-Level Templates
For multi-level templates, users must build the shipment hierarchy before tracking can begin.
Depending on the template configuration, the hierarchy may include:
- Orders
- Containers
- Pallets
- Boxes
- Individual Units
Examples:
Order
 └── Pallet
      ├── Box
      ├── Box
      └── Box
Or
Order
 └── Container
       ├── Pallet
       │     ├── Box
       │     └── Box
       └── Pallet
The hierarchy structure available in the Manifest tab depends entirely on how the selected template was configured.
Note: Different organizations may use different shipment hierarchies. Refer to the Templates section for information about the hierarchy configured for your environment.
Understanding the Manifest Screen
The Manifest screen is divided into two sections:
Manifest Hierarchy Panel
The left side of the screen displays the shipment hierarchy.
This section is used to:
- Create Pallet IDs
- Add assets
- View parent-child relationships
- Edit existing records
- Delete hierarchy items
Shipment Route Map
The right side displays the shipment route configured in the Legs tab.
The map provides a visual representation of the shipment's origin and destination locations and helps verify that the shipment route has been configured correctly.
Adding a Pallet ID
Before assets can be assigned, at least one Pallet ID must be created.
A pallet acts as a grouping mechanism that allows related shipment assets to be organized together.
Examples include:
- Warehouse pallets
- Shipping pallets
- Handling units
- Consolidated shipment groups
To add a pallet:
- Click Add Pallet ID.
- Enter a unique pallet identifier.
- Click Confirm.
The pallet is added to the manifest hierarchy.
Tip: Use pallet identifiers that match warehouse or logistics references whenever possible. This makes shipment reconciliation easier during loading and unloading activities.
Managing Existing Pallets
After a pallet is created, additional actions become available.
Users can:
- Add assets to the pallet
- Edit the pallet identifier
- Delete the pallet
Edit a Pallet
- Click the Edit icon beside the pallet.
- Update the pallet information.
- Save the changes.
Delete a Pallet
- Click the Delete icon beside the pallet.
- Confirm the deletion.
Note: Deleting a pallet may remove all assets associated with that pallet from the shipment hierarchy.
Adding Assets to a Pallet
Once a pallet has been created, assets can be assigned to it.
To add an asset:
- Locate the pallet within the hierarchy.
- Click the Add (+) icon.
- The Add Unit ID window appears.
Users can either:
- Select an existing asset already available in the platform.
- Create a completely new asset.
Option 1: Assigning Existing Assets
Use this option when the asset has already been created in the platform.
Examples:
- Existing containers
- Existing pallets
- Existing returnable assets
- Previously registered shipment units
To add an existing asset:
- Open the Add Unit ID window.
- Select the Existing tab.
- Use the search field to locate the asset.
- Search using the asset name or asset identifier.
- Click the + icon beside the required asset.
- Repeat for additional assets if required.
- Click Done.
The selected assets are added to the pallet hierarchy.
Tip: Existing assets help reduce duplicate asset creation and ensure historical asset information remains associated with the shipment.
Option 2: Creating a New Asset
If the required asset does not already exist in the system, a new asset can be created directly from the Manifest tab.
To create a new asset:
- Open the Add Unit ID window.
- Select the New tab.
The asset creation form is displayed.
Configuring the Unit ID
The Unit ID uniquely identifies the asset being added to the shipment.
Users can either:
Enter a Unit ID Manually
Enter a meaningful identifier that follows your organization's naming standards.
Examples:
BOX-1001
PALLET-234
UNIT-8765
Automatically Generate a Unit ID
To automatically generate a unique identifier:
- Select Auto Generate Unit ID.
The platform generates a unique Unit ID automatically.
This helps prevent duplicate identifiers and simplifies asset creation.
Selecting an Asset Type
Every asset must be assigned an Asset Type.
Available asset types include:
- Container
- Pallet
- Box
- Unit
Choose the option that best represents the physical object being tracked.
Asset Type Examples
| Asset Type | Example |
|---|---|
| Container | Ocean container or cargo container |
| Pallet | Wooden or plastic shipping pallet |
| Box | Carton or shipping package |
| Unit | Individual item or product |
Selecting the correct asset type helps maintain an accurate shipment hierarchy and improves reporting and inventory visibility.
Assigning a Tracking Device
A tracking device can be associated with the asset during creation.
To assign a device:
- Click the Device ID field.
- Search for the required device.
- Select the appropriate device from the list.
The selected tracker will be associated with the asset and used for shipment monitoring.
Tracker Status Validation
When selecting a device, the platform validates whether the tracker is actively reporting.
A warning similar to the following may appear:
Tracker has not reported in the last 60 minsThis warning indicates that the device may currently be:
- Offline
- Powered off
- Outside network coverage
- Experiencing communication issues
Best Practice: Whenever possible, assign trackers that are actively reporting to ensure accurate shipment visibility.
Saving the Asset
After completing the required fields:
- Verify the Unit ID.
- Verify the Asset Type.
- Verify the Device ID.
- Click Confirm.
The asset is added beneath the selected pallet.
The hierarchy panel immediately updates to display the new relationship.
Reviewing the Manifest Hierarchy
As pallets and assets are added, the hierarchy panel displays the complete shipment structure.
Users can:
- Expand or collapse hierarchy levels.
- Review assigned trackers.
- Verify parent-child relationships.
- Edit hierarchy items.
- Delete hierarchy items.
Before proceeding, ensure the hierarchy accurately reflects the physical shipment that is being loaded and transported.
Finalizing the Manifest
Before moving to the next step, verify:
- All required pallets have been created.
- All required assets have been added.
- Asset types are correct.
- Tracking devices are assigned appropriately.
- The hierarchy accurately reflects the physical shipment contents.
Accurate manifest information improves shipment tracking, traceability, alerting, reporting, and operational visibility.
Proceeding to the Next Step
After completing and reviewing the manifest:
- Click Next.
The system proceeds to the Rules tab.
Returning to the Previous Step
To return to the shipment route configuration:
- Click Back.
The system navigates back to the Legs tab.
Starting Shipment Tracking
After all required shipment configuration steps have been completed and at least one trackable asset has been assigned, the Start Tracking button becomes available.
Click Start Tracking to create the shipment and begin active monitoring of all assigned assets and tracking devices.
Once tracking has started, the shipment becomes visible within the shipment management and monitoring screens, and the platform begins processing location updates, alerts, route monitoring, and shipment events.
Important: Ensure the correct tracking devices are assigned before starting the shipment. Incorrect device assignments may result in inaccurate shipment visibility, alert generation, and reporting.
Modifying a Shipment After Tracking Starts
Starting shipment tracking does not immediately lock the shipment.
The fields that can be modified depend on the shipment's current status.
Preparing or Ready Status
While the shipment remains in either the Preparing or Ready status, users can continue to modify most shipment information, including:
- Shipment details
- Manifest information
- Assets and asset assignments
- Tracking device assignments
- Shipment rules
- Shipment route and legs
However, the selected Template cannot be changed after the shipment has been created.
Note: If a different template is required, a new shipment must be created using the desired template.
In Transit Status
Once the shipment status changes to In Transit, the shipment is considered active and moving through its route.
At this stage, most shipment configuration settings become read-only to preserve shipment integrity and auditability.
The only configuration that can be modified while a shipment is In Transit is:
- Shipment Legs (route information)
This allows users to make route adjustments when required, such as:
- Changing a destination
- Adding additional route segments
- Updating shipment routing information
All other shipment properties remain locked while the shipment is in transit.
Best Practice: Review shipment details, manifest information, asset assignments, and rules carefully before the shipment enters the In Transit state.
Rules Tab
The Rules tab allows you to configure the conditions that should trigger alerts during shipment transit.
Rules help users proactively monitor shipments by generating alerts whenever predefined conditions are met. These alerts can be based on sensor readings, device events, environmental conditions, shipment delays, or location-based events.
Examples include:
- Temperature exceeding acceptable limits
- Humidity outside the expected range
- Excessive shock or vibration events
- Low battery levels
- Excessive dwell time at a location
- Unauthorized route deviations
- Light exposure events
Rules assigned to a shipment are automatically inherited by the assets associated with that shipment.
Note: Rules are used to monitor shipment conditions and generate alerts throughout the shipment lifecycle.
Understanding the Rules Screen
The Rules tab displays all rules currently assigned to the shipment.
If no rules have been assigned, the page displays a message indicating that no rules are currently configured.
To add, remove, or modify shipment rules:
- Click Manage Rules.
The Manage Rules screen opens.
Managing Shipment Rules
The Manage Rules screen contains two sections:
Added Rules
The left panel displays rules that are currently assigned to the shipment.
These rules will actively monitor shipment conditions and generate alerts when their configured conditions are met.
Available Rules
The right panel displays all rules that are available for assignment.
Users can:
- Search for rules
- Review rule names
- View rule severity levels
- Add rules to the shipment
Available severity levels may include:
| Severity | Description |
|---|---|
| Info | Informational notification |
| Warning | Potential issue requiring attention |
| Critical | High-priority issue requiring immediate action |
Assigning Existing Rules
To assign a rule to a shipment:
- Click Manage Rules.
- Locate the required rule in the Available Rules panel.
- Use the search field if necessary to find the rule.
- Click the + icon beside the rule.
The selected rule is moved from the Available Rules panel to the Added Rules panel.
Repeat the process to assign additional rules.
Assigning Multiple Rules
To assign all available rules at once:
- Click Add All.
All available rules are moved to the shipment's assigned rule list.
Tip: Only assign rules that are relevant to the shipment being monitored. Excessive alerts may reduce operational effectiveness.
Remove/Disable Assigned Rules
If a rule is no longer required:
- Open Manage Rules.
- Locate the rule in the Added Rules panel.
- Remove the rule from the assigned list by clicking the Remove button or toggle the button to disable rule.
The rule will no longer generate alerts for the shipment.
Creating a New Rule
If the required rule does not already exist, you can create a new rule directly from the Manage Rules screen.
To create a new rule:
- Click Create New Rule.
- The Create Rule page opens.
- Configure the rule details, conditions, severity, alert instances, and scope as required.
- Save the rule.
For detailed instructions on creating and configuring rules, refer to Alerts > Rules > Create Rule.
Note: Newly created rules become available for assignment immediately after they are saved.
Assigning the Newly Created Rule
After creating a rule:
- Return to the Manage Rules screen.
- Locate the newly created rule in the Available Rules panel.
- Click the + icon beside the rule.
- Verify that the rule appears in the Added Rules panel.
Click Done to save the shipment rule assignments.
The system returns to the shipment's Rules tab.
Reviewing Assigned Rules
After returning to the Rules tab:
- Review the assigned rules.
- Verify that all required monitoring conditions have been configured.
- Confirm that the severity levels align with operational requirements.
The Rules tab now displays the rules that will actively monitor the shipment during transit.
Proceeding to the Next Step
After reviewing the assigned rules:
- Click Next to proceed to the next shipment configuration step.
- Click Back to return to the Manifest tab.
- Click Cancel to exit the shipment creation process.
If all required shipment information has been completed, you may also click Start Tracking to begin shipment monitoring.
Best Practice: Configure only the alerts that are meaningful for the shipment being monitored. Well-configured rules help operations teams quickly identify genuine issues while minimizing unnecessary notifications.
Documents Tab
The Documents tab allows users to upload and manage documents, images, and other files related to the shipment.
Attaching shipment-related documentation provides a centralized location for storing supporting records and makes them easily accessible throughout the shipment lifecycle.
Documents uploaded here remain associated with the shipment and can be reviewed by authorized users whenever needed.
Common examples include:
- Bill of Lading (BOL)
- Shipment Manifest
- Packing List
- Commercial Invoice
- Delivery Instructions
- Certificates and Compliance Documents
- Photos of Shipment Contents
- Photos of Packaging Conditions
- Loading and Unloading Evidence
- Proof of Delivery (POD) Document
Tip: Uploading relevant shipment documentation helps improve traceability, audit readiness, and operational visibility throughout the shipment journey.
Understanding the Documents Screen
The Documents tab contains a document upload area where users can add files to the shipment.
The right side of the screen continues to display the shipment route map, allowing users to review the shipment path while managing documents.
The upload area supports both:
- File selection from your computer
- Drag-and-drop uploads
Uploading Documents
To upload a document:
-
Click anywhere within the upload area, or
-
Drag and drop one or more files into the upload area.
-
Select the file(s) you want to upload.
-
Click Upload.
The selected files are attached to the shipment and become available for future reference.
Supported File Types
The platform supports the following file formats:
- CSV
- DOCX
- JPG
- JPEG
- SVG
- PNG
File Upload Limits
The following upload limits apply:
- Maximum of 20 files per upload session
- Maximum file size of 10 MB per file
Note: Files that exceed the supported size limit may not be uploaded successfully.
Best Practices for Shipment Documentation
Consider attaching all documents that may be useful during shipment execution and review.
Examples include:
Operational Documents
- Shipment Manifest
- Bill of Lading (BOL)
- Packing List
- Shipping Instructions
Compliance Documents
- Regulatory Certificates
- Customs Documentation
- Import and Export Forms
Visual Evidence
- Photos of shipment contents before dispatch
- Photos of packaging condition
- Loading dock photographs
- Damage inspection photographs
Maintaining complete shipment documentation helps improve communication between logistics teams, carriers, customers, and auditors.
Reviewing Uploaded Documents
After a document is uploaded, verify that:
- The correct file was selected.
- The uploaded document is legible and complete.
- The file name clearly identifies its purpose.
- No confidential or incorrect files were attached accidentally.
Best Practice: Use meaningful file names such as:
BOL_SHIP-IN-LA-4223.pdf
Packing_List_Order_123.pdf
Shipment_Photo_Loading_Dock.jpg
This makes documents easier to identify later.
Proceeding to the Next Step
After uploading and reviewing all required shipment documents:
- Click Next to proceed to the next shipment configuration step.
- Click Back to return to the Rules tab.
- Click Cancel to exit the shipment creation process.
If all required shipment information has been completed, you may also click Start Tracking to create the shipment and begin active monitoring.
Note: Uploading documents is typically optional unless required by your organization's shipment process or regulatory requirements.
Parcel Tracking Tab
The Parcel Tracking tab allows you to associate a carrier tracking number with the shipment.
If parcel tracking information was already entered in the Basic Details step, it will be displayed here. You can review or update the information before starting shipment tracking.
Parcel tracking is commonly used when shipments are transported through external carriers such as USPS, FedEx, UPS, or DHL.
Configuring Parcel Tracking
To configure parcel tracking:
- Enable the Parcel Tracking toggle.
- Select the Parcel Carrier from the drop-down list.
- Enter the carrier-provided Tracking Number.
- Click Save.
Note: The tracking number must exactly match the tracking reference provided by the carrier.
Updating Existing Parcel Tracking Information
If parcel tracking details were previously entered during shipment creation, you can modify them here.
To update the information:
- Change the carrier if required.
- Update the tracking number.
- Click Save.
The updated information is associated with the shipment.
Reviewing Parcel Tracking Information
Before proceeding, verify that:
- Parcel Tracking is enabled if required.
- The correct carrier has been selected.
- The tracking number has been entered correctly.
Accurate parcel tracking information helps improve shipment visibility and tracking accuracy.
Completing Shipment Creation
After reviewing the parcel tracking information:
- Click Start Tracking to create the shipment and begin tracking.
- Click Back to return to the Documents tab.
- Click Cancel to exit the shipment creation process.
Tip: Before starting tracking, review all shipment details, manifest information, rules, documents, and parcel tracking information to ensure the shipment has been configured correctly.
Starting Shipment Tracking
After completing all required shipment configuration steps, click Start Tracking to create the shipment and begin active monitoring.
When you click Start Tracking, the system displays a confirmation dialog asking you to verify that you are ready to begin tracking.
To start tracking:
-
Review all shipment information, including:
- Shipment details
- Route and legs
- Manifest hierarchy
- Assigned assets and devices
- Rules
- Documents
- Parcel tracking information (if applicable)
-
Click Start Tracking.
-
In the confirmation dialog, click Start Tracking again to confirm.
The shipment is created and tracking begins immediately.
Note: You can continue to add or modify shipment rules and documents from the shipment details page after tracking has started.
Modifying a Shipment After Tracking Starts
After a shipment has been started, users can continue to edit shipment information while the shipment remains in the Preparing or Ready status.
During these stages, all shipment properties can be modified except the selected template.
Once the shipment transitions to the In Transit status:
- Shipment details become locked.
- Manifest information becomes locked.
- Template configuration cannot be changed.
- Only shipment legs can be modified if route updates are required.
Important: Verify that the correct assets, devices, route information, and shipment configuration have been assigned before starting tracking. Changes become more restricted once the shipment enters the transit phase.
Canceling the Action
If you are not ready to start tracking:
- Click Cancel in the confirmation dialog.
The shipment remains in the current state and tracking does not begin.
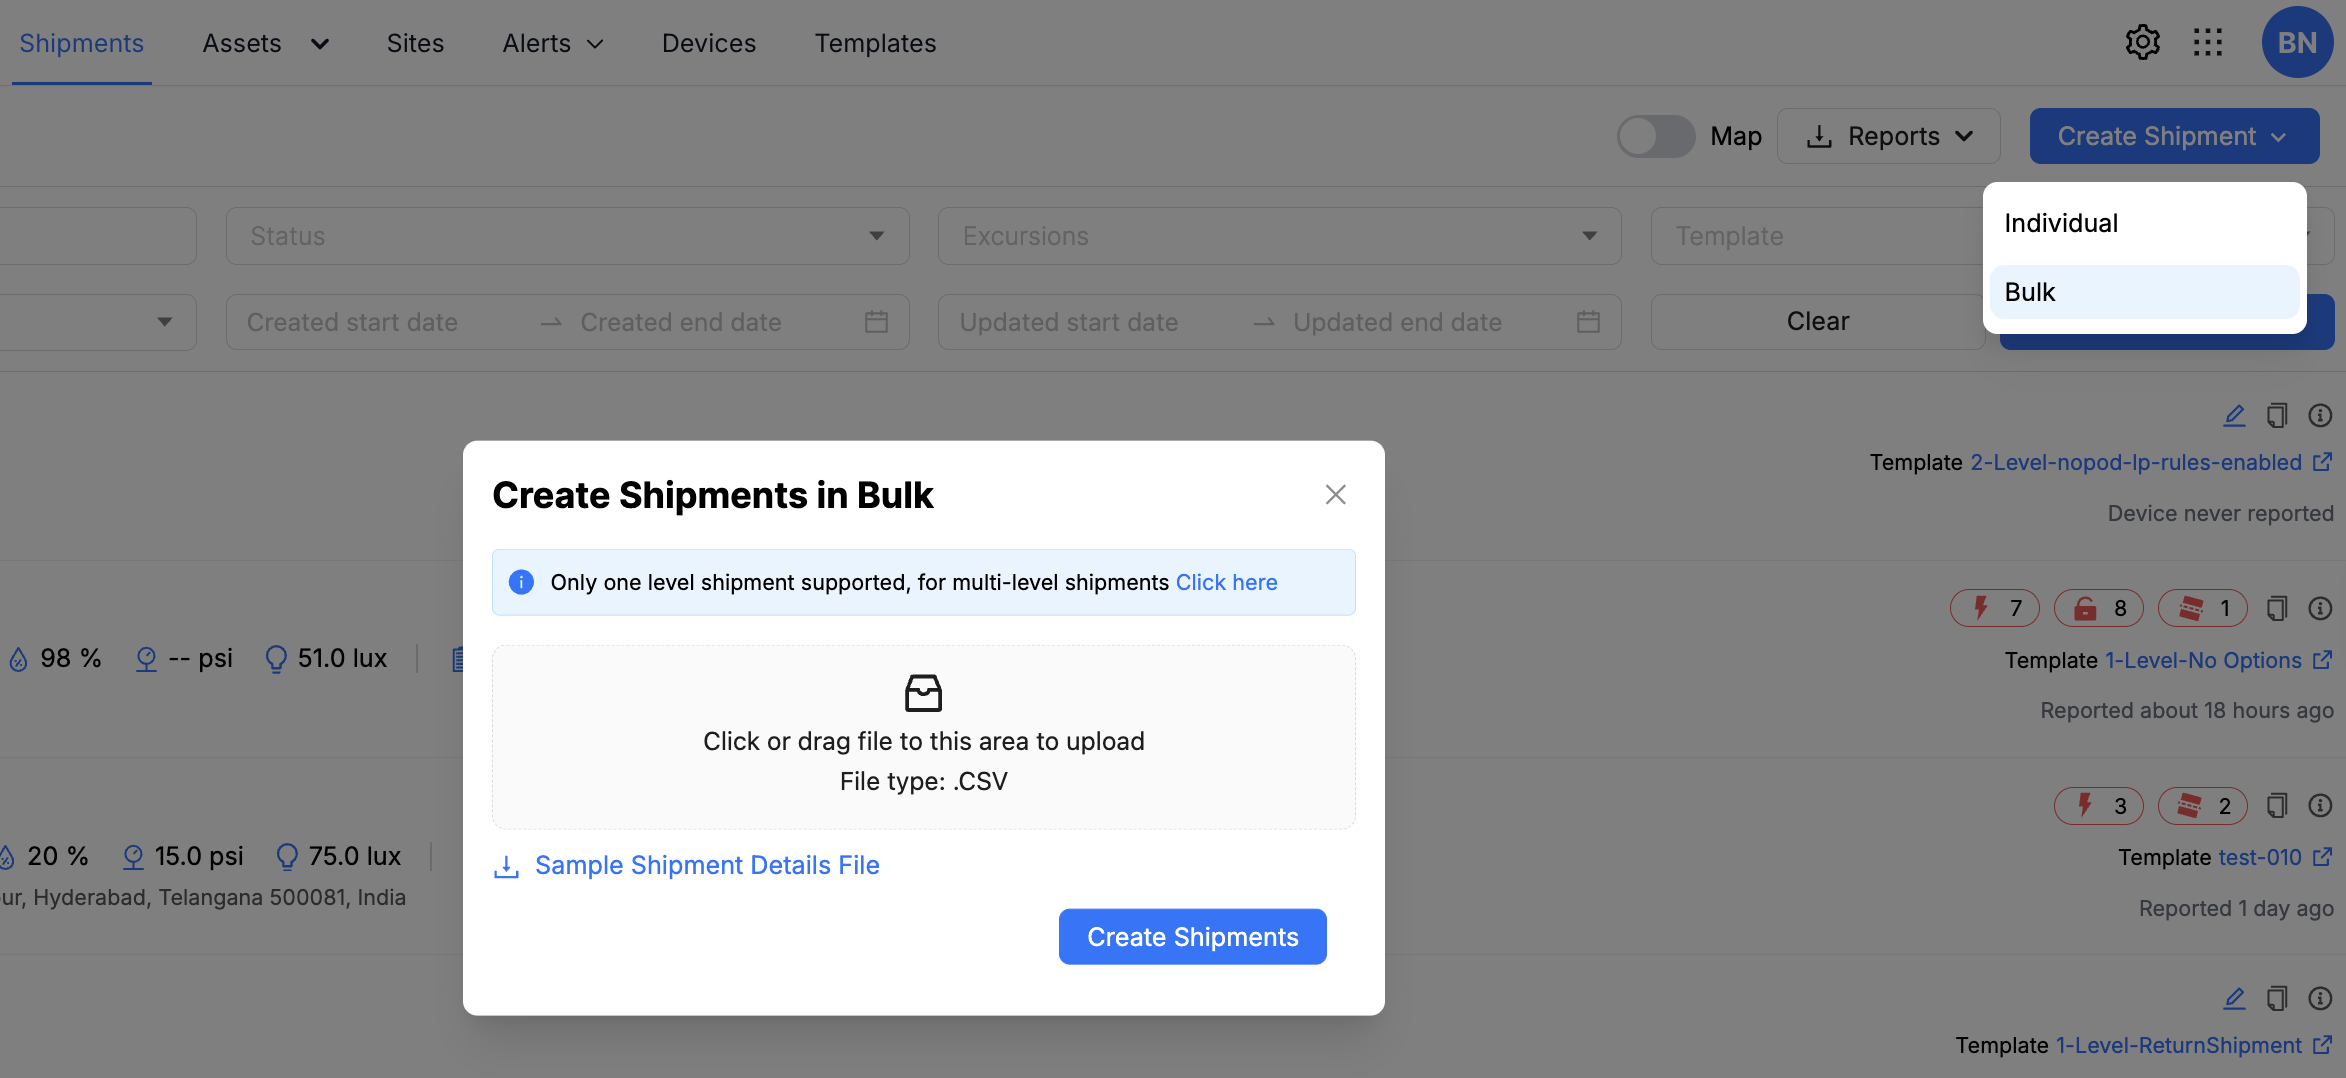
Create Bulk Shipments
Use the Bulk option in the Shipments Menu to create multiple shipments at once by uploading a CSV file. This method is best suited for large batches of standardized shipment data.
Bulk Shipment Limitations
The Bulk Shipment feature supports only one-level standardized shipments.
If your bulk shipment list requires multi-level templates, use the Individual Shipment feature instead (see the previous section).
Bulk Shipment Creation
Sample Shipment Details File
To simplify the bulk shipment process, the platform provides a sample CSV file. You can download this file, enter your standardized shipment details, and then upload it to create bulk shipments quickly.
Details in the Sample File
Mandatory Columns in the Bulk Shipment Sample File
The sample CSV file includes predefined mandatory columns. Complete each column to ensure successful validation and shipment creation.
-
shipment_identifier: Enter a unique identifier for each shipment.
Note: Do not duplicate Shipment IDs.
-
device_identifier: Select the tracker device that will monitor the shipment’s progress.
For more information, see the Devices section.
-
template_name: Select the required 1-Level shipment template.
- This template must already exist in the platform before use.
- To learn how to create custom templates, see Create Template in the Templates section.
-
source_site_name: Enter the name of the source site.
- The site must already exist in the platform for the CSV file to be validated.
- If it does not exist, create it before uploading the bulk shipment file.
-
destination_address_line_one: Enter the first line of the destination address.
-
destination_address_line_two: Enter the second line of the destination address.
-
destination_address_city: Enter the city of the destination site.
-
destination_address_state: Enter the state or province of the destination site.
-
destination_address_country: Enter the country of the destination site.
-
destination_address_zipcode: Enter the postal or ZIP code of the destination site.
Creating Bulk Shipments
- In the main navigation, select Shipment.
- Click + Create Shipment.
- From the dropdown menu, select Bulk.
- In the pop-up window:
- Download the Sample Shipment Details File.
- Fill in all required shipment details.
- Verify the data for accuracy.
- Upload the completed CSV file to the platform.
- The platform will:
- Validate the file.
- Create the shipments.
- Send an email summary with:
- Successfully created shipments.
- Failed shipments.
- Reasons for failures.
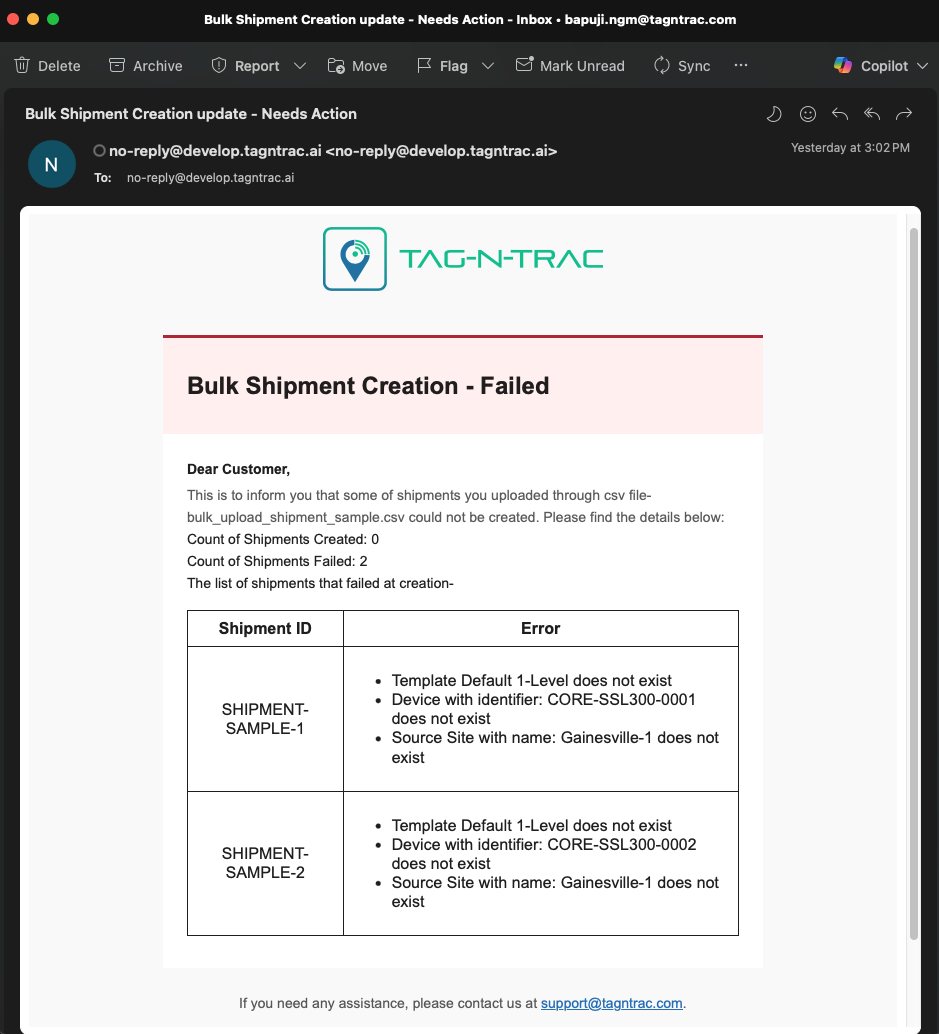
Bulk Shipments Confirmation Email
If the email indicates errors:
- Remove successfully created shipments and empty rows from the CSV file.
- Correct the failed shipment entries based on the error details provided in the email.
- Re-upload the corrected CSV file.
- Repeat the process until all shipments are successfully created.
Best Practices
- Viewing options: The search results can be viewed in either the Table View or the Map View. Toggle between the viewing options to switch between two modes.
- For customers who frequently use the same shipping lanes, it is recommended to use shipment templates when creating shipments.
- Verify all details before submission to avoid errors.
- Use Auto Generate for Asset Identifiers for consistency.
- Metadata is optional; proceed without it if not needed.
- Use Individual creation for single or complex shipments requiring detailed customization.
- Use Bulk creation for large batches of shipments with standardized details.
- Verify the devices are active and online while assigning to a shipment.
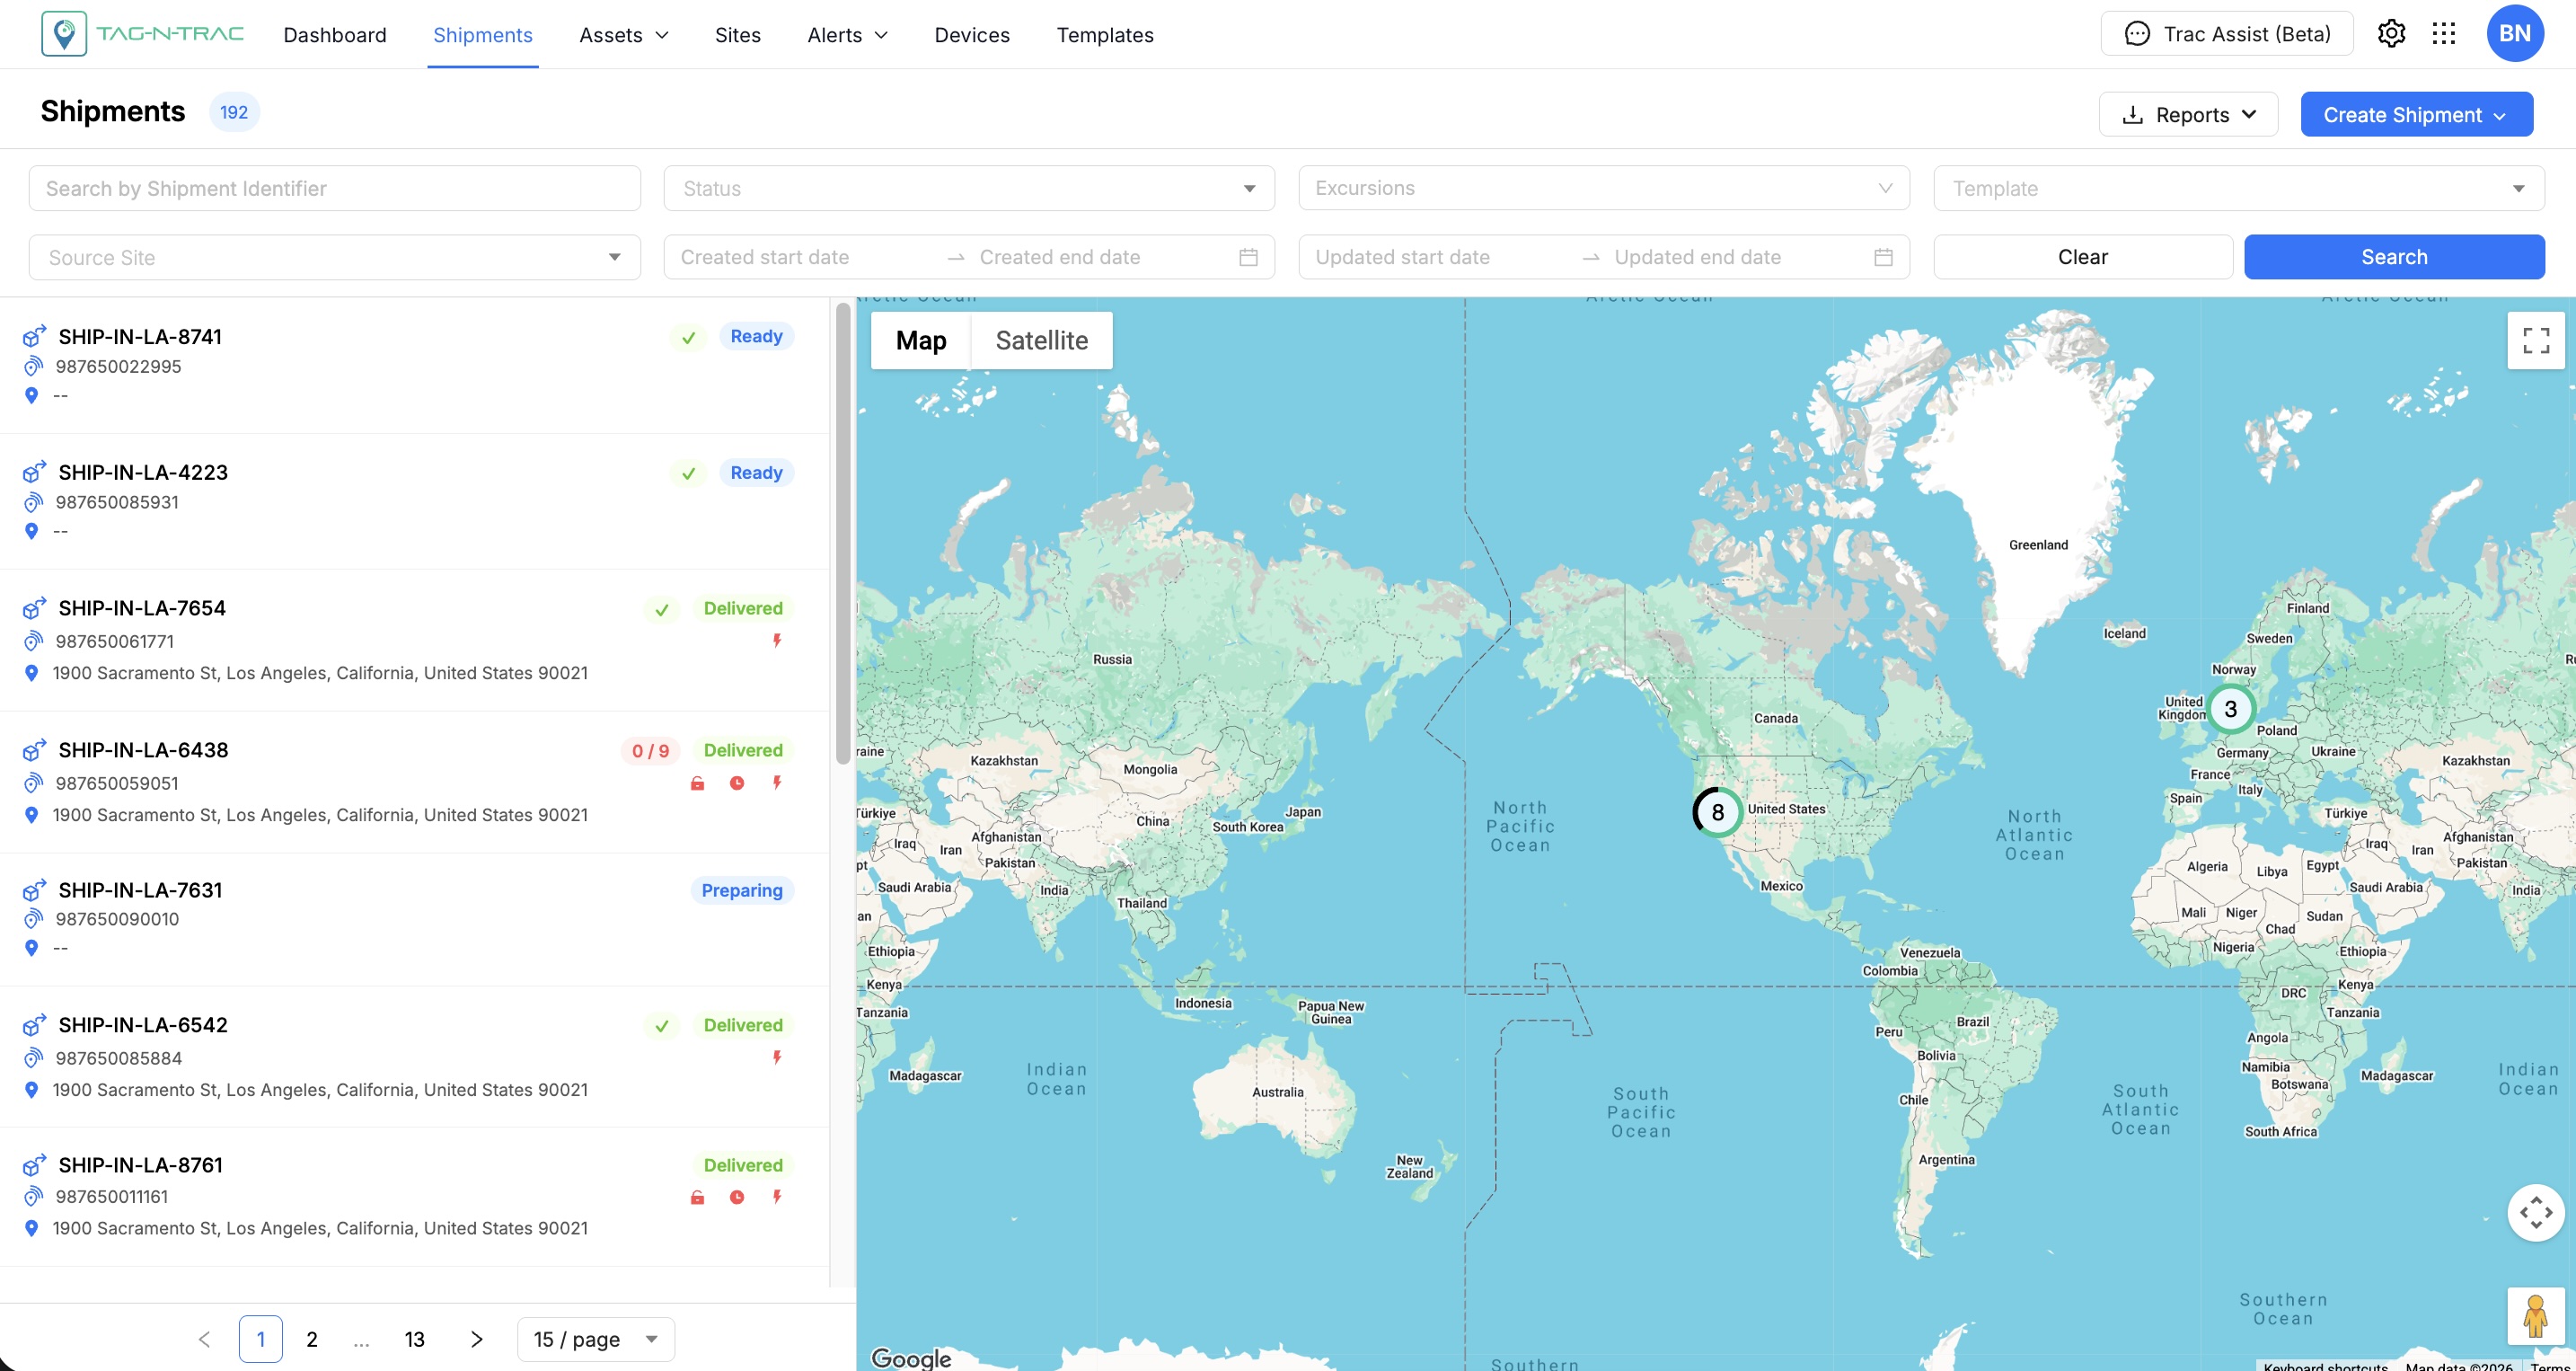
Search and Filter Options
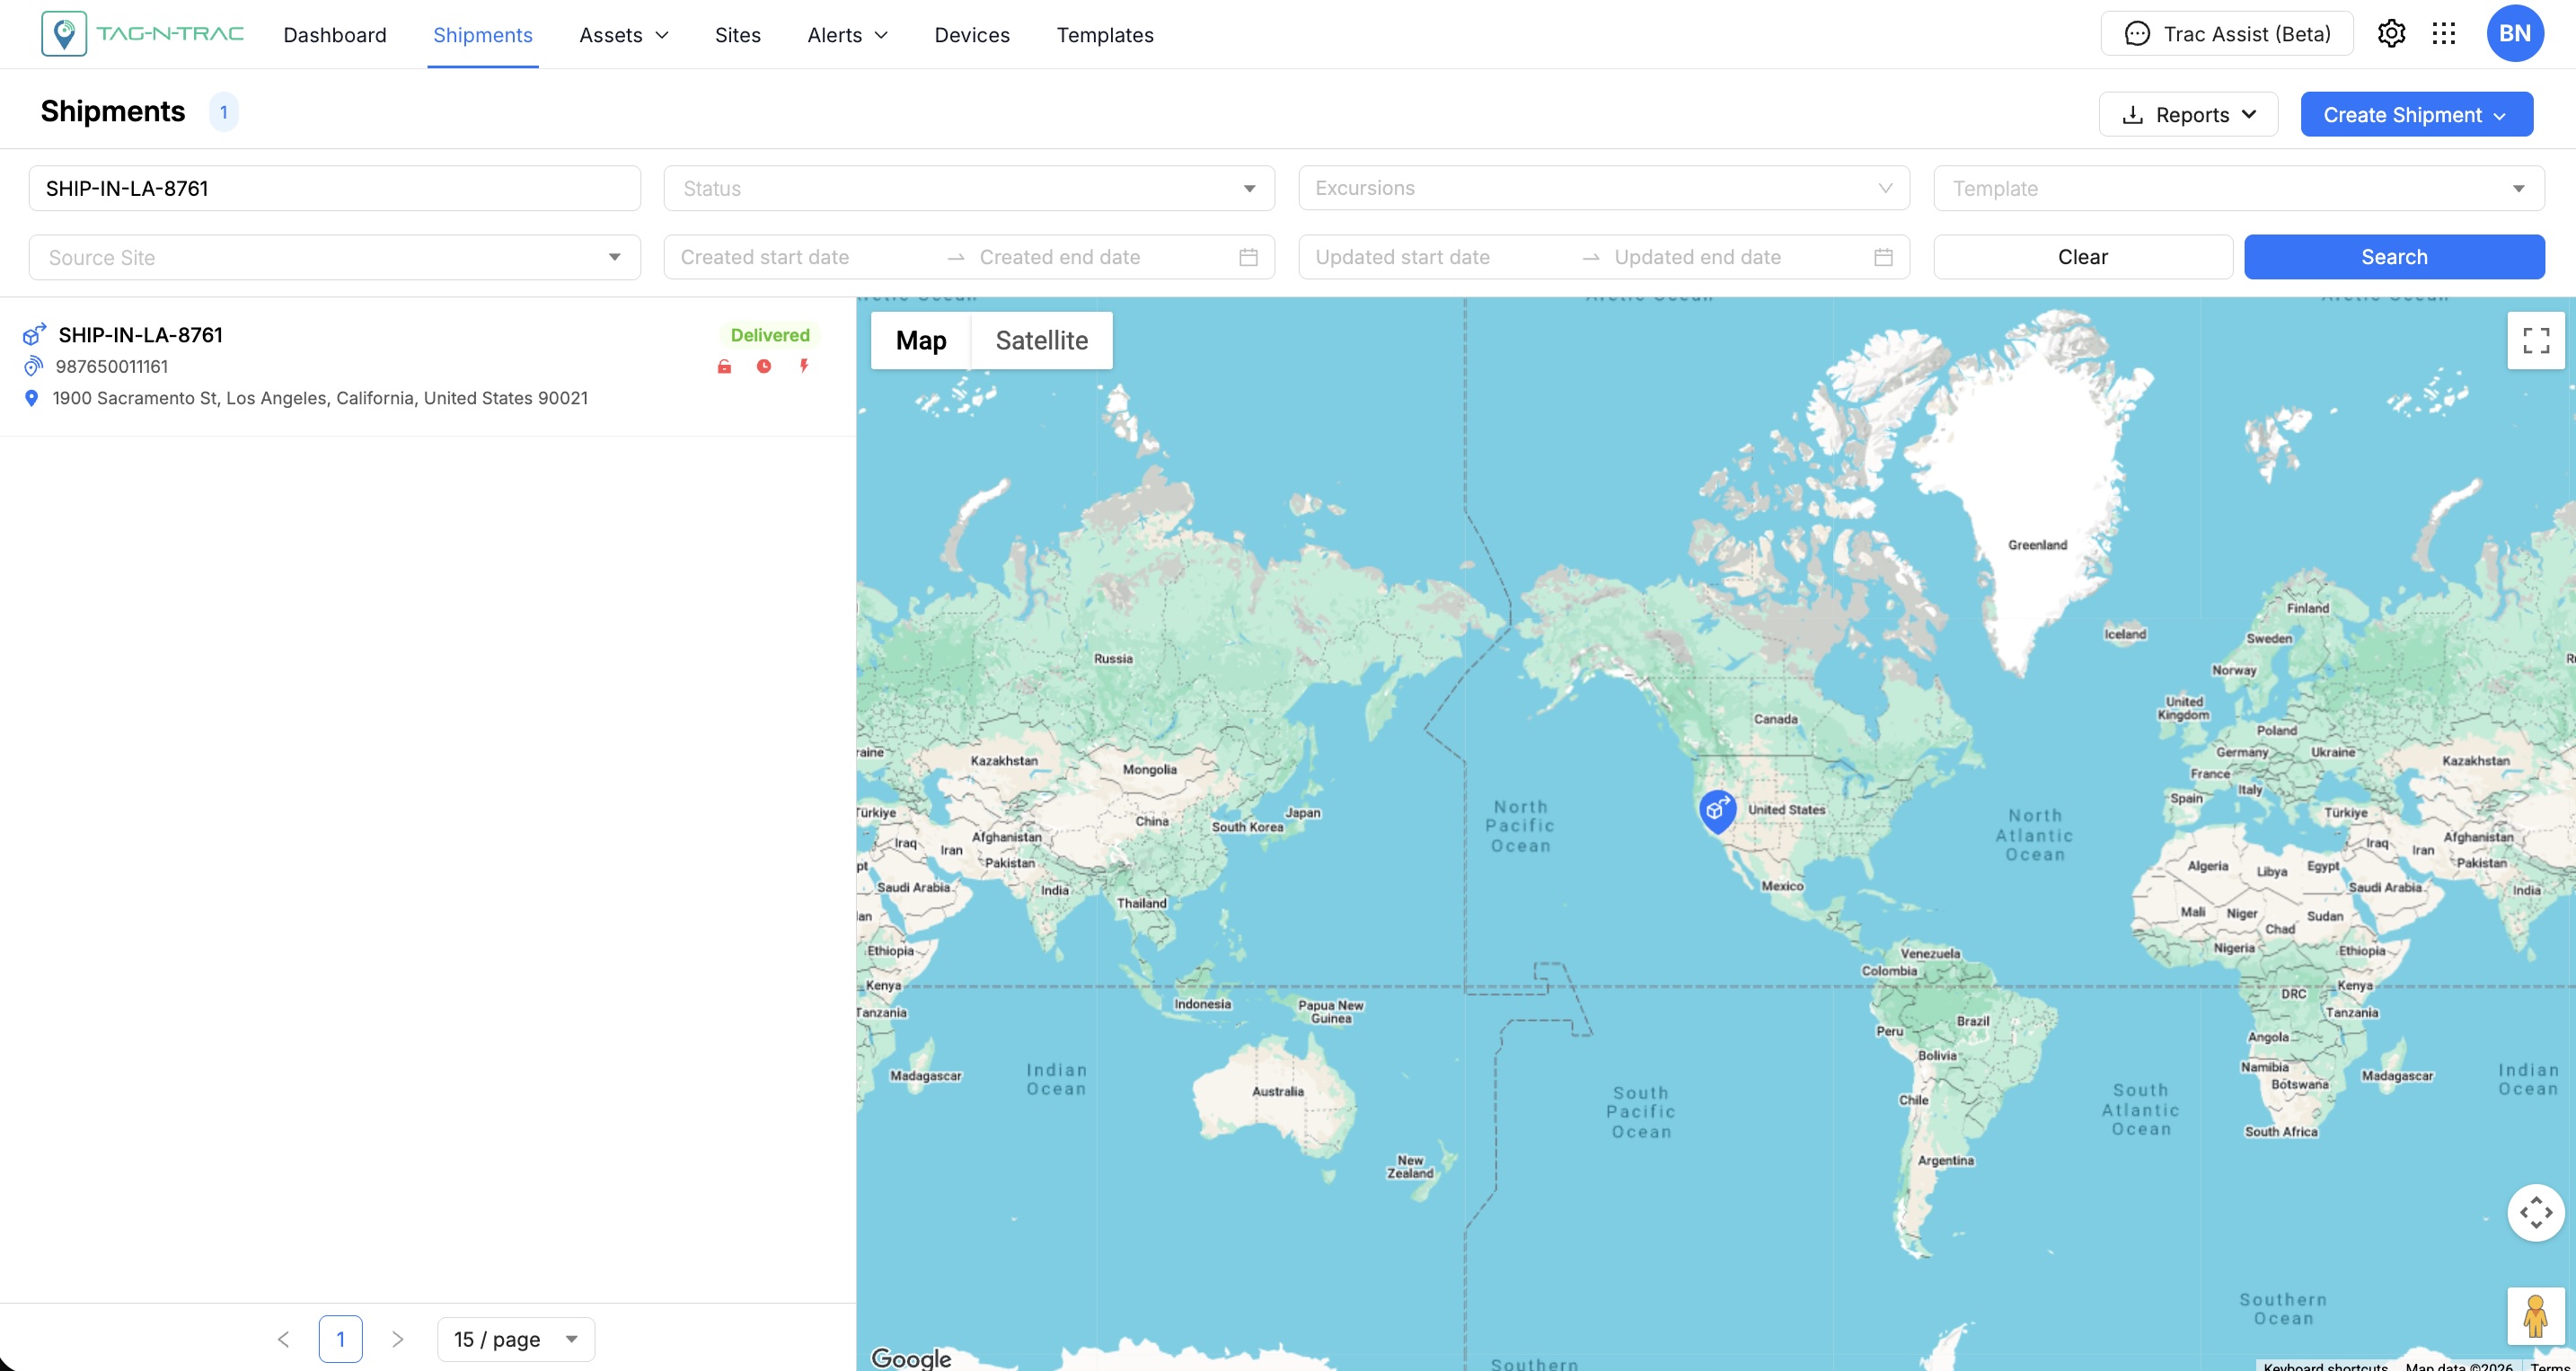
The Shipment menu includes a search and filter panel that enables you to efficiently locate and refine shipments using various search fields. Once a shipment is successfully created, it is listed in the Shipments List.
You can scroll through the list to locate a specific shipment or use the search and filter options to quickly find it.

Shipment Search and Filter Options
Use the following options to search for a shipment:
| Search By Field | Description |
|---|---|
| Shipment Identifier | Enter a shipment identifier to locate a specific shipment. |
| Template | Select a shipment template from the dropdown list to filter results based on the template used during shipment creation. |
| Status | Filter shipments by status, such as Missing, Resolved, Ready, Preparing, or Delivered. |
| Source Site | Select the originating site of the shipment from the dropdown list. |
| Excursion | Filter shipments based on excursions or deviations from expected routes or rule events. |
| Created At Date Range | Specify a start and end date to filter shipments by their creation date. |
| Updated At Date Range | Specify a start and end date to filter shipments by their last updated date. |
| Search | Select this button to apply all selected filters and display the results. |
| Clear | Select this button to reset all fields and filters to their default values. |
Shipments List
Below the search and filter panel in the Shipment menu, the shipment results are displayed in a list format.
Shipment List
The following details are displayed in the Shipments List:
| Column | Description |
|---|---|
| Shipment Identifier | A unique identifier for each shipment. Select the identifier to view detailed shipment information. |
| Template | Displays the shipment template type used for the shipment. |
| Tracker | Shows the tracker device associated with the shipment. |
| Source Address | Indicates the origin site or address of the shipment. |
| Destination Address | Indicates the destination site or address of the shipment. |
| Status | Displays the current shipment status. Statuses include preparing, missing, resolved, and delivered. Statuses are color-coded for quick identification. |
| Shipment Duration | Represents the total time from shipment preparation to delivery or resolution, indicating the full shipment lifecycle. |
| Excursion Events | Displays any deviations or irregularities that occurred during the shipment's transition. |
| Created At | The timestamp indicating when the shipment was created. |
| Last Updated At | The timestamp indicates the most recent update made to the shipment. |
| Actions | Provides management options, such as editing the shipment (using a pencil icon). Editing is available only when the shipment is in the preparing status. |
| Viewing Options | Allows users to switch between List View and Map View using a toggle button. To customize view preferences, go to User Settings under the Organization tab in the Manage module. |
Pagination Interface
This interface is a common component used in the platform to navigate large datasets (e.g., tables or lists).

Pagination Interface
Pagination Controls
<and>arrows: Navigate to the previous or next page.- Page numbers:
1,2,...,32– Indicates individual pages.- Page 1 is currently active, shown with a highlighted border.
... 32- Indicates skipped pages in between and hows the last page of the list.
Items Per Page Selector
A dropdown that lets users control how many entries appear per page:
15 / page(default): Displays 10 entries per page.30 / page: Displays 25 entries per page.50 / page: Displays 50 entries per page.100 / page: Displays 100 entries per page.
Shipments List View
You can preview a shipment to view essential status, events, and sensor data. This topic explains both methods and how to navigate the preview and detailed view using the UI icons provided.
Shipment Search and Filter
Shipment Preview
Use the Shipment Preview to quickly locate shipments, review shipment status and sensor data, and access detailed shipment or template information. This view provides a summarized display of each shipment with key metrics and navigation options.
Understanding Shipment Entries
Each shipment entry is composed of the following sections:
| Section | Description |
|---|---|
| Shipment ID | Displays the shipment ID and current status (for example, Delivered or missing). Select the shipment ID to open the shipment drawer window. |
| Device ID | Displays the associated tracking device ID. |
| Location | Displays the most recent location update or associated address. |
Action Icons
The right side of each shipment entry includes the following icons:
| Icon | Description |
|---|---|
| ⚡ | Indicates the total number of shock events. |
| 🔓 | Indicates the total number of door open events. |
| 🕓 | Indicates the number of dwell time events. |
Note: Icons are displayed based on the available sensor data and the triggered events.
Drawer Preview Window
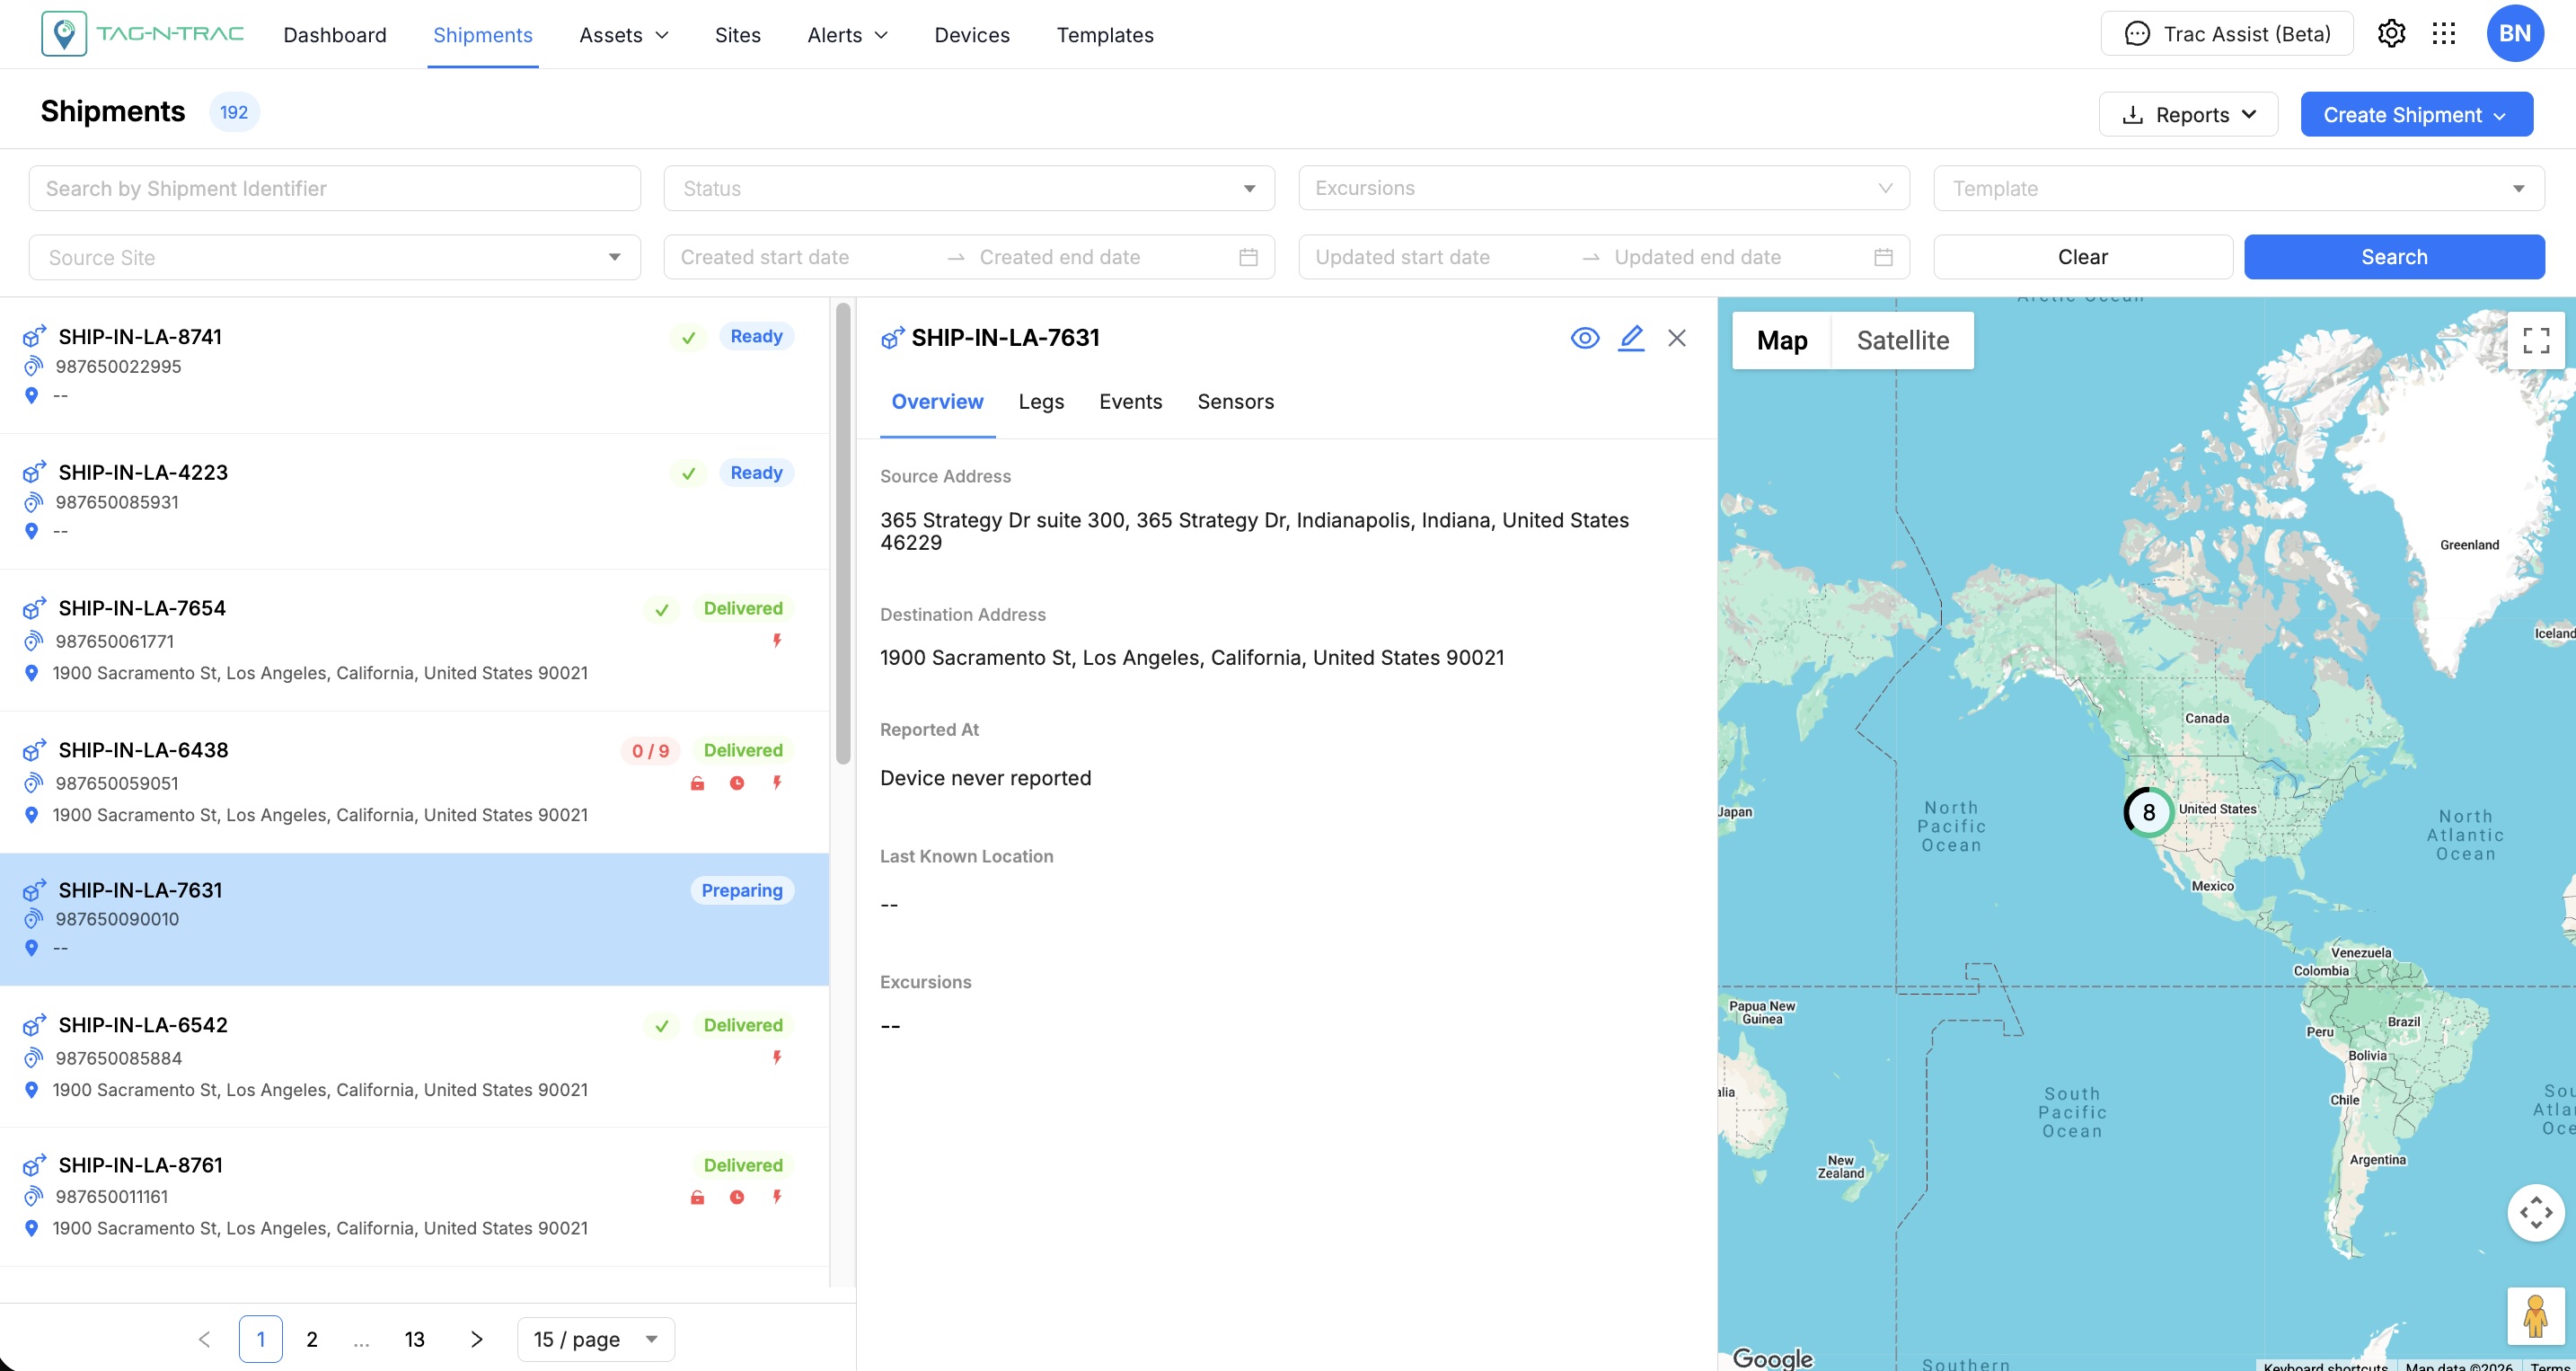
Shipment Drawer Window
In the Drawer Window the shipments are shown with location markers.
- Click on a shipment from the Shipments List.
- Click the shipment icon on the map. A pop-up will appear with basic information.
- To open the detailed view:
- Click the Shipment ID link (e.g.,
SH-1746600472), or - Click the 👁️ Eye icon to open the full detail view.
- Click the Shipment ID link (e.g.,
Note: Clicking the shipment on the map always opens a pop-up first before enabling further interactions.
Editing a Shipment
You can edit a shipment depending on its status:
- In Preparing stage: All details except the template can be modified.
- In In Transit or any other stage: Only the destination address can be edited.
To edit the shipment:
- Click the Pencil icon from the drawer view.
- Modify the allowed fields accordingly.
Overview Tab
The Overview tab provides a high-level summary of the shipment and its current status. It serves as the primary dashboard for monitoring shipment progress and reviewing important shipment information at a glance.
The Overview tab displays:
- Shipment status and transit progress
- Source and destination locations
- Last reported device location
- Device sensor information
- Active excursions and alerts
- Shipment summary details
Location Information
The shipment route is displayed along with the configured source and destination locations.
Examples:
- Source Address: CEVA Logistics, Mt. Juliet, TN
- Destination Address: Amazon CMH3, Monroe, OH
The latest reported location of the shipment is also displayed, including:
- Address
- Latitude and Longitude coordinates
- Timestamp of the latest update
Sensor Summary
The Overview tab displays the most recent sensor readings reported by the assigned tracking device.
Depending on the device capabilities, this may include:
- Temperature
- Humidity
- Battery Level
- Light
- Pressure
- Shock
- Other supported sensor metrics
Excursions
Any active or historical excursions associated with the shipment are displayed in the Overview tab.
Examples include:
- Temperature threshold violations
- Humidity excursions
- Excessive shock events
- Dwell time violations
- Geofence breaches
This allows users to quickly identify shipment conditions that require attention.
Legs Tab
The Legs tab displays the complete shipment route and all configured shipment legs.
For multi-leg shipments, each leg is displayed separately, showing:
- Mode of transport
- Origin location
- Destination location
- Carrier information
- Leg status
The Legs tab helps users understand how the shipment moves from the source location to the final destination.
Note: For shipments that are still in the Preparing or Ready stage, shipment legs can be modified if route changes are required.
Events Tab
The Events tab provides a chronological timeline of all shipment activities and system-generated events.
This tab helps users understand what has occurred throughout the shipment lifecycle.
The Events tab includes:
- Shipment movement updates
- Location updates
- Excursion events
- Rule-triggered alerts
- Status changes
- System-generated events
Events are displayed in reverse chronological order, with the most recent event shown first.
Each event includes:
- Event type
- Description
- Timestamp
- Associated location (when available)
This timeline serves as an audit trail for shipment activity.
Sensors Tab
The Sensors tab provides detailed visibility into all sensor readings reported by the tracking device during transit.
Sensor data is presented using charts and historical trends, allowing users to analyze shipment conditions over time.
Depending on the assigned device, the Sensors tab may display:
- Temperature (°C)
- Humidity (%)
- Battery (%)
- Light (Lux)
- Pressure
- Shock
- Other supported sensor measurements
For each sensor, users can typically view:
- Current reading
- Minimum value
- Maximum value
- Historical trend graph
This information helps users verify that the shipment remained within acceptable environmental conditions throughout transit and supports compliance, quality assurance, and audit requirements.
Reports
The platform is enabled with an option to export the search results to CSV format. To export the data, click the Report button located next to + Create Shipment, and choose your preferred method to export search results.

Shipment Report - Export Shipment Data
Clicking on the Reports button opens a dropdown with the following options:
- Export All
- Export Current View
Export All
Selecting this option exports all shipment data available on the platform, regardless of any active search or filter criteria. This action triggers a system-generated email containing a CSV file with the complete shipments dataset.
Export Current View
Selecting this option exports the currently visible shipment data from the Shipments List, based on the active search and filter criteria.
Shipment Details Page
The Shipment Details Page allows users to track and manage individual shipments. This topic outlines the main features of the Shipment Details Page and offers best practices to help you use the interface effectively.
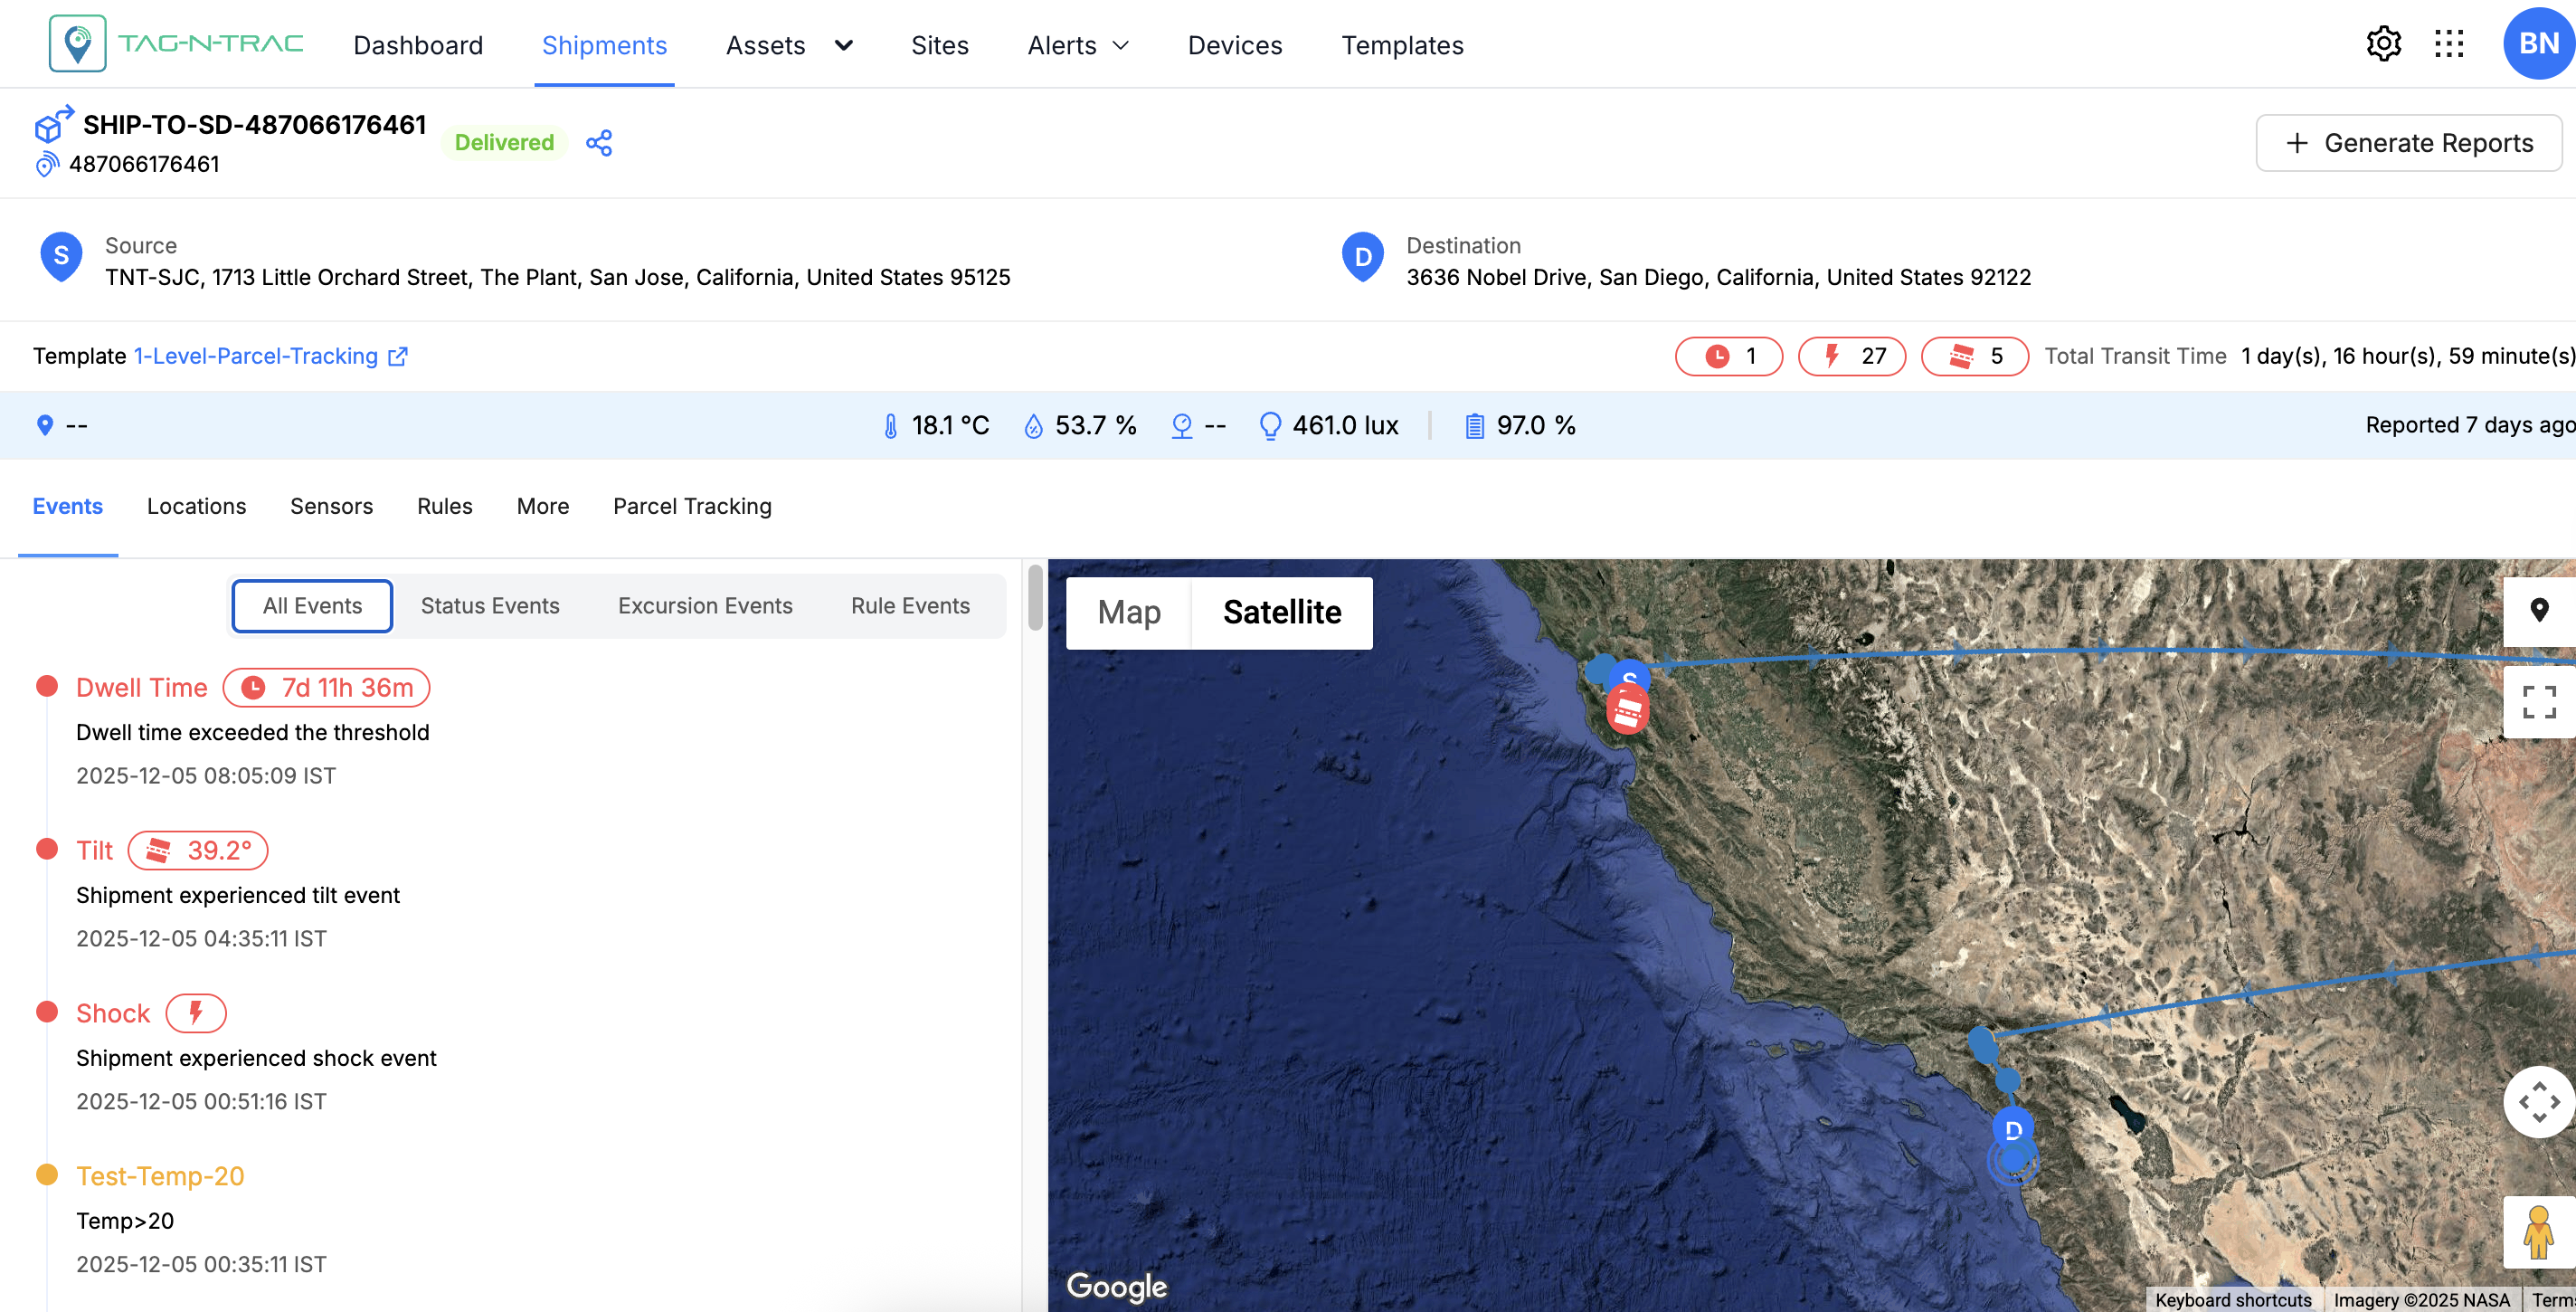
Shipment Details Page
Header Information
At the top left of the Shipment Details Page, the shipment’s unique identifier (Shipment ID) is prominently displayed, followed by the associated device identifier. The Delivery Date and Time appears next to the device name, providing a quick reference for shipment completion. Below this section, both the outbound (source) and inbound (destination) addresses are listed, allowing users to verify shipment routing information at a glance.
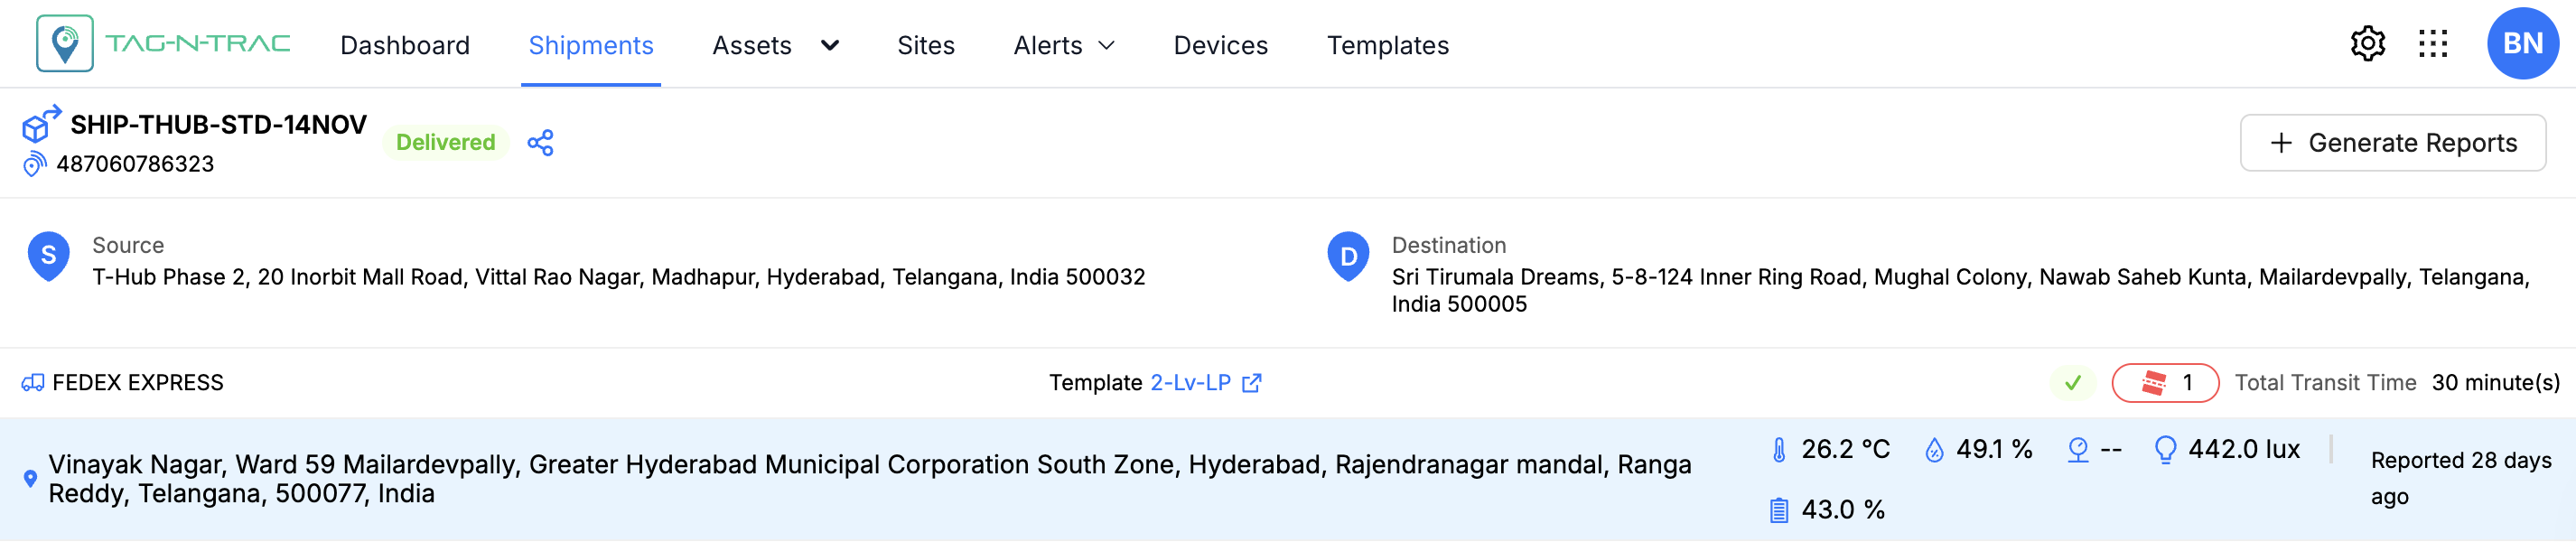
Shipment's Header Information
Share Shipment Tracking Link
The Share Link option allows users to quickly draft and send an email containing a clickable link to multiple recipients to track shipments. Here's how you can use this feature.
Share Shipment Tracking Link
Share a Tracking Link via Email
Follow these steps to share a shipment tracking link through email:
-
Click the Share icon: In the top-left corner of the interface, select the Share icon next to the Shipment ID to begin the sharing process.
-
Enter recipient email addresses: A drawer window appears. Manually enter the email addresses of all intended recipients in the provided field.
-
Copy Link: If you want to manually share the tracking URL elsewhere, click Copy Link to copy the Read Only tracking link to your clipboard.
-
Share Link: After entering the email addresses, click the Share Link button. This action will:
- Automatically draft and send an email to the specified recipients.
- Includes a clickable read-only tracking link in the body of the email, allowing recipients to view the shared shipment data or report.
Managing Recipients
Once the email is sent, the recipients' information is recorded in the History section. This section tracks all sharing activity and displays details for each recipient. The interface also provides management options for each listed recipient.
The share link interface includes the following information:
| Field | Description |
|---|---|
| Displays the recipient's email address. | |
| Name | Shows the name of the recipient (if available). |
| Shared On | Indicates the date and time when the tracking link was shared. |
| Active Until | Displays the date and time until which the tracking link remains accessible. |
| Resend | Click the Resend button (mail icon) to resend the tracking link. Use this option if the recipient did not receive the original email or if the link needs to be re-sent. |
| Revoke | Click the Revoke button (trash icon) to remove the recipient's access. After revocation, the recipient will no longer be able to view the shipment data. |
| Renew | Click the Renew button to extend the recipient’s access period. Useful for time-limited access that needs to be prolonged. |
| Link Expiration - Not Delivered or Resolved | The tracking link remains active until 48 hours after the shipment is delivered or resolved. |
| Link Expiration - Delivered, Partially Delivered, or Resolved | The tracking link remains active for 48 hours from the time of delivery or resolution. |
| Copy Link | A Copy Link button at the top-right corner allows you to manually copy the tracking link for sharing through other channels. |
Practical Tips
- Switch Between Views: Start with Compact View for a quick summary. Switch to Detail View for an in-depth analysis of shipment information.
- Confirm Source and Destination: Double-check the source and destination addresses for accuracy before proceeding with any shipment-related queries.
- Leverage Tracker Device Information: Use the tracker device name to cross-reference with internal systems or contact support if needed.
- Stay Informed with Status Updates: Familiarize yourself with the meaning of each status (Preparing, Ready, etc.) to quickly interpret the shipment's stage in the logistics process.
- Use the Map for Real-Time Insights: Use the map's zoom and pan features to explore more about the shipment's current region and route.
Updated about 2 months ago