Assets
The Assets menu helps you efficiently manage your asset inventory. Use it to track and organize assets within the system.
The assets menu displays all assets available on the platform. Standard asset types include Unit, Box, Pallet, and Container.

Assets Menu
The Assets menu offers two key features:
- Asset List: Create, view, track, and manage individual assets.
- Asset Groups: Create, view, track, and organize assets into categories for easier management.
These features ensure streamlined asset tracking and organization across your inventory.
Accessing the Assets Menu
- Sign in to the platform.
- On the top menu bar, select Assets > Assets List.
The following sections describe the features in detail.
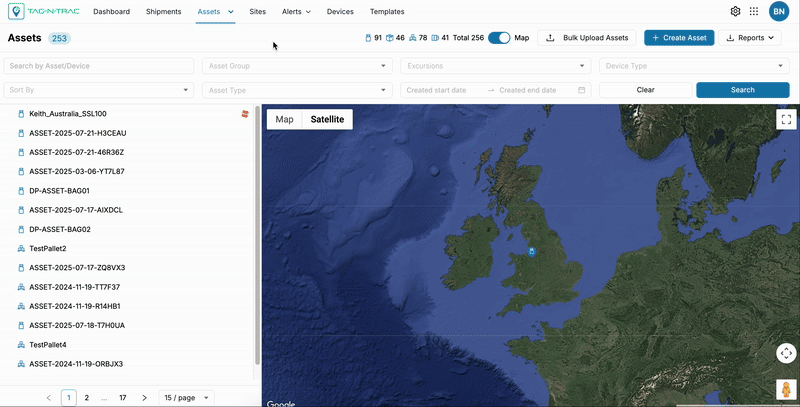
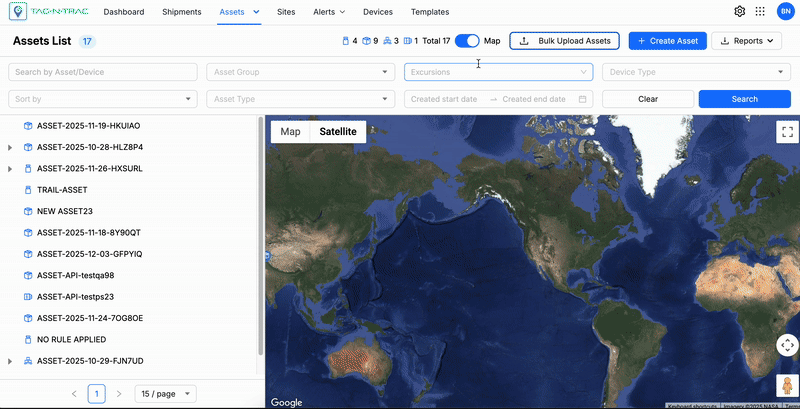
Assets List
The Assets List feature shows all assets currently available on the platform.
Assets List
You can create and manage assets in two ways:
- Create Individual Assets – Add assets one at a time.
- Upload Assets in Bulk – Use the Bulk Upload Assets option to set up multiple assets at once.
The Asset List includes the following options:
- Assets Search and Filter: Lets you filter and search the assets by metadata.
- Assets List
- List View
- Map View
- Reports
- Assets Count
Create Asset
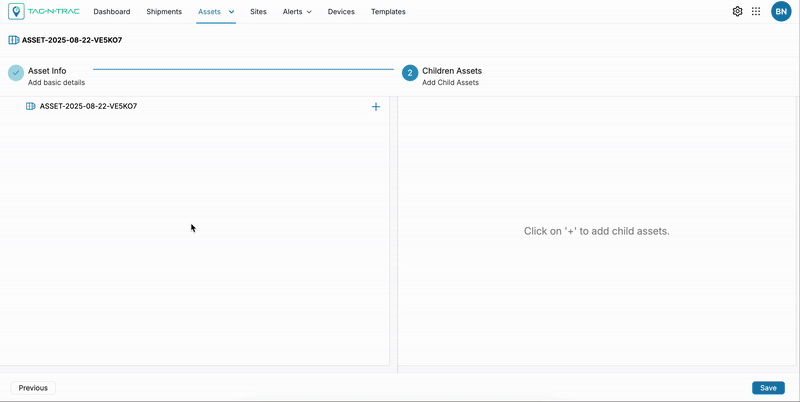
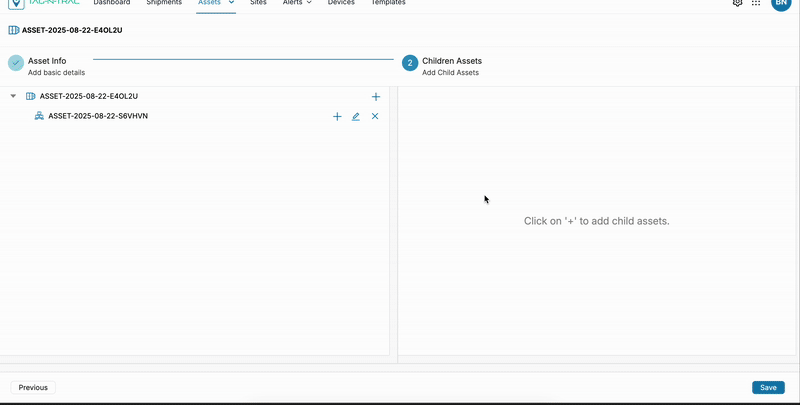
The Assets menu lets you create, manage, and organize assets in the platform. Use + Create Asset to define asset details, link a parent asset, and add metadata. You can assign asset IDs manually or generate them automatically to simplify asset management and keep records accurate.
Creating an Assets
Follow these steps to create an individual asset:
Creating an Asset
-
Go to Assets from the main menu.
-
Click + Create Asset in the upper-right corner of the window.
-
In the Asset Info section, fill in the required fields:
Add Basic Details- Asset Identifier (Required): Enter an Asset ID manually or select the Auto Generate checkbox to create one automatically.
- Asset Type (Required):
- Select an option from the predefined asset types in the dropdown menu.
- To create a new asset type, navigate to Manage → Manage Types → Asset Types section.
Note: For details on creating or modifying an asset type, see the Manage Types > Asset Types section in the Manage module.
- Asset Group (Optional): Assign the asset to a relevant group, if required.
Note: For details on creating an asset group, Refer to the Asset Groups section.
- Parent Asset (Optional):
- If this is a child asset, choose the Asset ID of the parent asset from the dropdown.
- If this is a parent asset and includes child assets, proceed with the next steps to create or add child assets.
- Device ID (Optional): Start typing in the dropdown and the platform will suggest the available devices. From the suggestions, choose the device identifier to associate a device with the asset for tracking and monitoring.
- Cancel: To abort creating an asset, click Cancel to stop the process and return to the Assets List page.
- Create Asset: After completing all required details, click Create Asset to successfully add the asset to the Assets List.
-
In the Add Children Asset section, fill in the required fields:
Add Child AssetChild assets are assets that are linked to a parent asset, enabling better organization, tracking, and hierarchical structuring of related components or systems.
Existing Child AssetsTo add existing assets to the parent shipment:
Existing Child Assets
- Click + in the upper-right corner next to the Asset ID. This opens the Child Asset Window.
- You can add existing assets to a parent asset by searching using the Select Existing Assets dropdown.
- Start typing in the dropdown and the platform will suggest the existing assets.
- Choose required assets to be added to the parent asset.
- Click Add to Parent button to successfully add the assets.
- Click Save to complete the process.
New Child Assets
To create and add new child assets to the parent shipment:
Creating and Adding New Child Assets
- Asset Identifier: This is a required field where you must either manually enter an Asset ID or click on the Auto Generate check box to generate one automatically.
- Asset Type:
- Select an option from the predefined asset types in the dropdown menu.
- To create a new asset type, navigate to Manage → Manage Types → Asset Types section.
Note: For details on creating or modifying an asset type, see the Asset Types section in the Manage module under Organization.
- Device ID: Start typing in the dropdown and the platform will suggest the available devices. From the suggestions, choose the device identifier to associate a device with the asset for tracking and monitoring.
- Cancel: To abort creating an asset, click Cancel to stop the process and return to the Assets List page.
- Create and Add: Click + Create and Add button to successfully create and assign a child asset.
- Click Save to finalize and save the asset.
Tip: You can create multiple child assets for a single parent to represent grouped items within a larger asset.
Once linked, child assets will be visible in the parent asset’s detail view, helping users quickly understand asset structure and dependencies.
Bulk Upload Assets
The Bulk Upload Assets feature allows you to create multiple assets simultaneously by uploading a .csv file. This functionality helps save time, minimize manual entry, and reduce errors during asset creation.

Bulk Upload Assets
With this feature, you can:
- Download a sample
.CSVtemplate. - Fill in asset details such as Asset ID, Asset Type, Device ID, and Parent Asset.
- Upload the completed file to the platform.
Once uploaded, the system automatically validates the data and processes the file to create assets seamlessly.
Tip: Use the sample CSV template to ensure your file matches the correct format and field structure.
Create Bulk Assets
Follow these steps to upload bulk assets:
Bulk Upload Assets
- Navigate to the Asset List window.
- Select the Bulk Upload Assets button in the upper-right corner of the window.
- A pop-up window appears, providing the following options:
- Download Sample File.
- Upload the
.csvfile.
- A pop-up window appears, providing the following options:
- Download the sample file template.
- Populate the document with asset details such as Asset Identifier, Asset Type, Device Identifier, and Parent Asset (if applicable).
Note: Ensure all details are unique and not repeated. Use only active or online devices when creating bulk assets.
- Upload the completed file back to the platform.
- After a file is uploaded, the platform performs the following actions:
- Validates the uploaded file.
- Processes the file.
- Creates the corresponding assets.
- When the upload is successful, the user receives an email that includes:
- A list of assets that were successfully created.
- A list of assets that failed to be created.
- To resolve failed uploads, the user must:
- Correct the data for the unsuccessful assets.
- Remove the successfully created assets from the original
.csvfile. - Re-upload the revised file.
- Repeat the process until all the assets are successfully created.
Search and Filter Assets
The Search and Filter options in the Assets List menu let you find assets using multiple criteria defined during asset creation.

Assets Search and Filter
The search bar and filter criteria allow you to locate assets quickly and efficiently.
Asset Filtering Parameters
The search and filtering options allow you to narrow down asset and device data using the following parameters:
- Search by Asset/Device: Enter a specific asset or device identifier to locate an individual asset or device.
- Asset Group: Display assets associated with a selected asset group.
- Excursion: Filter assets based on excursion events, such as Dwell Time, Door Open, or Shock Event.
- Device Type: Filter results by device type (Examples: Bluetooth or Cellular).
- Sort By: Organize results by asset status, including options like Latest Created, Last Updated, or Last Reported.
- Last Reported: Sorts assets based on the most recent reporting activity.
- Latest Created: Sorts assets by the date and time they were first added to the system.
- Latest Updated: Sorts assets by their most recent modification, such as metadata, status, or configuration changes.
- Asset Type: Limit the results to specific asset categories such as Container, Pallet, Box, or Unit.
- Created At Date Range: Specify a start and end date to view assets created within a defined period.
To Search Assets
- Fill in one or more fields in the filter section.
- Click Search to retrieve results.
- Click Clear to reset the filters and start a new search.
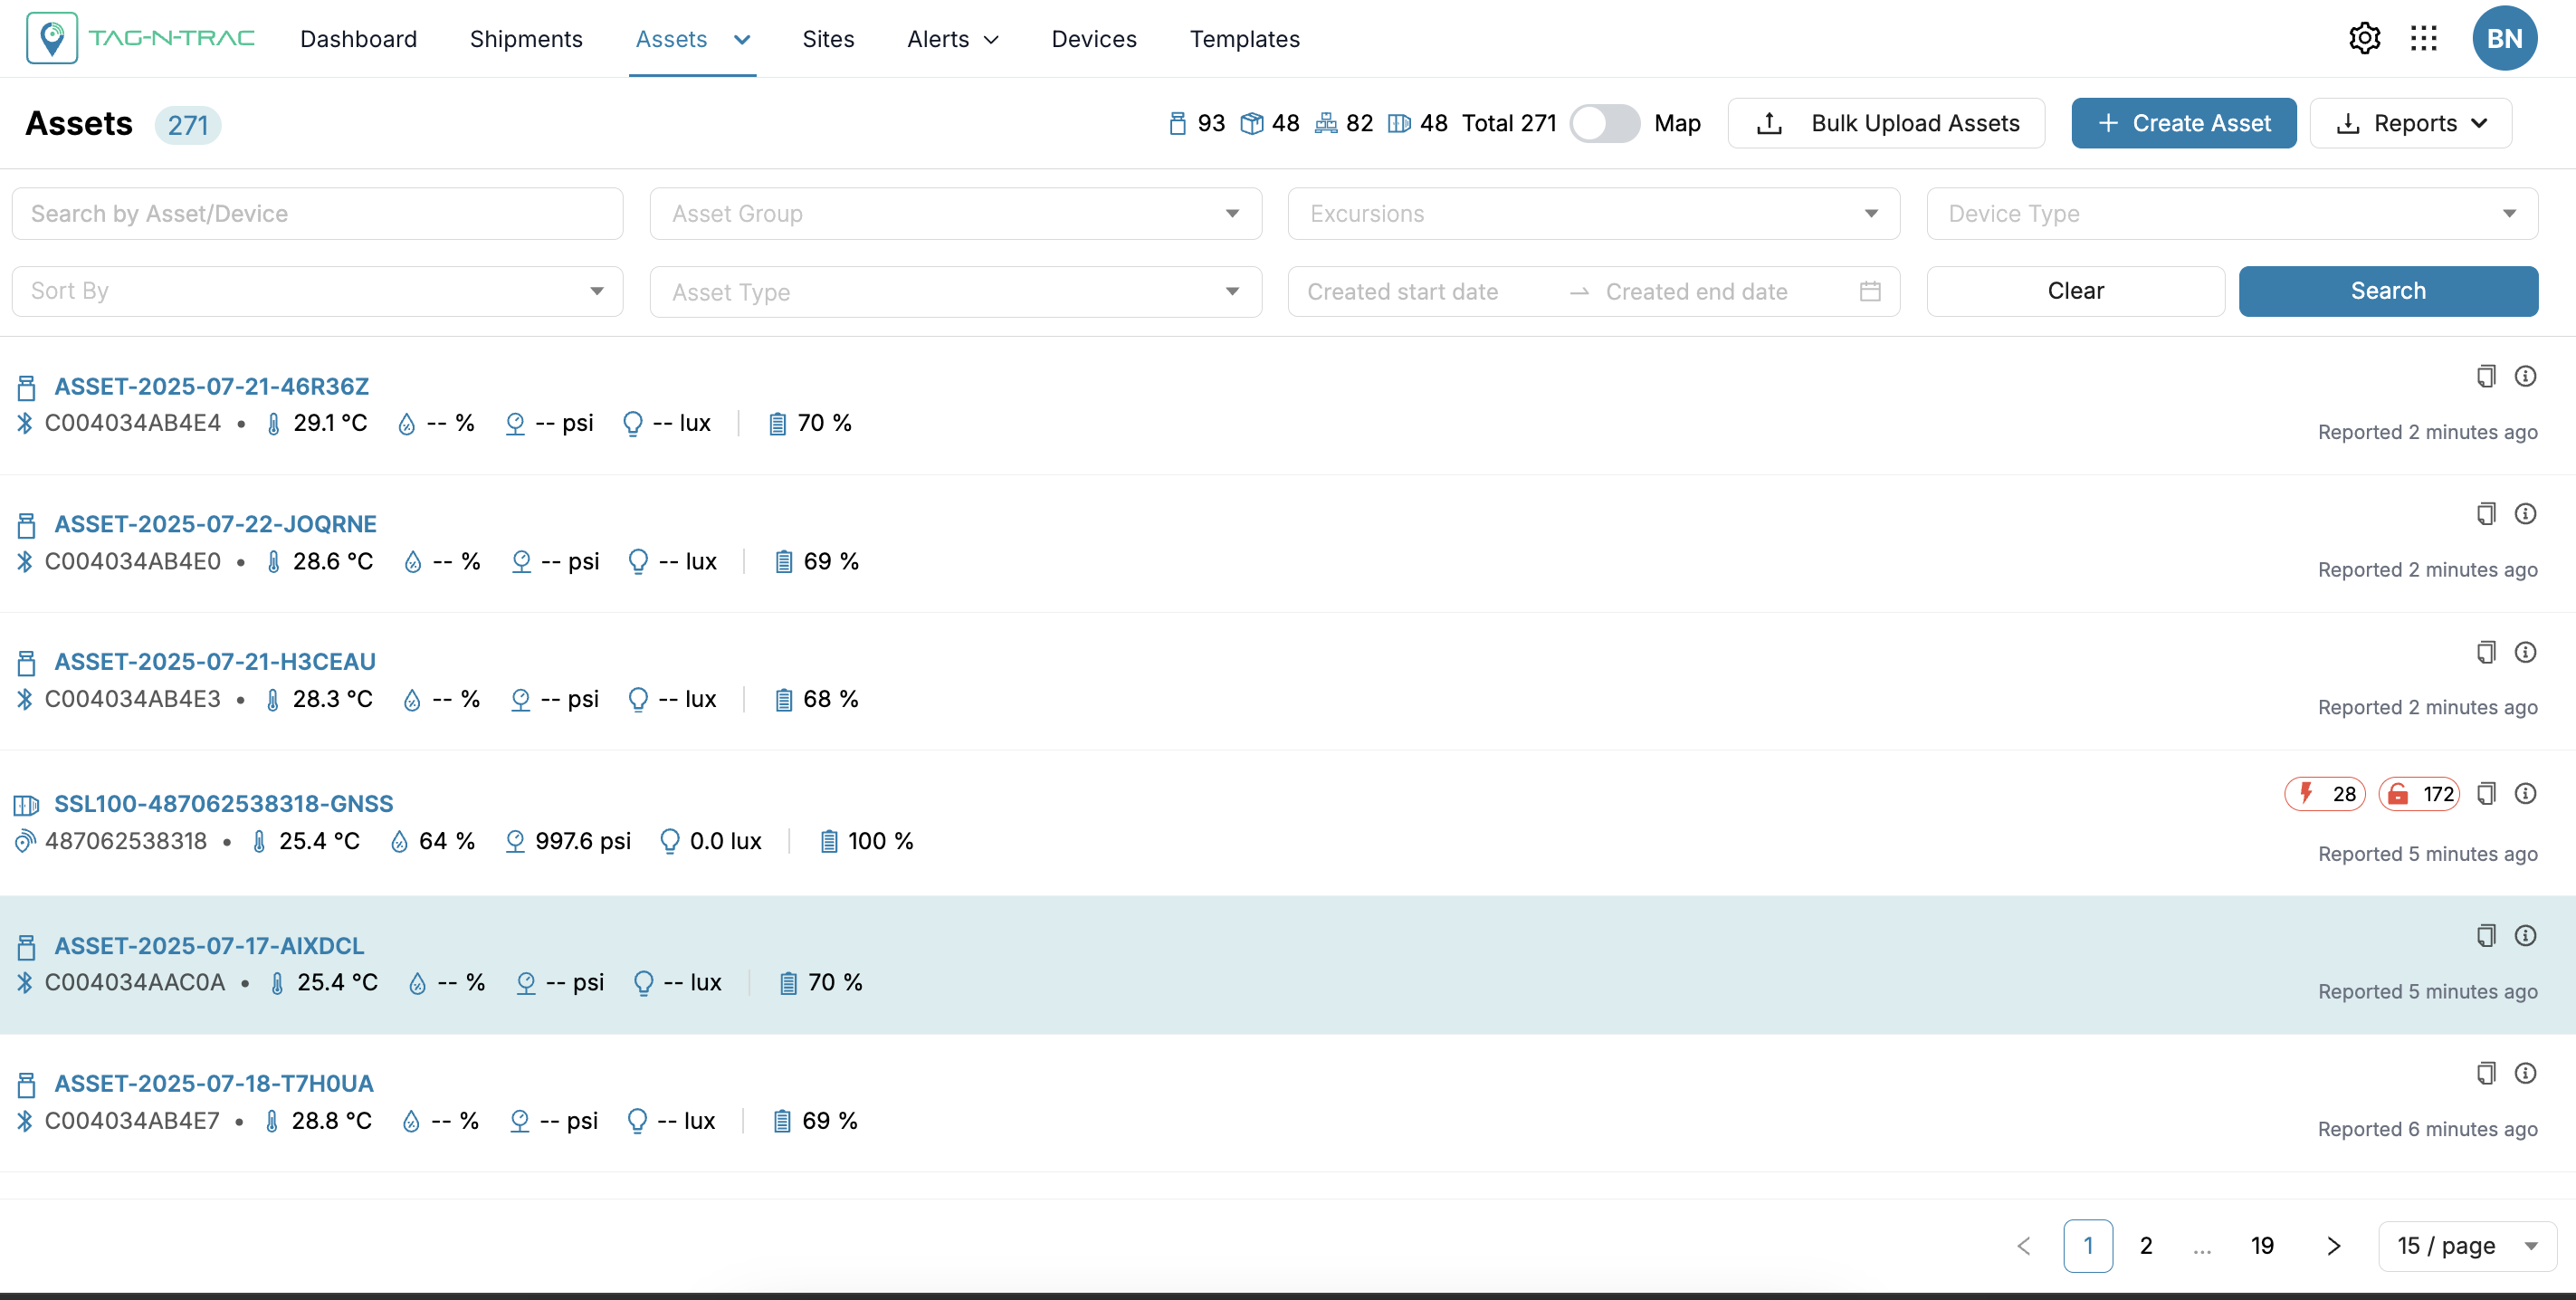
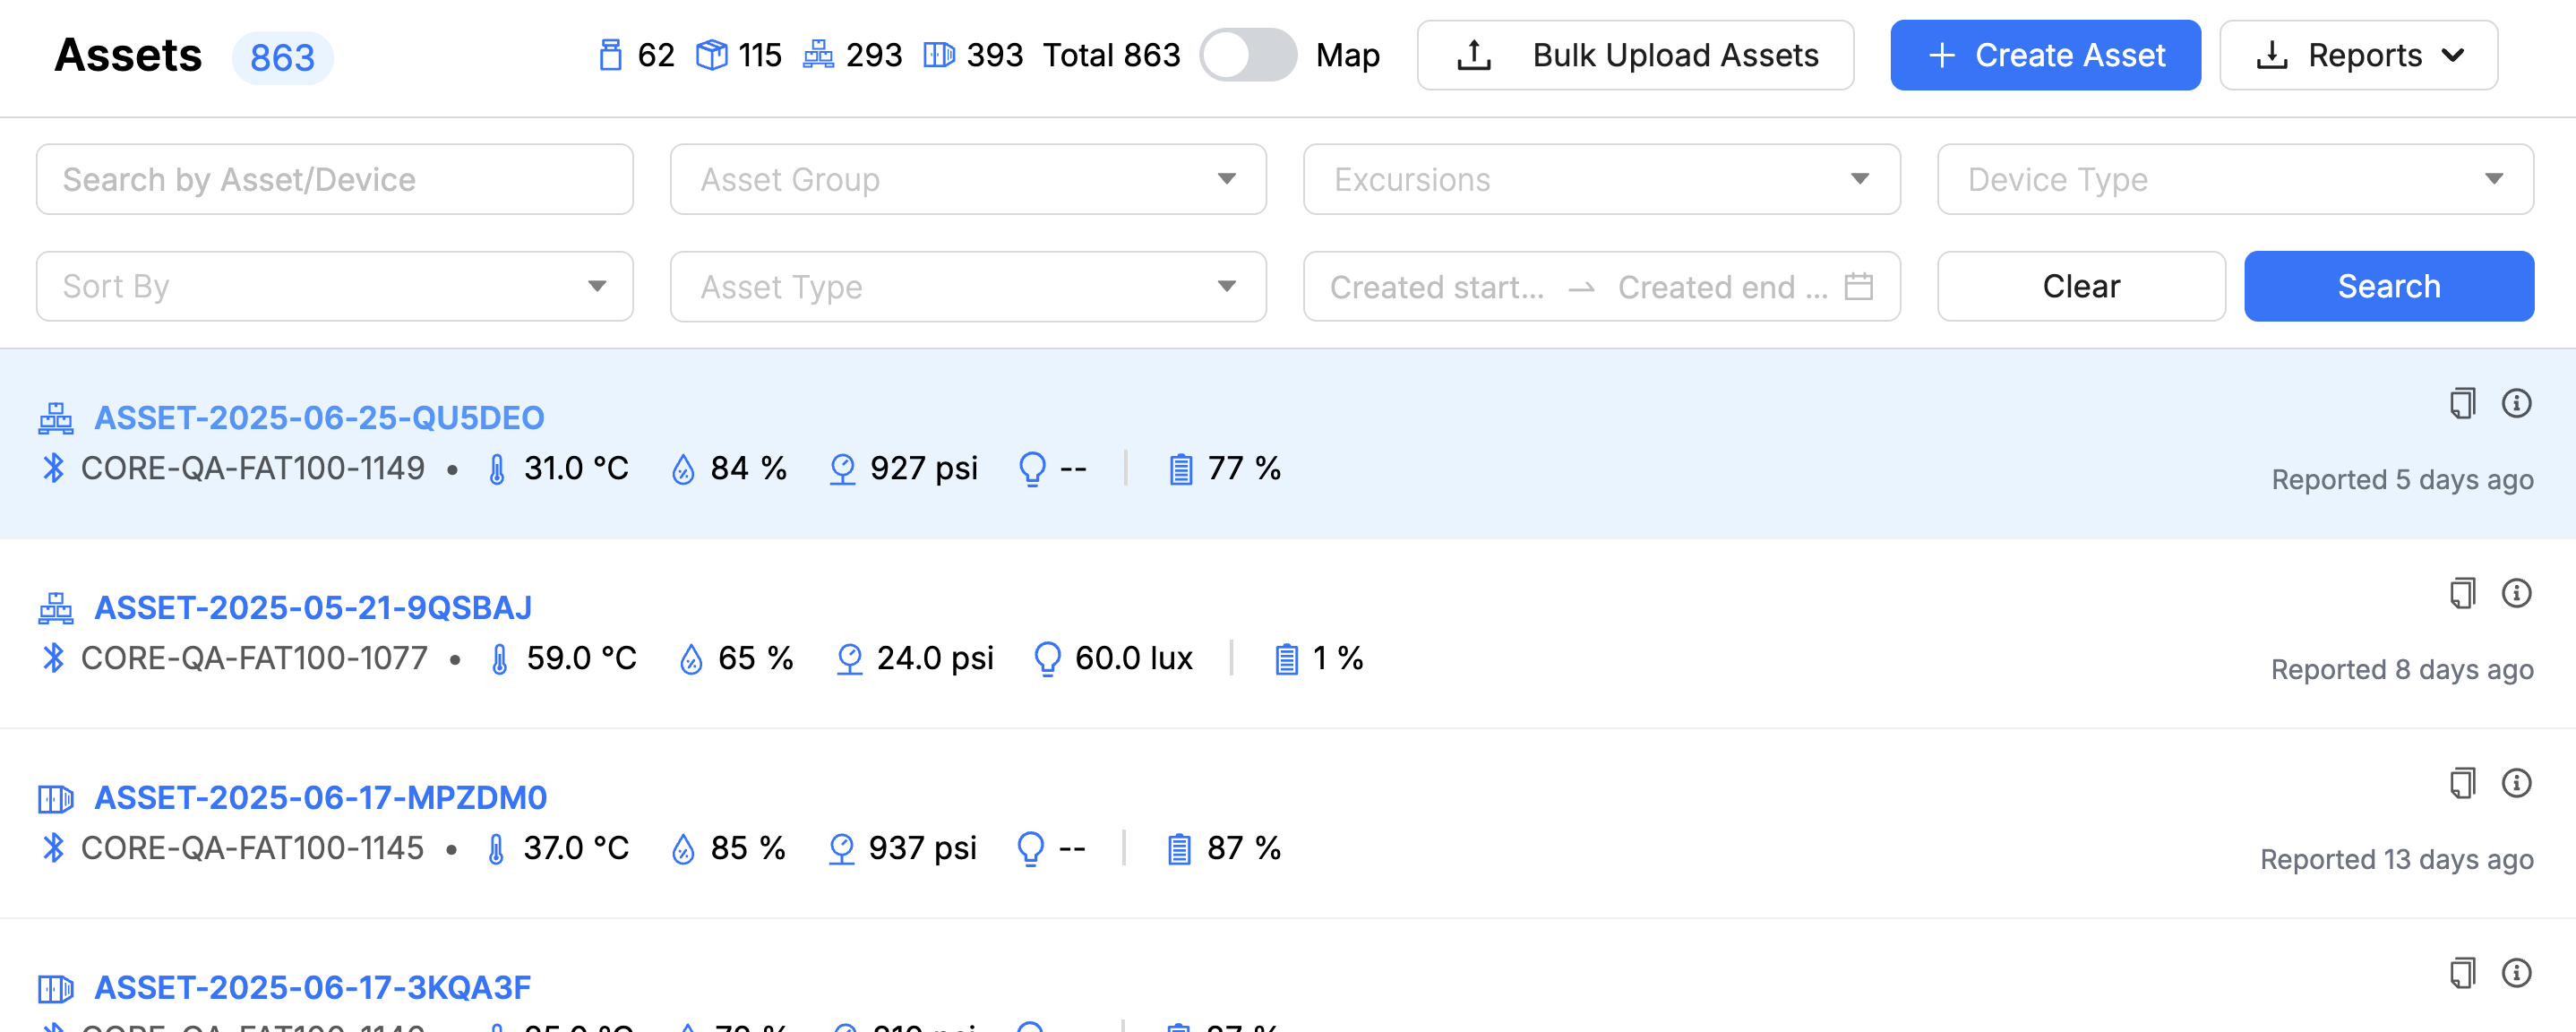
Assets List
The Assets List feature enables users to efficiently manage, search, create, and analyze assets. This section outlines the layout, available functionalities, and step-by-step guidance for using the asset list effectively.
Key Features
The Assets List displays all assets that have been added to the platform and provides two visualization options:
- List View: Presents detailed asset information in a structured list format. Each row represents an asset and includes key attributes such as ID, type, status, last reported time, and associated device details.
- Map View: Provides a geographical representation of assets on an interactive map. This view is ideal for monitoring the spatial distribution and real-time locations of assets.
Assets List - List View
Assets List - List View
The assets list provides detailed asset information, including:
| Field | Description |
|---|---|
| Asset ID | A unique identifier for each asset. Clicking on the Asset ID navigates to the asset’s details page. |
| Device | The associated device identifier. |
| Sensor Values | Displays real-time data such as temperature, humidity, pressure, and battery status (where applicable). |
| Excursion Events | Indicates whether any excursion events have occurred, such as threshold violations, tilt, or extended dwell time. Hover over an event icon to view its type. |
| Copy Link | Select this icon to copy a direct link to the asset. You can share the link with stakeholders who have access to the platform. |
| More Info | Select this icon to open a pop-up that displays additional shipment details, including the parent asset, creation date, and last update. |
| Parent Asset | Displays the parent asset, if applicable. Child assets inherit attributes such as Asset Groups from the parent. |
| Created At | The date and time the asset was added to the system. |
| Updated At | The most recent update timestamp for the asset. |
| Last Reported | Time since the asset last sent a report. |
| Actions | Provides options to edit or view more details of the asset. |
| Asset Details Page | Select the Asset ID to open the Asset Details page and view more information. |
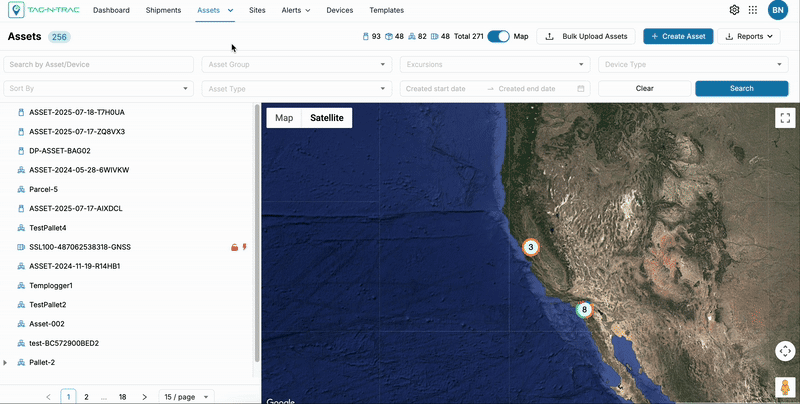
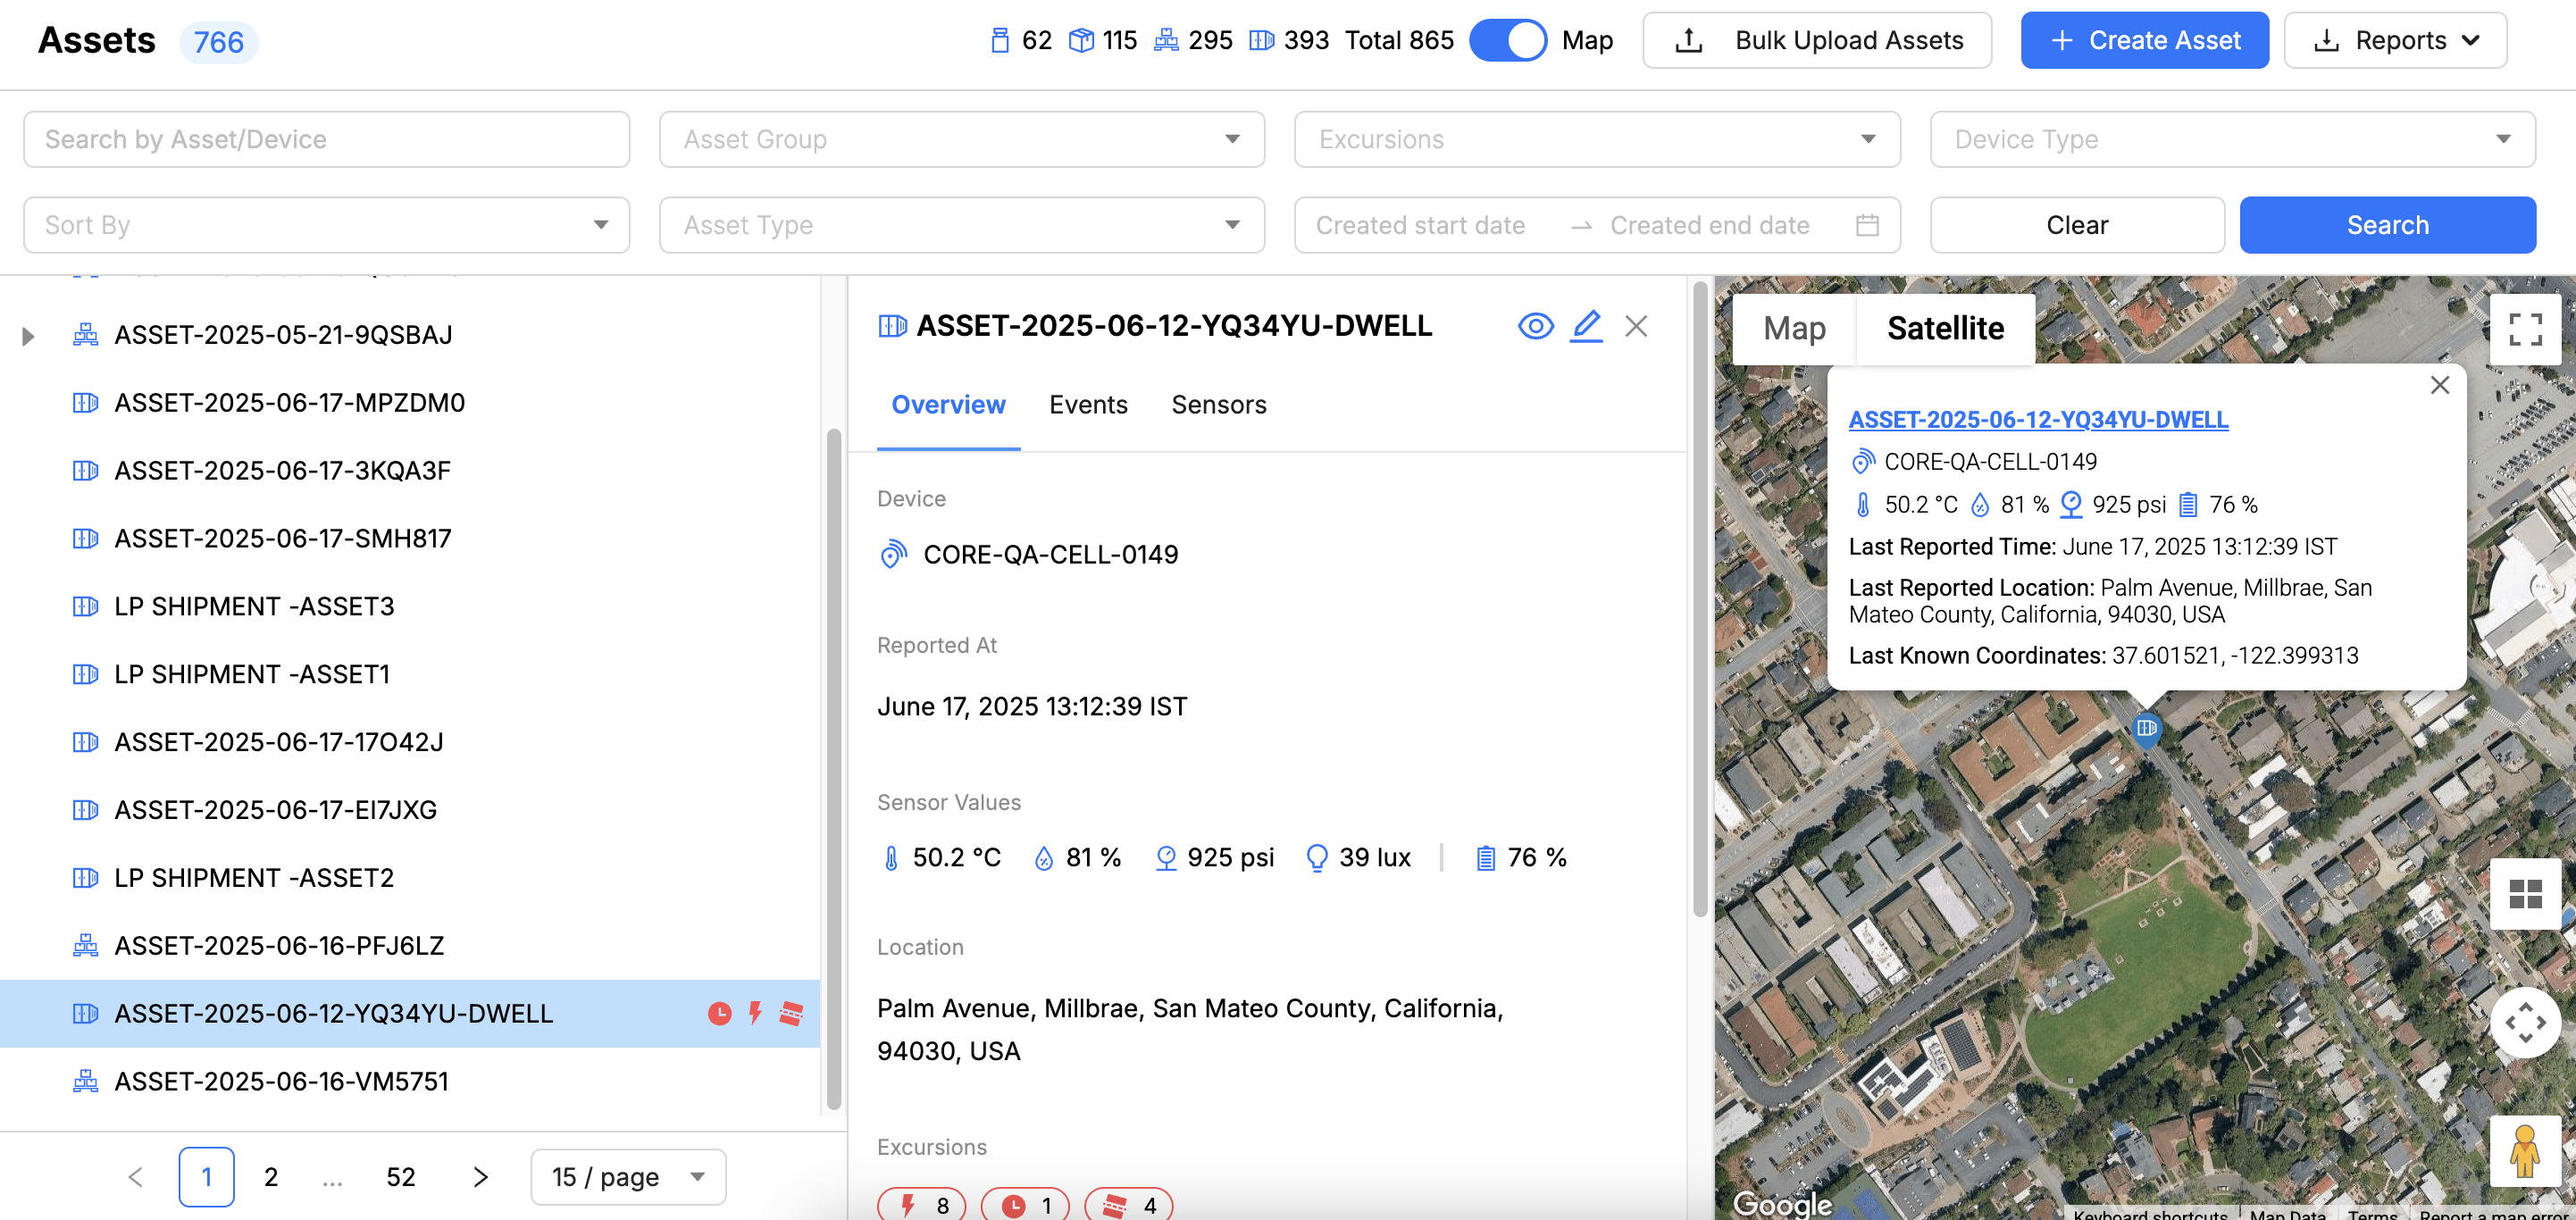
Assets List - Map View
The map view offers a geographical map display to visualize asset locations, providing spatial insights. Click on the toggle between to switch between the List View and the Map View.
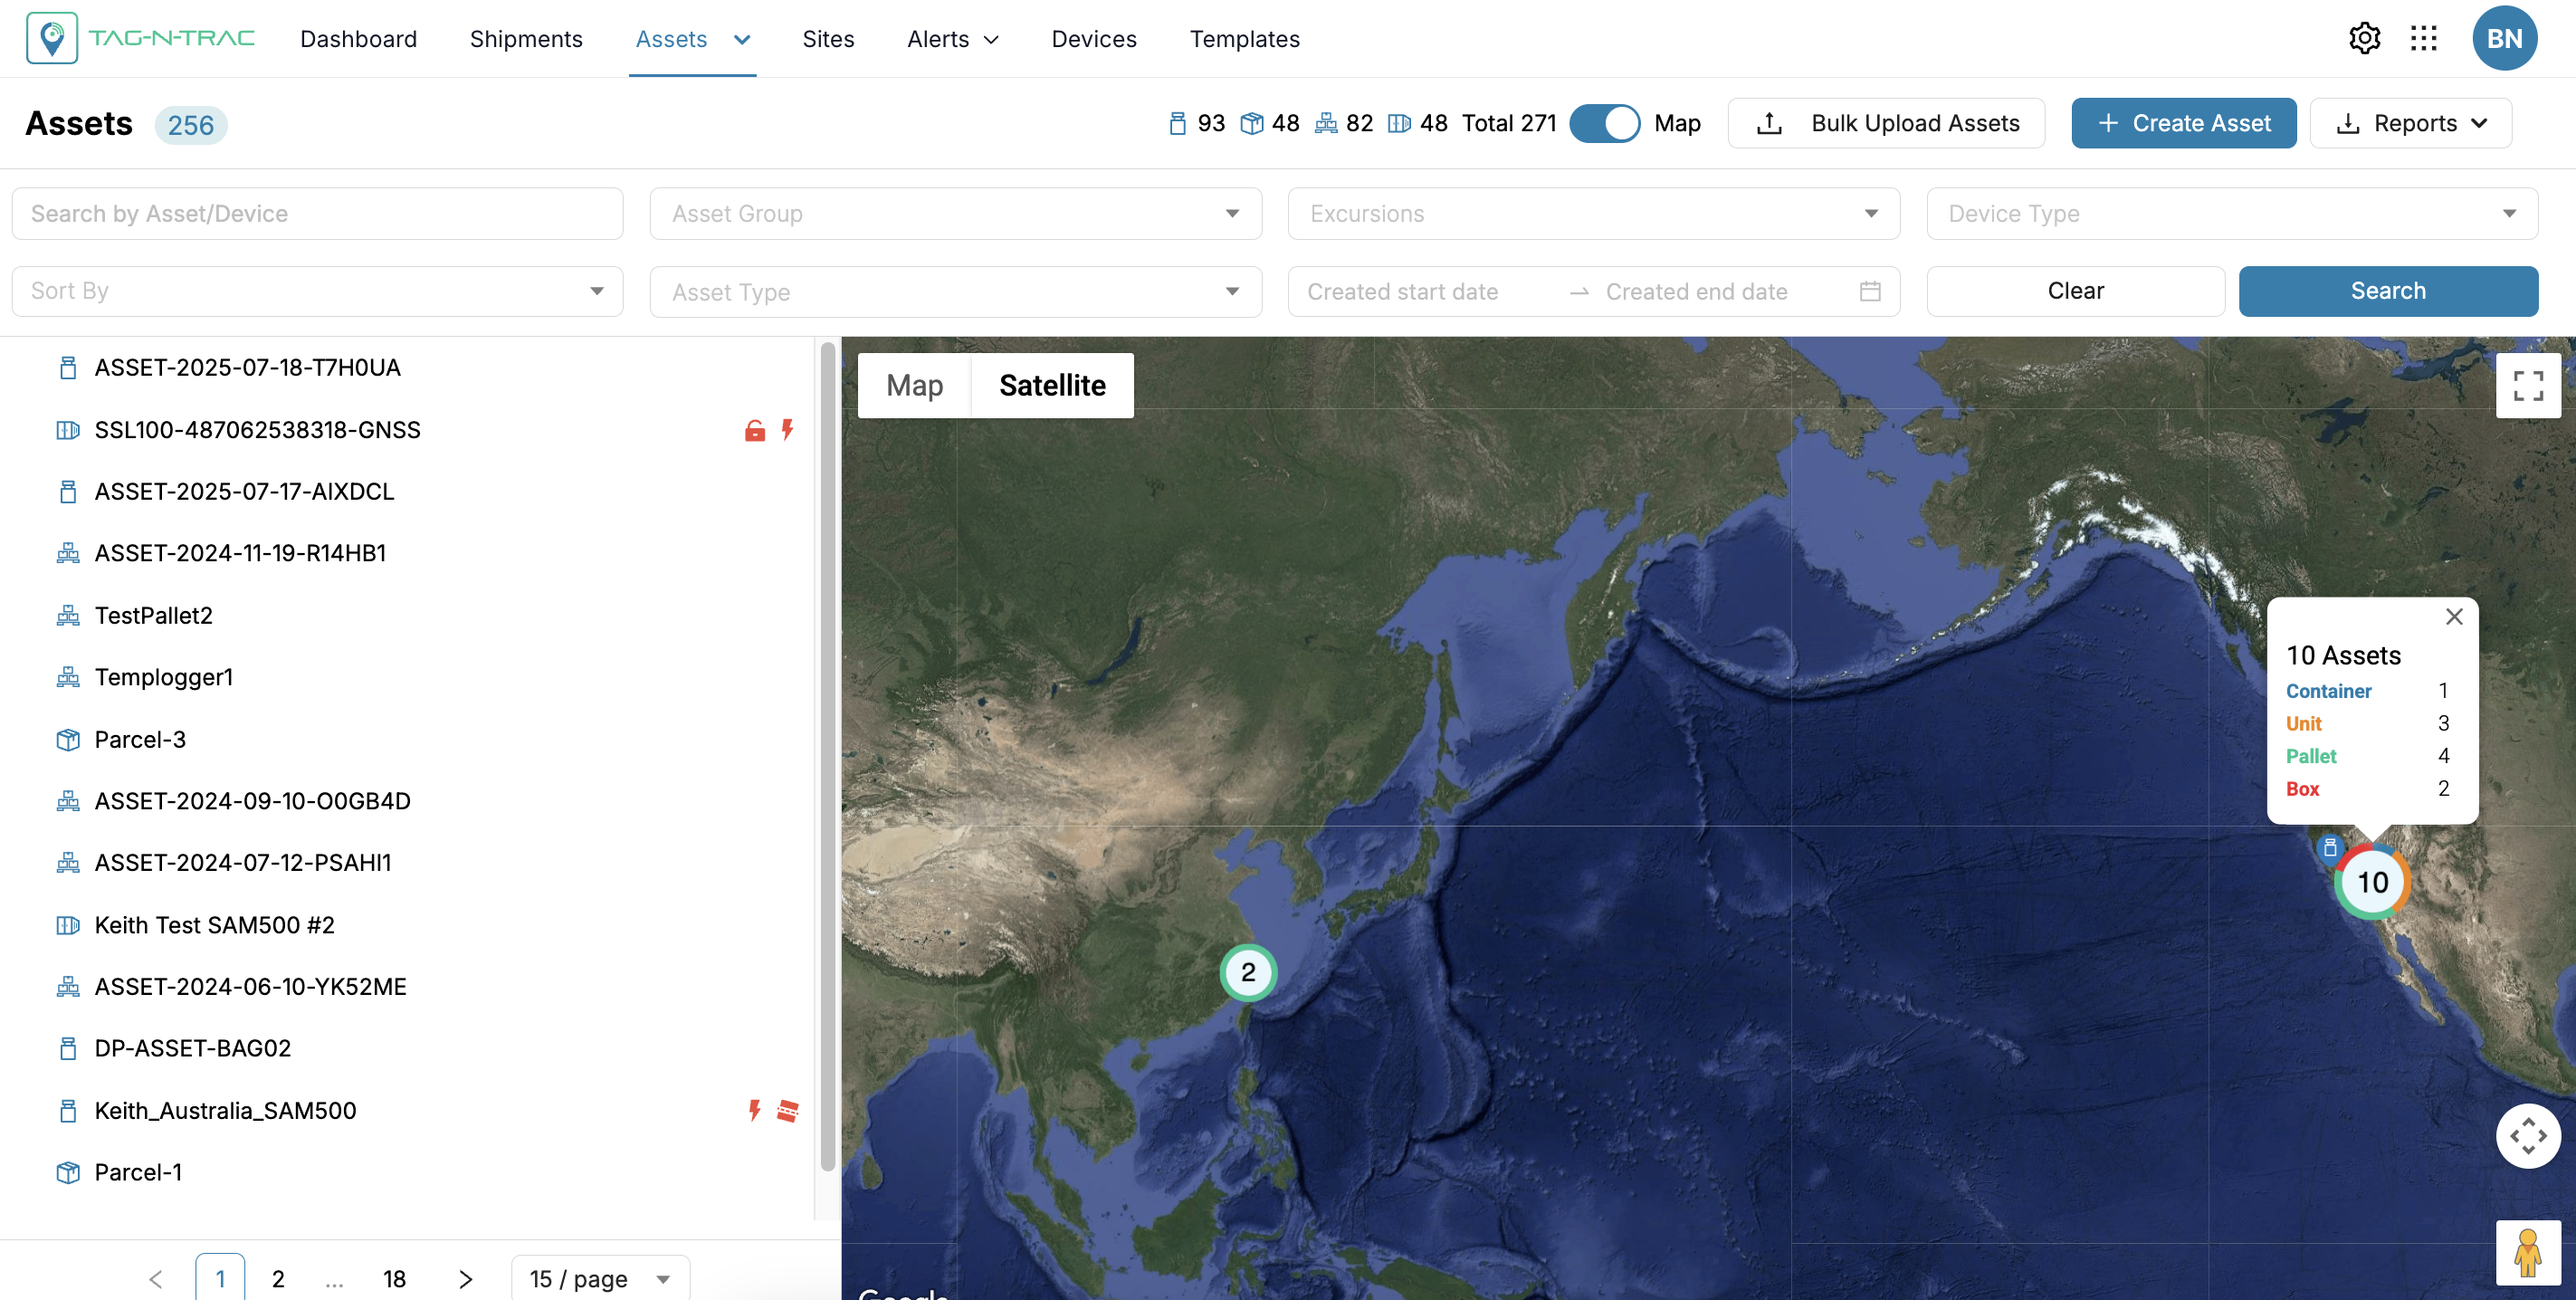
Assets List - Map View
Click on an asset in the list to open the asset preview drawer window.
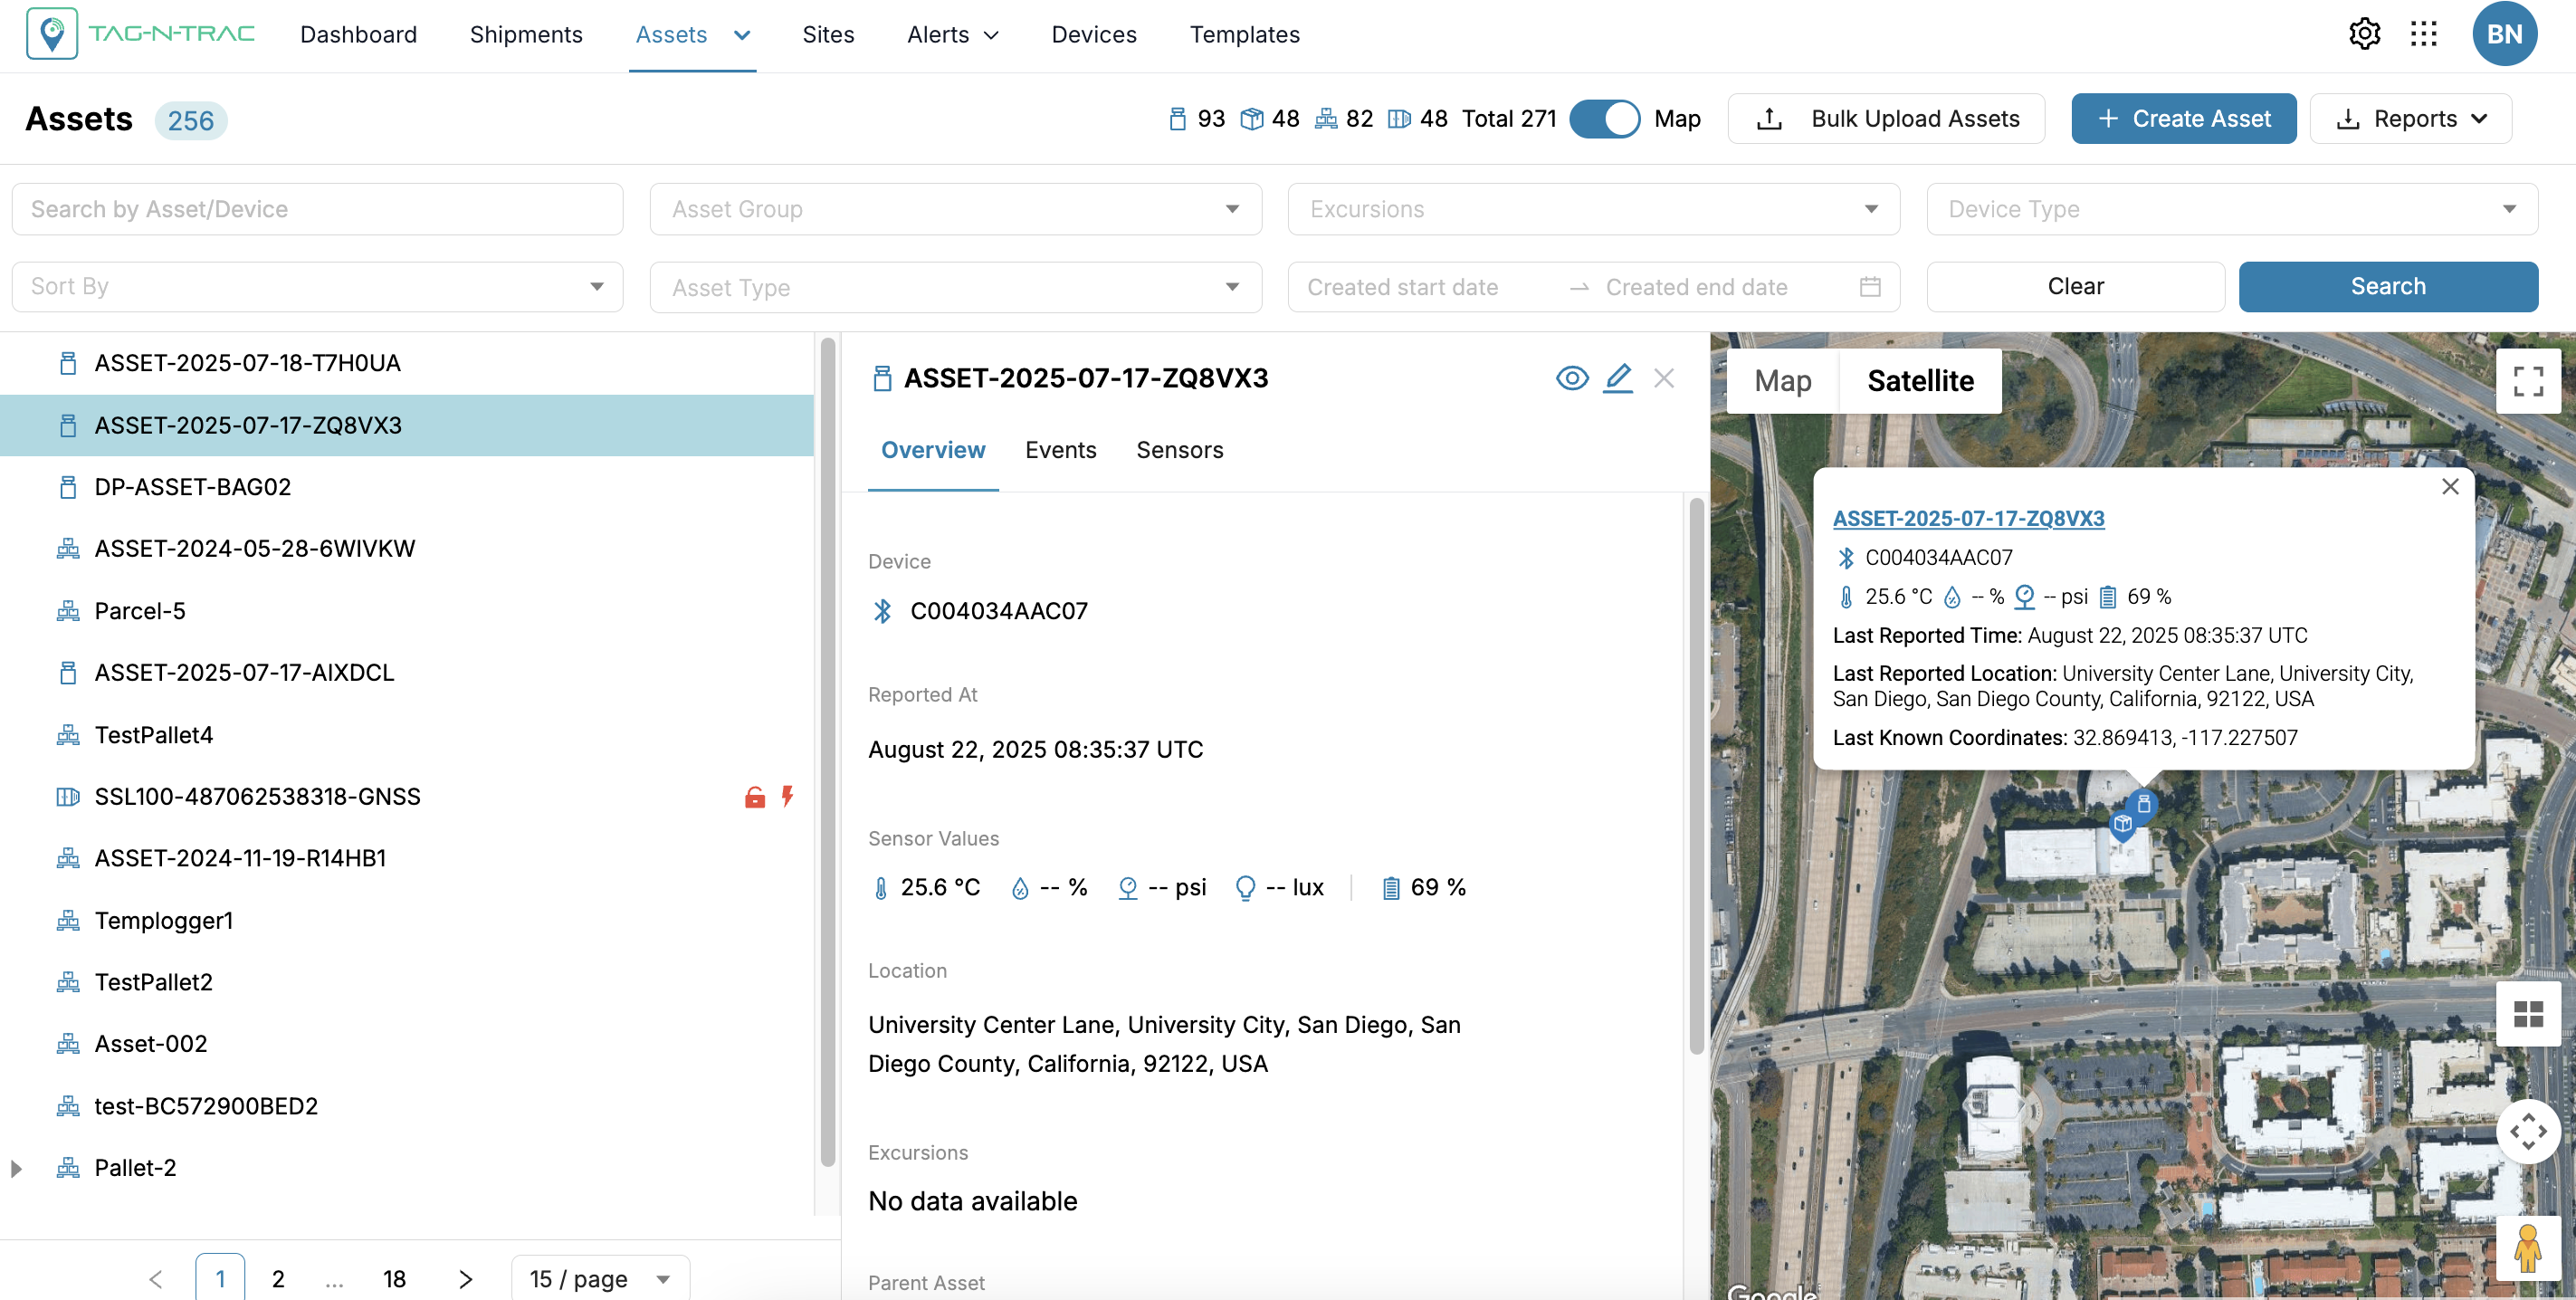
Asset Drawer Window
Asset Drawer Window View
In the Assets List – Map View, selecting an asset opens a drawer window that displays high-level information about the asset's overview, events and the sensors graphs, and available quick actions.
Asset Drawer Window
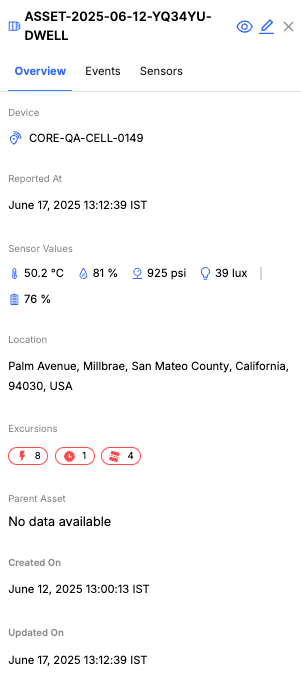
Overview Tab
Asset Drawer Window
The Overview tab in the drawer window provides a summary of key asset information, including:
- Device: Displays the associated device ID.
- Reported At: Indicates the most recent timestamp when sensor data was received.
- Sensor Values: Shows live metrics such as:
- Temperature (°C)
- Humidity (%)
- Pressure (psi)
- Light (lux)
- Battery level (%)
- Location: Shows the asset's last known location with full address.
- Excursions: Displays counts of triggered alerts categorized by type (e.g., temperature, humidity, pressure, tilt, and so on).
- Parent Asset: Indicates the parent asset, if applicable.
- Created On: Timestamp when the asset was created.
- Updated On: Timestamp of the most recent update to the asset.
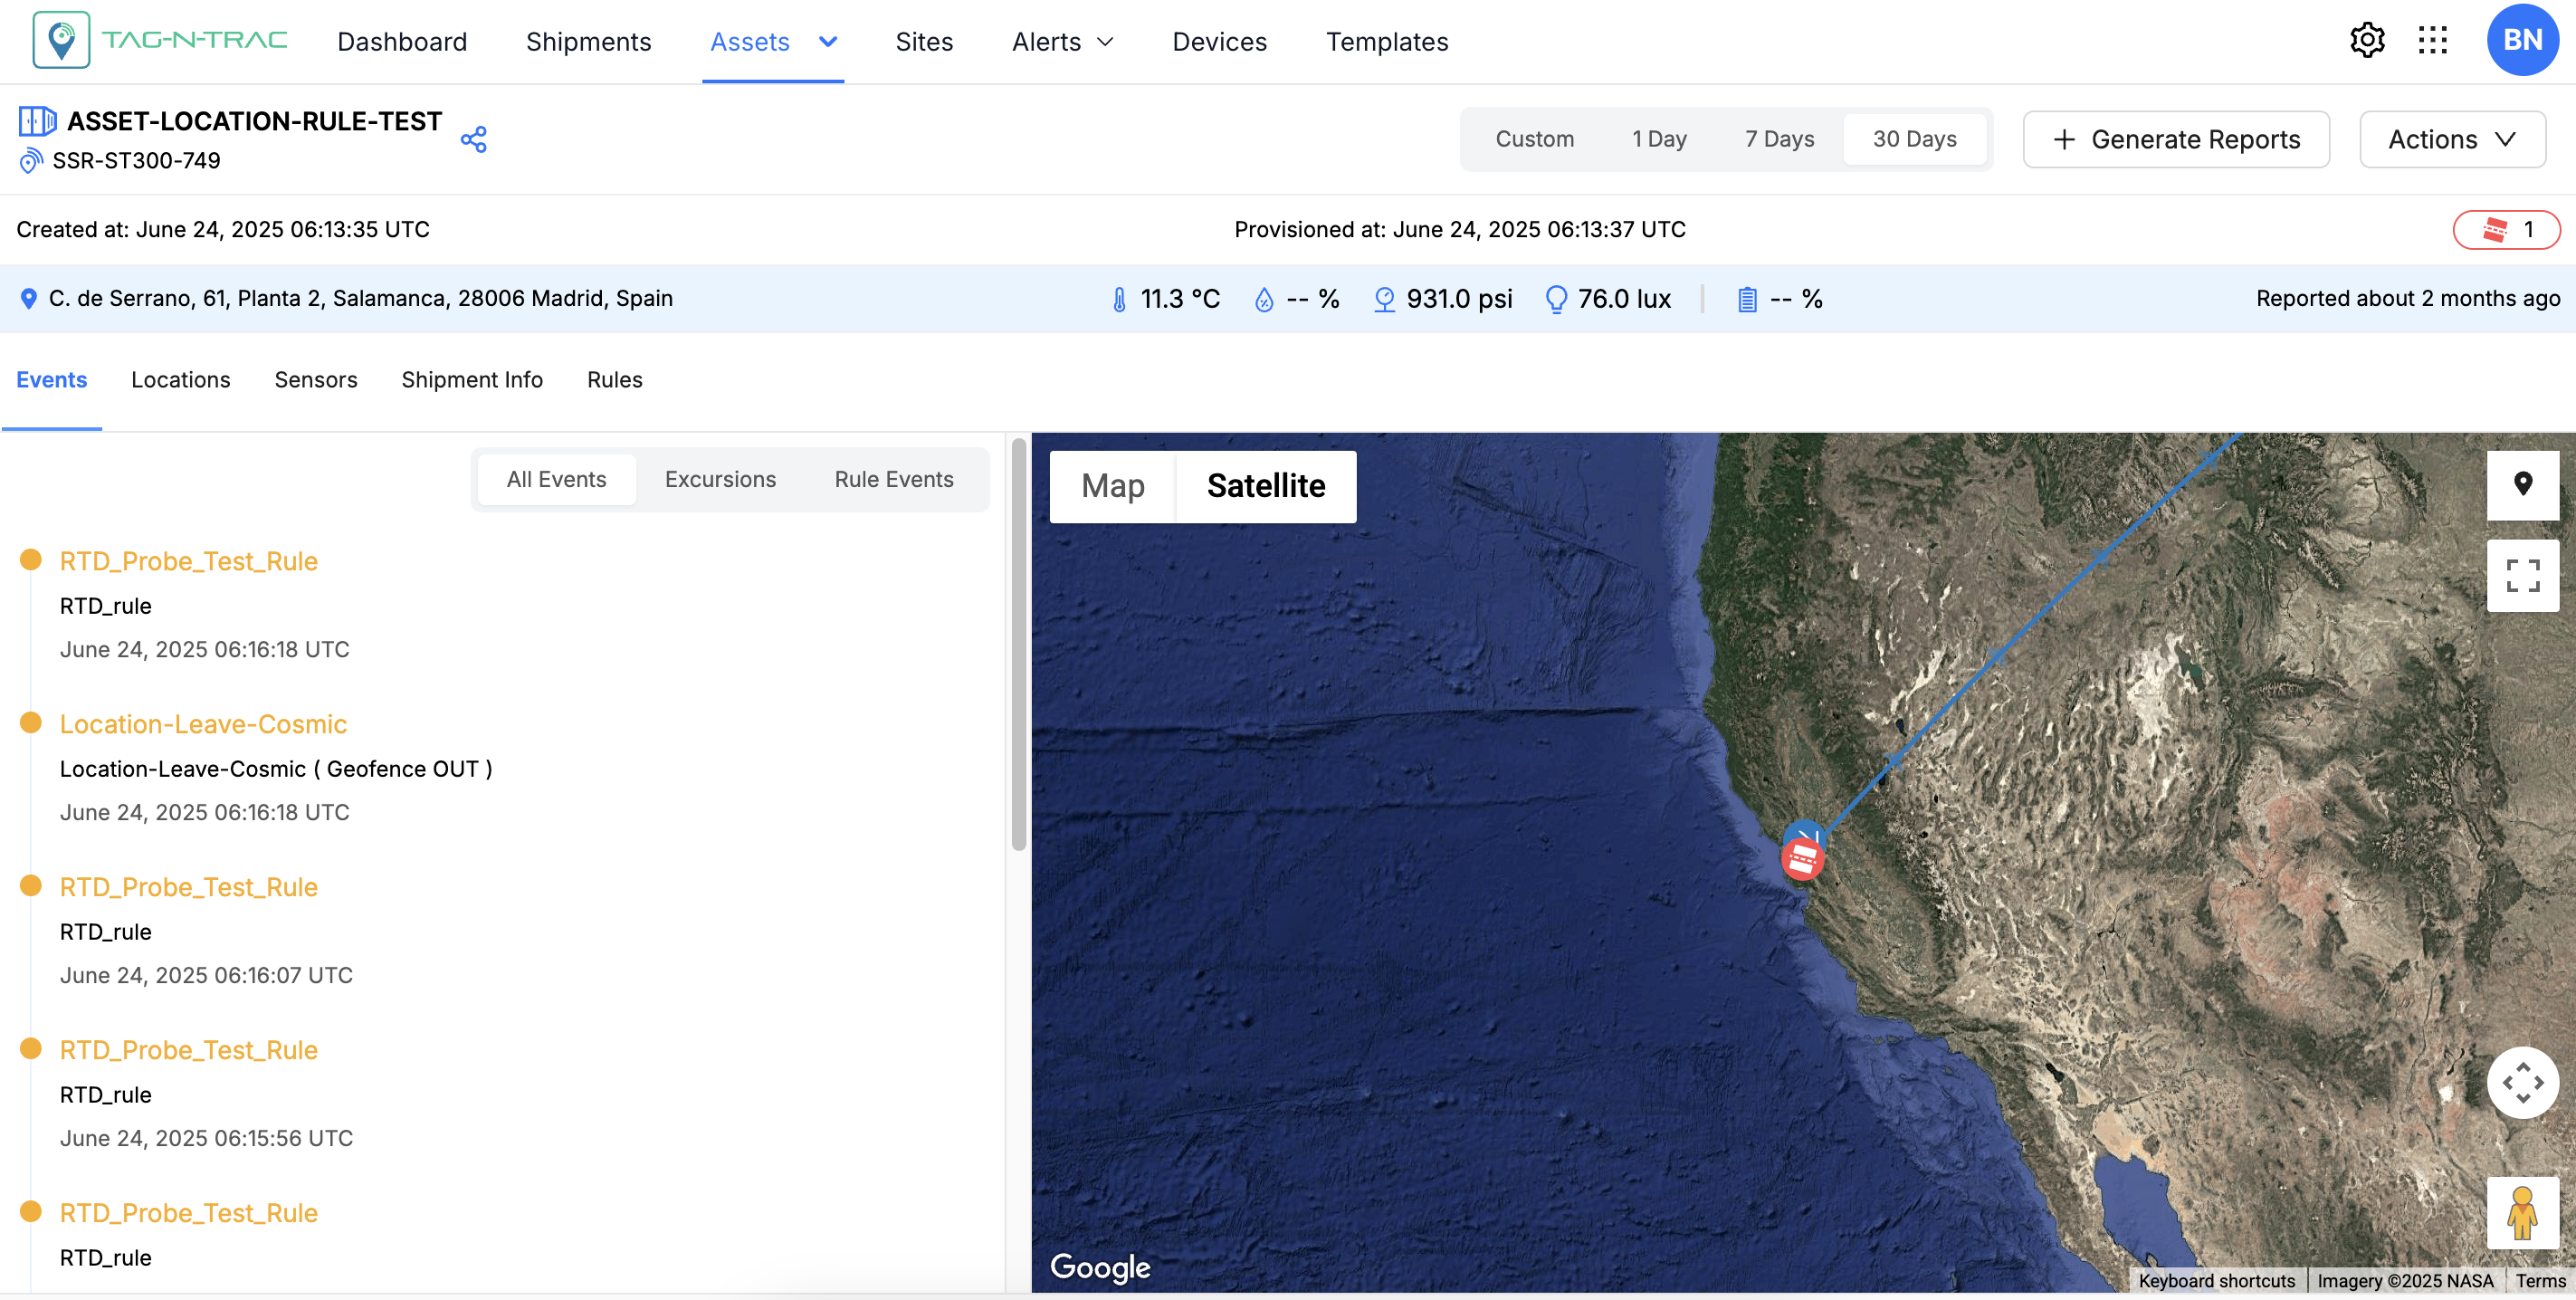
Events Tab
The Events tab provides a detailed timeline of the asset's lifecycle, showing various statuses and actions taken. This section allows you to track key events for better monitoring and management of your assets.
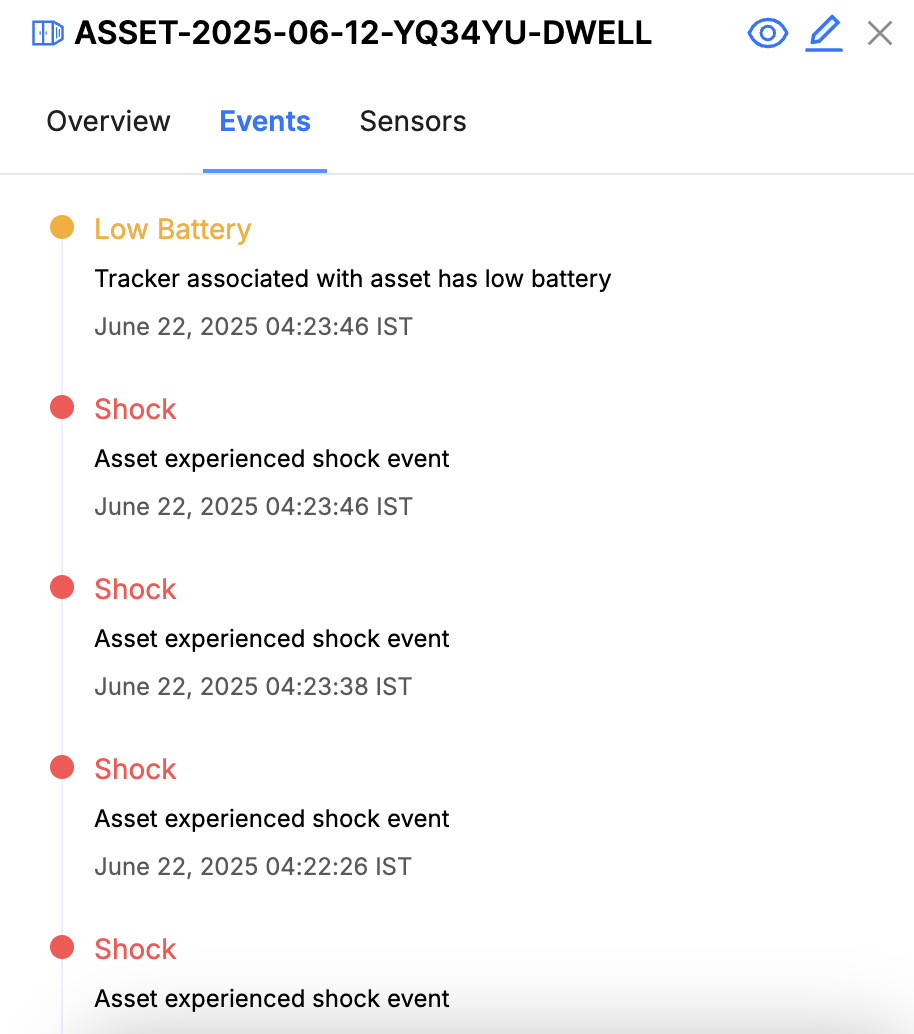
This streamlined interface helps users efficiently monitor asset status and actions in real-time and displays all recorded events for the asset.
This tab displays the following information:
- Event Timeline:
- View all major events such as:
- Created: When the asset was added to the system.
- Provisioned: When the asset was provisioned with a device.
- De-provisioned: When the asset was unlinked or removed from a device.
- Rule Events: Displays the rule-based events based on the selected template type during the shipment creation process.
- Each event displays a timestamp for accurate tracking.
- View all major events such as:
Sensors Tab
The Sensors tab provides real-time and historical readings from various sensors associated with the asset. This allows users to monitor environmental and operational conditions effectively.
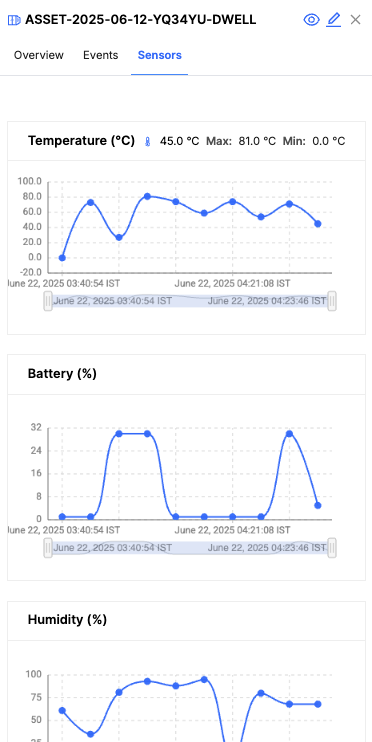
This tab offers a comprehensive way to analyze sensor data, ensuring timely insights for asset management.
This tab displays the following information:
- Sensor Readings:
- Includes data for:
- Temperature: Displays temperature variations over time.
- Light: Tracks light intensity levels.
- Pressure: Records atmospheric or applied pressure.
- Humidity: Logs humidity levels.
- Battery: Indicates battery status or levels.
- Acceleration: Captures movement or vibration data.
- Includes data for:
- Interactive Graphs:
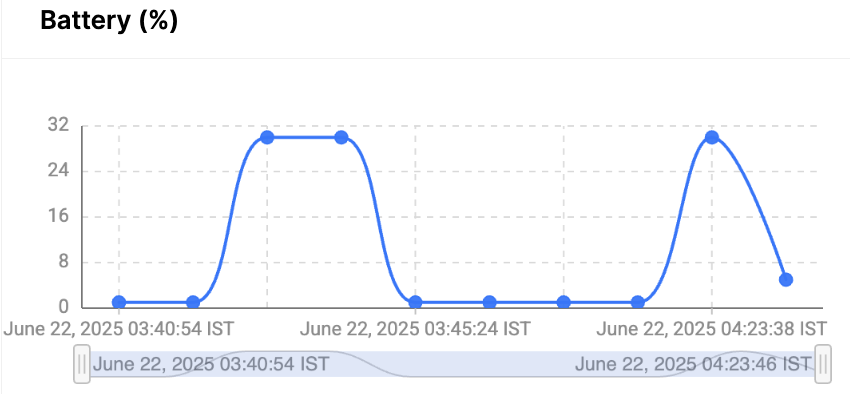
Zoom and Pan: Use the brush-style slider located beneath each graph to adjust the visible time range:
- Zoom: Drag the edges of the slider to zoom in or out.
- Pan: Move the entire slider left or right to navigate across the timeline.
Quick Actions

- View Asset Details Page (Eye Icon) – Opens the Asset Details page with detailed information.
- Clicking the Asset ID in the pop-up on the Map view also opens the Asset Details page.
- Edit Asset (Pencil Icon): Selecting the edit (pencil) icon opens an editable form that allows you to update the asset’s name, address, and other settings.
- To modify the asset, follow the same steps used during the asset creation process.
Note: Note that only the uncommissioned assets can be modified.
- To modify the asset, follow the same steps used during the asset creation process.
- Close Site Drawer (X Icon): Closes the drawer and returns to the Assets List.
Additional Options
- Pagination: If the assets list spans multiple pages, use the pagination controls at the bottom-right to navigate through the list.
- Real-Time Updates: Sensor values and status indicators are updated in real-time for connected devices.
Reports in Assets List
The Reports feature allows users to export asset data efficiently in different formats. With the Report button, users can export the current view, selected assets, or the entire assets list. The exported data is downloaded as a CSV file, ensuring easy access and analysis.
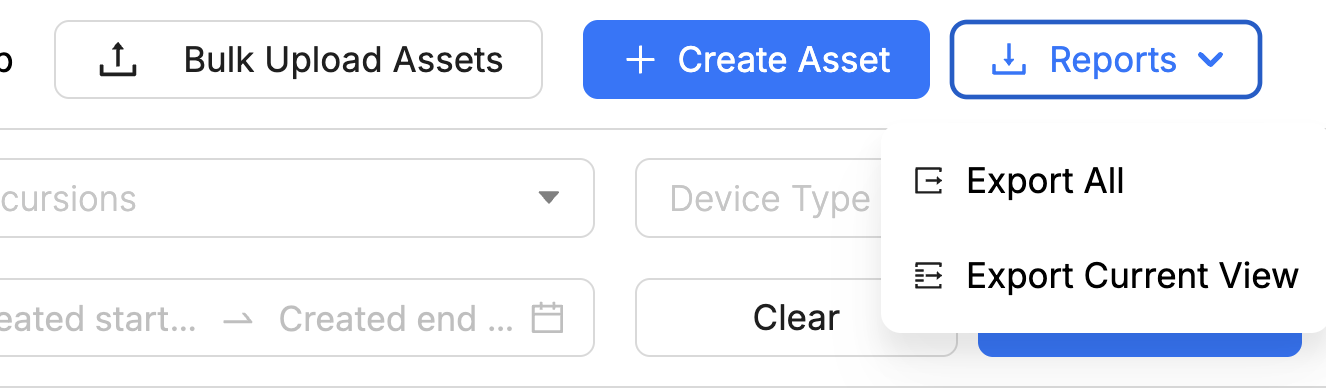
The Report button allows exporting asset data in various types:
- Export Current View: Export the current list view as displayed on the screen.
- Export All: Export the complete list of assets.
To Download Reports
- Click the Report button.
- Choose the desired export option from the dropdown.
- A
.CSVfile will download in the chosen format.
Best Practices
- Regularly update asset metadata for easy identification.
- Use the Bulk Upload Assets feature to save time when adding large numbers of assets.
- Leverage the map view for location-based monitoring of assets, especially for logistics or geographically distributed devices.
- Export and analyze reports periodically to track performance, excursions, and asset conditions.
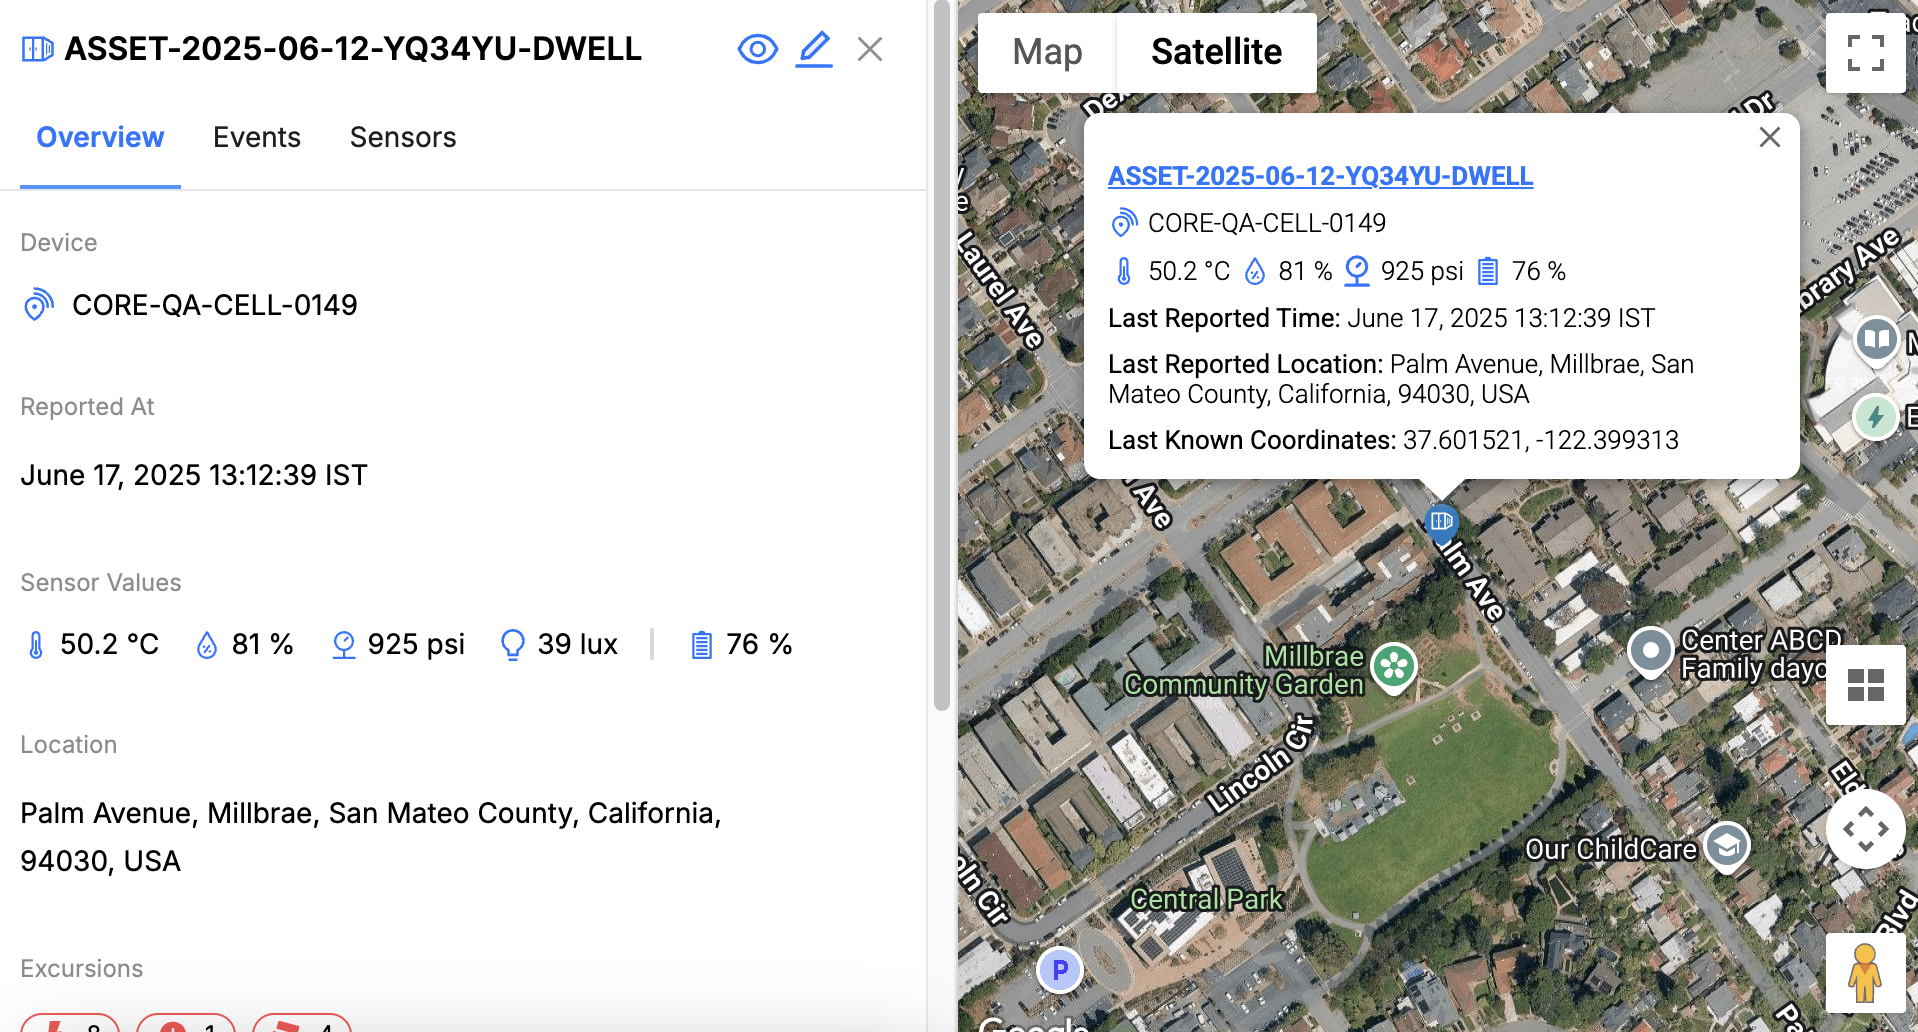
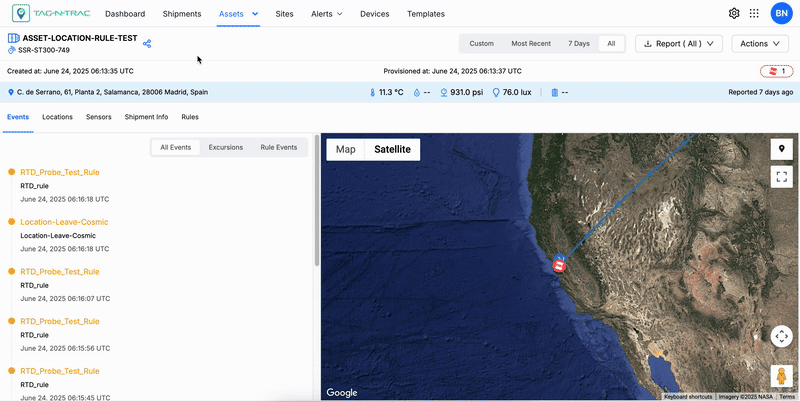
Asset Details Page
To view the asset details page, click any Asset ID from one of the following locations:
List View
To view asset details in the list view, click an Asset ID in the list.
Map View
To view detailed information about an asset from the map view, do one of the following:
- Select the eye icon in the drawer window to open the Asset Details page.
- Click the Asset ID in the location pin popup to navigate directly to the Asset Details page.
Any of these actions will direct you to the Asset Details Page of the selected asset.
The Asset Details Page includes more details about the asset, such as header information, device information, device current readings, filter options to view relevant data, the option to download the asset report, and other crucial details.
Asset Details Page
The following topics describe the option available on the Asset Details Page.
Header Information
The Header section of the interface provides quick access to key asset metadata and essential operational indicators.

The following sections describe all key elements available on the Asset Details page, including device data, events, sensor graphs, and configuration details.
Share Link
The Share Link feature enables users to quickly draft and send an email containing a clickable link to one or more recipients. Follow the steps below to use this feature.

Steps to Share Tracking Link
Email Link
- Locate the Share Icon: In the top-left corner of the interface, next to the Asset ID, click the Share Icon to initiate the sharing process.
- Enter Recipient Email Addresses:
- A drawer window or input field will appear.
- Manually enter the email addresses of all intended recipients.
- Click Share Link:
- After entering the email addresses, click the Share Link button.
- This will automatically:
- Draft an email addressed to all specified recipients.
- Include a clickable link in the email body that grants access to the shared data or report.
Note: Ensure that the entered email addresses are accurate to avoid errors or missed recipients.
Copy Link
- A Copy Link button is available at the top-right corner. This allows users to manually copy the tracking link for sharing through other communication methods.
Managing Recipients
Once the email is sent, the recipients' details will appear in the share link drawer window. The following options are available for managing each recipient:
The Share Asset Tracking Link window displays the following information for each shared tracking link:
- Email: The recipient's email address.
- Name: The recipient's name, displayed only if the user’s data is available in the Platform.
- Shared On: The date and time the tracking link was shared.
- Active Until: The expiration date and time of the tracking link's availability.
Actions for Each Recipient
- Resend:
- Click the Resend button (mail icon) to resend the tracking link to the recipient.
- This can be used if the recipient reports not receiving the email or if the email needs to be sent again.
- Revoke:
- Click the Revoke button to remove the recipient's access to the asset tracking link.
- Once revoked, the recipient can no longer view the asset data.
- Renew:
- Click the Renew button to extend the recipient's access after the link has expired or passed the Active Until date.
- Useful for time-limited access that needs to be prolonged.
Best Practices
- Revoking Access: Revoke access for recipients who no longer need asset data to ensure data security and compliance.
- Renewing Links: Regularly check the expiration status of shared links and renew them as needed to avoid access interruptions.
- Resending Emails: Confirm the recipient’s email address before resending a tracking link to prevent duplicates or misdirected emails.
Device Information
Users can view device metadata and real-time sensor readings from the Asset Details page.
Note: Device data is available only if a device was associated with the asset during asset creation or modification.
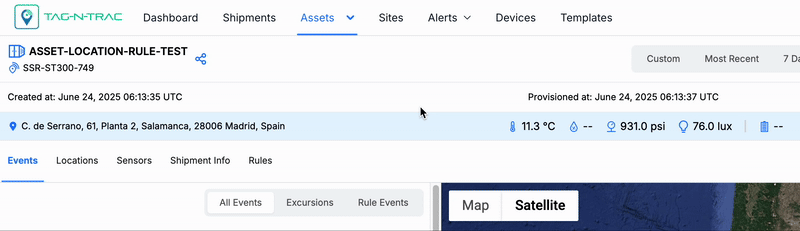
- Device ID – Unique identifier of the device linked to the asset.
- Temperature – Current temperature reading, displayed in degrees Celsius (°C).
- Humidity – Current relative humidity level, shown as a percentage.
- Pressure – Atmospheric pressure reading, measured in pounds per square inch (psi).
- Light – Ambient light level, measured in lux.
- Battery Level – Remaining battery percentage of the device.
Timestamps
The Asset Details page displays the following timestamps in the header section:

- Created At: The date and time the asset was initially created in the system.
- Provisioned At: The date and time the asset was successfully provisioned and became available for use.
Date Filter Controls
Use the date filter controls to customize the timeframe of the displayed asset data. Available options include:
- Most Recent – Displays the latest available data.
- 7 Days – Filters data from the past seven days.
- All Time – Shows all historical data available for the asset.
- Custom Range – Allows users to specify a custom start and end date.
Note: Adjusting the date filter updates graphs and performance metrics across all tabs.
Generating Reports
The Generate Report feature allows you to create detailed reports for asset or shipment data based on your selected criteria. Reports can be exported in CSV or PDF format and customized using available filters.

Generate Report
To generate a report:
-
Click the + Generate Report button.
-
In the Generate Report dialog, configure the following options:
Report Format (Required)- Choose between PDF or CSV based on your reporting needs.
Date Range (Required)-
Select a predefined range (1 Day, 7 Days, 30 Days) or choose Custom to set a specific duration.
Tip: The timezone applied to the report aligns with your user settings.
Sensors (Required)- Select the sensors to include in the report:
- Temperature
- Probe
- Humidity
- To include all available sensors, enable Select All Sensors.
4. Additional Attributes (Optional)- Include Location Information: Adds geolocation data to the report.
- Include Event Details: Includes system-triggered events for deeper analysis.
-
After selecting the desired filters, click Download to export the report in your chosen format.
Best Practices
- Use CSV for raw data analysis and integration with analytics tools.
- Use PDF for sharing formatted reports with stakeholders.
- Apply shorter date ranges (e.g., 1 or 7 days) for operational monitoring and longer ranges (e.g., 30 days) for audits and summaries.
Note: All data in the report is generated in real time based on the selected filters and your account's timezone.
Actions
The Actions tab allows you to edit an asset if it has not been provisioned or has already been de-provisioned.
Note: Assets cannot be modified if they are part of an active shipment.

Edit or Modify Asset
To edit or modify an asset, click Action > Edit. This opens the Asset Detail Window where the use can modify the asset details.
Asset Detail Page
The tabs in the Asset Detail Window provide a comprehensive view of asset movements and related data. This interface includes an interactive map and contextual information, allowing users to track asset locations, view associated timestamps, and access detailed records.
Asset Detail Page
Data Filter Options
The user can filter the asset events data by using the date filter feature.
-
Date Filters:
- Options to filter asset data by:
- Most Recent: View the latest data.
- 7 Days: Filter data for the last 7 days.
- All: View the complete data log.
- Custom Date Range: Specify a custom time frame using the Start date and End date fields.
- Options to filter asset data by:
-
Download Report:
The Report (Custom) button allows users to generate and download a report of asset data for the selected filter.- Example:
- Report (All)
- Report (Most Recent)
- Example:
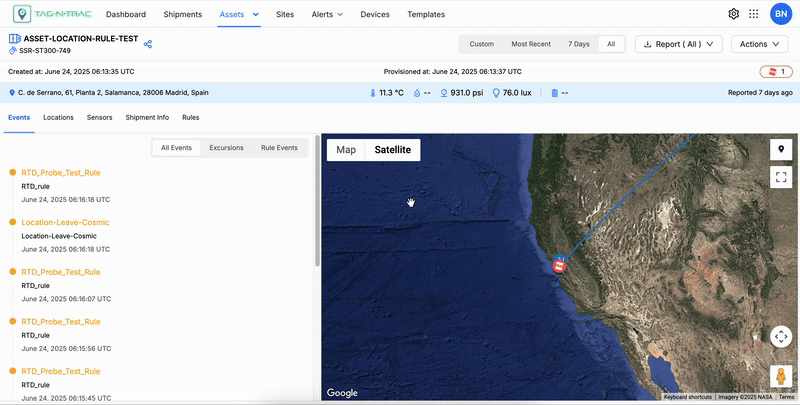
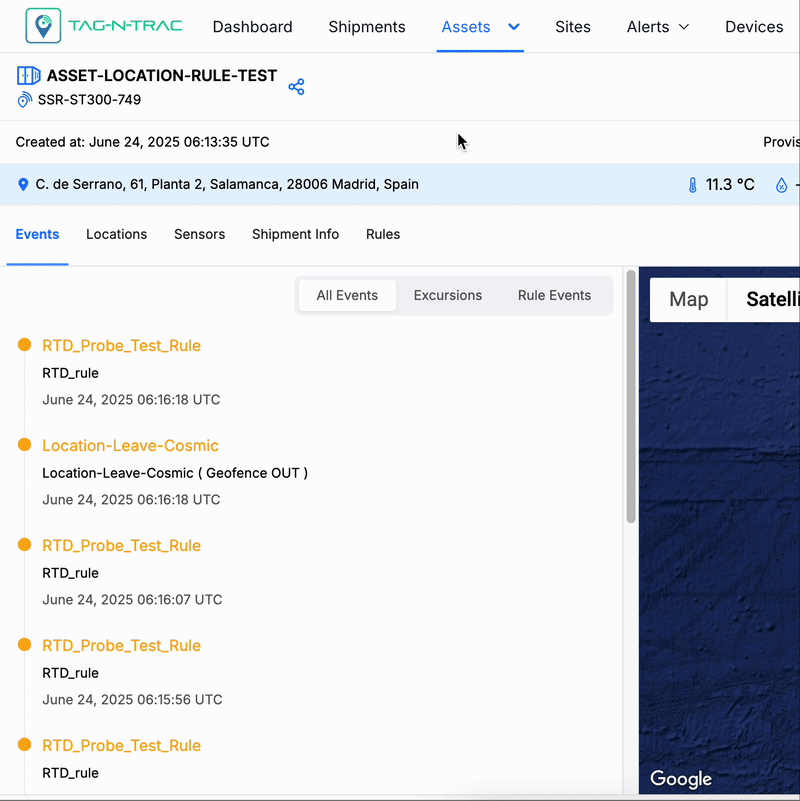
Events Tab
The Events tab provides a detailed timeline of the asset's lifecycle, showing various statuses and actions taken. This section allows you to track key events for better monitoring and management of your assets.
Events Tab
Accessing Events Tab
- In the Assets > Assets List menu, click on an asset to view the Asset Details Page.
- Click on the Events tab to view the details.
- Use the toggle options (All Events / Rule Events) to customize the event list based on your needs.
- Refer to timestamps to track when actions occurred.
This streamlined interface helps users efficiently monitor asset status and actions in real-time.
This tab displays the following information:
- Event Timeline:
- View all major events such as:
- Created: When the asset was added to the system.
- Provisioned: When the asset was provisioned with a device.
- De-provisioned: When the asset was unlinked or removed from a device.
- Rule Events: Displays the rule-based events based on the selected template type during the shipment creation process.
- Each event displays a timestamp for accurate tracking.
- Event Filters:
- All Events: Displays all recorded events for the asset.
- Rule Events: Displays only on rule-based events triggered by specific conditions.
- View all major events such as:
Location and Timestamp List
The location and timestamp list provides a hierarchical view of the locations an asset has visited, starting with the most recent. Each entry includes the exact date and time in your time zone, ensuring precise tracking.
Location and Timestamp List
Accessing Location and Timestamp List Tab
- In the Assets > Assets List menu, click on an asset to view the Asset Details Page.
- Click on the Location and Timestamp List tab to view the following details.
- Location Hierarchy: A hierarchical list of locations visited by the asset, starting with the most recent. Scroll down to see more locations on the list.
- Timestamp Format: Each location entry is accompanied by the precise date and time in your time zone.
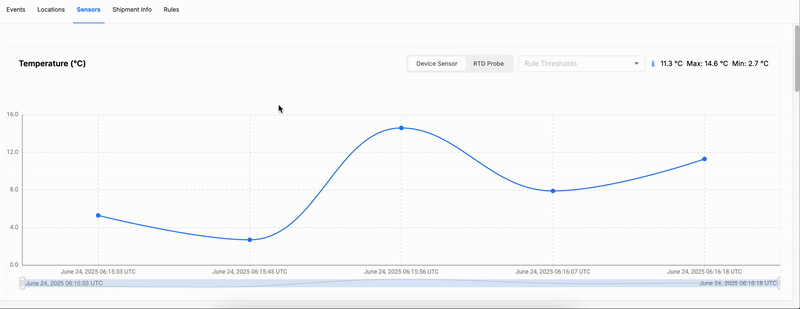
Sensors
The Sensors tab provides real-time and historical readings from various sensors associated with the asset. This allows users to monitor environmental and operational conditions effectively.
Sensors Tab
Accessing Sensors Tab
- In the Assets > Assets List menu, click on an asset to view the Asset Details Page.
- Click on the Sensors tab to view the details.
- Use the zoom and pan tools to focus on specific periods or details.
- Expand graphs for a full view or collapse them for a compact layout.
This tab offers a comprehensive way to analyze sensor data, ensuring timely insights for asset management.
This tab displays the following information:
- Sensor Readings:
- Includes data for:
- Temperature: Displays temperature variations over time.
- Light: Tracks light intensity levels.
- Pressure: Records atmospheric or applied pressure.
- Humidity: Logs humidity levels.
- Battery: Indicates battery status or levels.
- Acceleration: Captures movement or vibration data.
- Includes data for:
- Interactive Graphs: The platform provides interactive graphs to help you visualize and analyze data more effectively. These graphs support multiple viewing and navigation options for enhanced usability.
- Maximize / Minimize: Use the expand icon located on the top right corner of the graphs to enlarge or minimize individual graphs for easier viewing.
- Zoom and Pan: Use the brush-style slider located beneath each graph to adjust the visible time range:
- Zoom: Drag the edges of the slider to zoom in or out.
- Pan: Move the entire slider left or right to navigate across the timeline.
- Show Rule Thresholds: To display threshold data for selected sensor readings:
- Choose the Rule Thresholds to display the threshold data.
Shipment Info
The Shipment Info tab helps users view and manage shipment details associated with a specific asset. Below is a breakdown of its key features and guidance on how to use it.
Accessing Sensors Tab
- In the Assets > Assets List menu, click on an asset to view the Asset Details Page.
- Click on the Shipment Info tab to view the details.
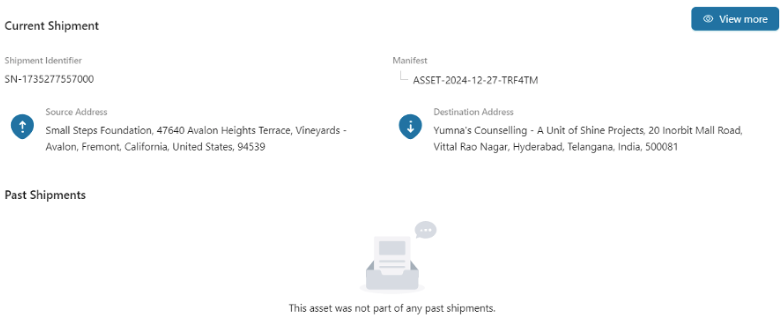
Shipment Info Tab
This tab provides a clear and organized overview of shipment-related information, making it easy to track and manage assets effectively.
This tab displays the following information:
- Current Shipment Details:
- Shipment Identifier: Displays a unique identifier to track the current shipment.
- Manifest: Lists the manifest ID containing details of shipment contents.
- Source Address: Provides the starting location of the shipment.
- Destination Address: Displays the target location of the shipment.
- Past Shipments:
- Shows the history of shipments related to the asset.
- If no past shipments are available, a message will indicate that there are none.
- View More Option:
- Clicking the View More button allows you to access a detailed breakdown of the associated shipments' history and additional shipment data.
Rule
The Rules tab provides an overview of the user-defined rules associated with a specific asset. This feature ensures you can monitor and act on important conditions like temperature, battery, location, and more.
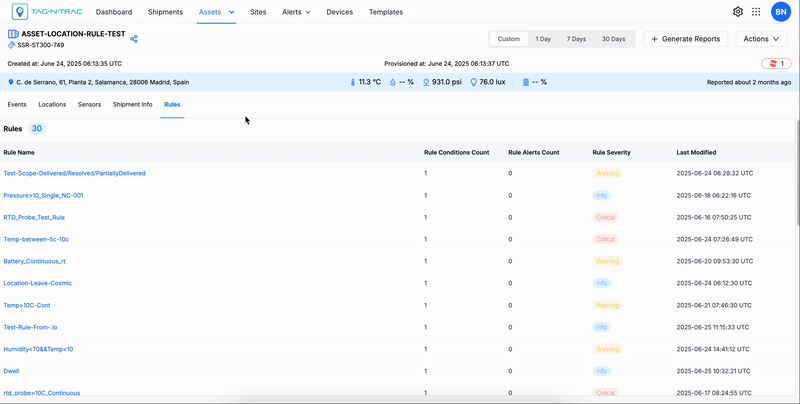
Accessing Sensors Tab
- In the Assets > Assets List menu, click on an asset to view the Asset Details Page.
- Click on the Rules tab to view the details.
This tab ensures efficient asset management by providing a clear view of conditions and potential issues, enabling timely interventions.
This tab displays the following information:
- Rule Management: View a list of all existing rules applied to an asset.
- Rules include attributes such as:
- Temperature
- Battery
- Shock
- Location
- Dwell Time
- Pressure
- Humidity
- Light
- Rules include attributes such as:
- Rule Details:
- Quickly view the following details for each rule:
- Rule Name: Descriptive title for the rule.
- Status: Whether the rule is active or inactive.
- Severity: The importance level of the rule.
- Attribute Name: The condition (e.g., temperature) being monitored.
- Last Updated At: The most recent update timestamp for the rule.
- Quickly view the following details for each rule:
- Triggered Events: Displays a list of rules that have been triggered for the selected asset. This helps identify conditions requiring immediate action.
Notes:
- Regularly review rules for relevance and update thresholds based on asset performance.
- Use severity levels to prioritize responses when multiple rules are triggered.
- Click the Rule Name to open the Rule Details page, where you can view additional information about the selected rule.
Asset Groups
The Asset Groups feature in Assets enables users to efficiently organize and manage assets by categorizing them into one or more logical groups. This helps streamline workflows, simplify asset tracking, and maintain organized data across the platform.
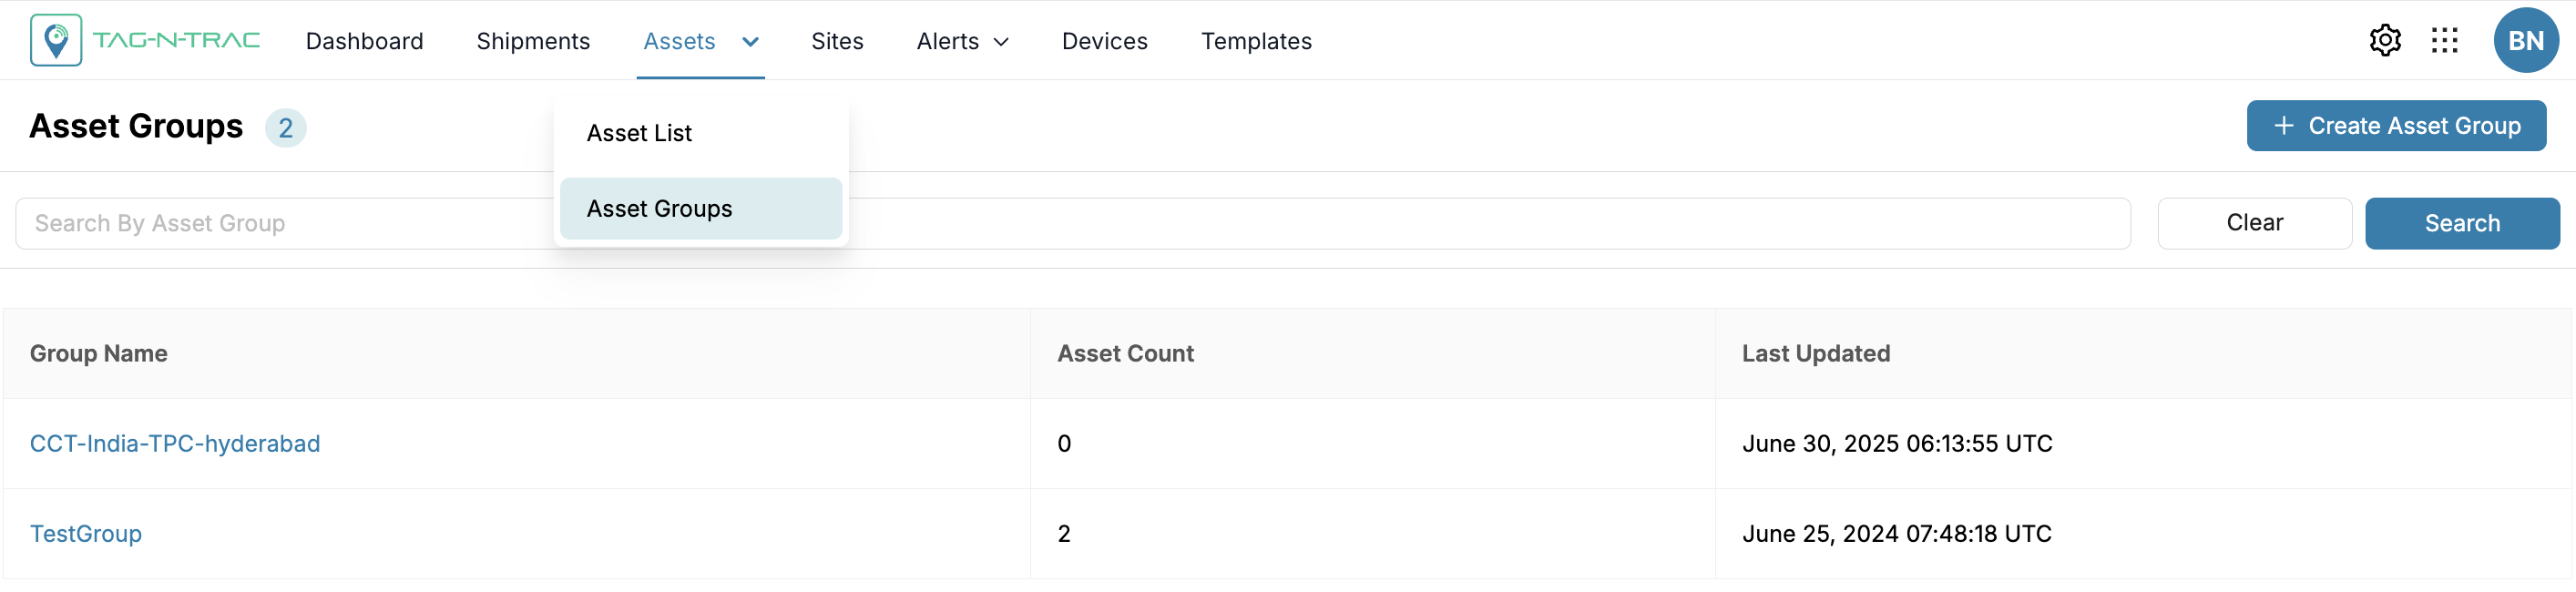
Asset Groups
Key Benefits
- Organize assets by type, function, or any custom criteria
- Improve data visibility and retrieval
- Simplify asset management and maintenance workflows
The Asset Groups feature displays all the asset groups currently available and added to the platform. You can create and manage your asset groups efficiently on the platform by clicking on the Create Asset Group.
Create Asset Group
Asset Groups help organize and manage multiple assets efficiently. This topic outlines the steps to create an Asset Group, add assets, and manage existing groups. By following these guidelines, users can streamline asset organization and ensure easy access to grouped resources. To create an asset group, start by clicking + Create Asset Group.
Create Asset Group
Follow these steps to create an Asset Group:
- Initiate Asset Group Creation:
- Click the + Create Asset Group button to open the asset group creation window.
- Provide Basic Details:
- Fill in the Asset Group Name field.
- Add a brief Description to describe the purpose of the group.
- Add Assets to the Group:
- Click on the Add Assets button in the Assets section.
- This opens a drawer window in which you can search for assets to include in the group.
- Search and Select Assets:
- Use the Search for Assets field to look for specific assets by their Asset ID, or
- Select the desired assets from list by clicking the + Add button next to each asset.
- Once all assets have been added, close the wizard to complete the process.
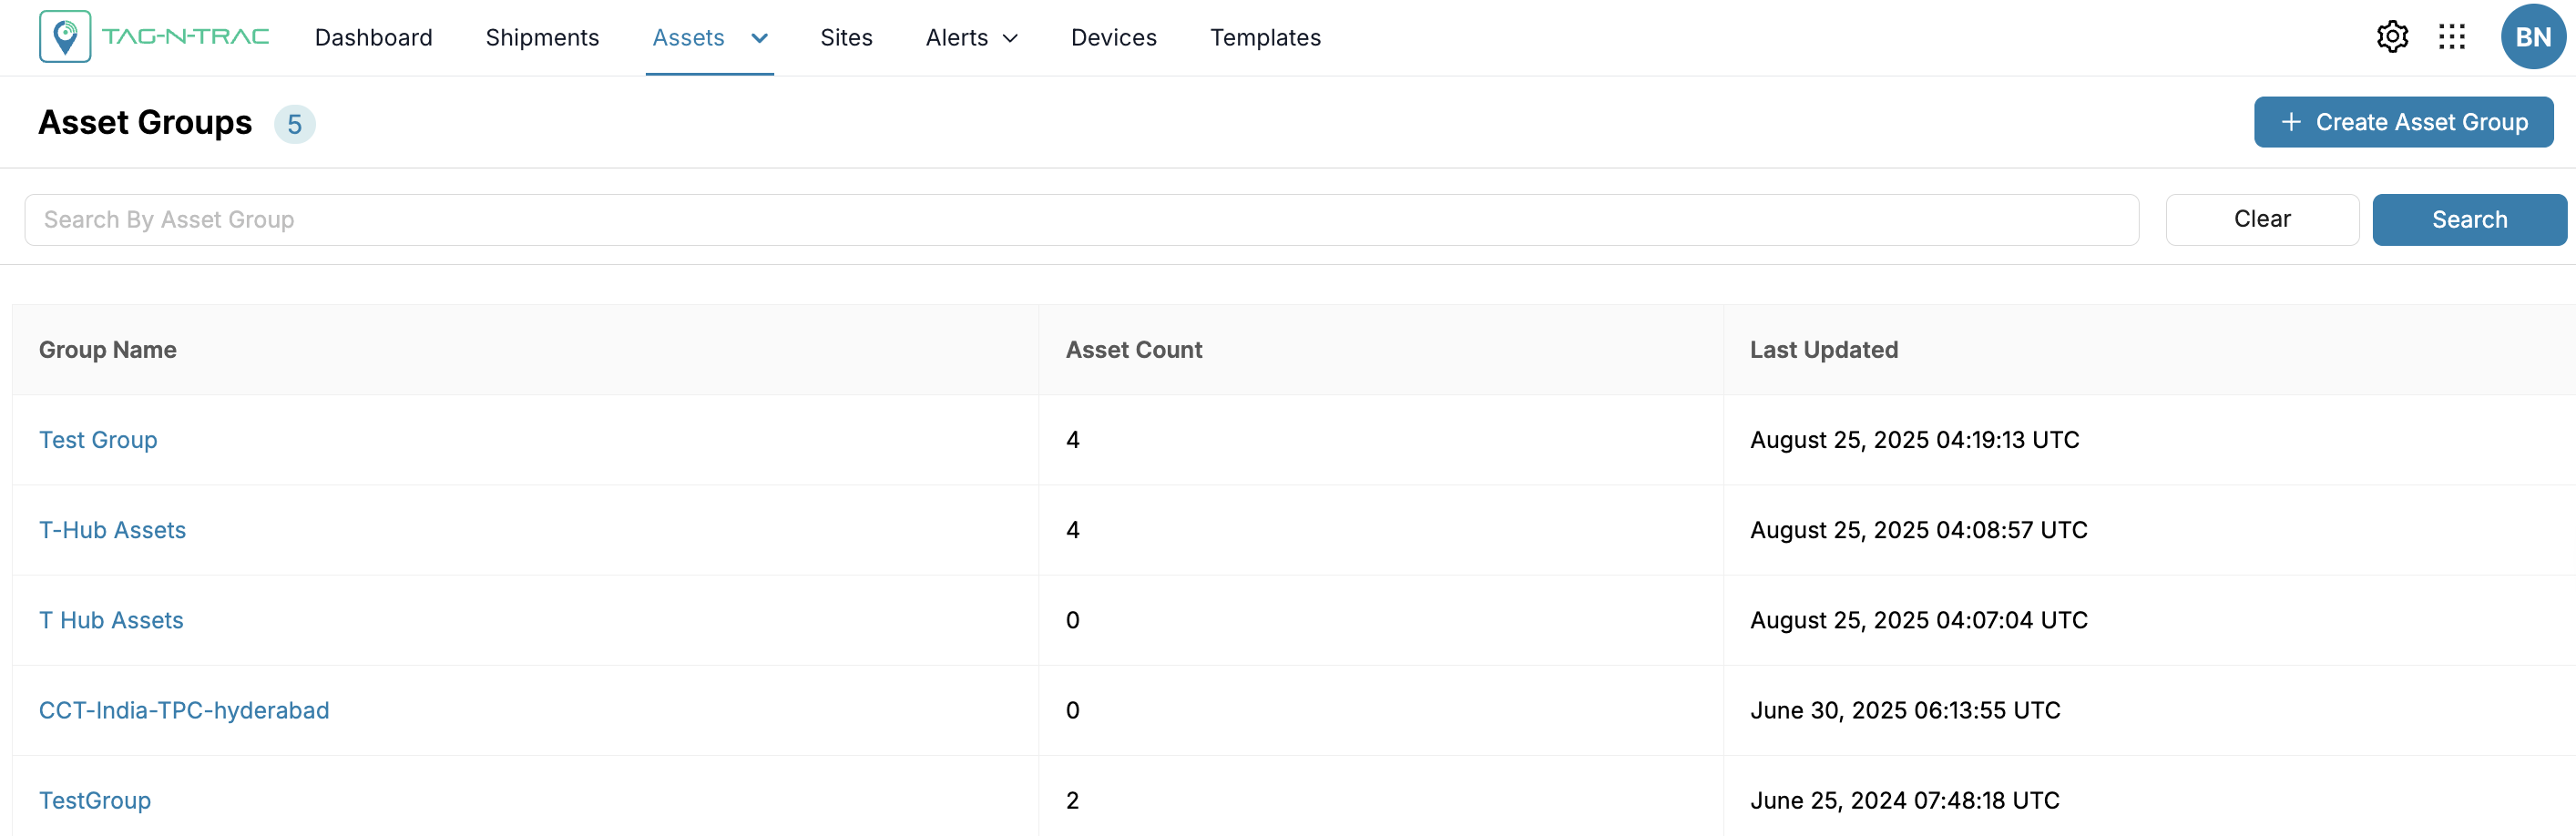
Managing Asset Group
The Asset Groups interface allows you to view, search, and manage all created asset groups in a centralized list.
Overview
The Asset Groups List displays all available asset groups along with key information such as Asset Count, and the Last Modified dates.
Managing Asset Group
Use the Search by field to quickly find specific asset groups by name.
- Click Clear to clear the field and start a new search.
- Click Search to view the asset group.
- Click + Create Asset Group to add a new asset group.
Viewing Asset Group Details
When you click an asset group from the list, you are directed to the Asset Group Details page. This page includes:
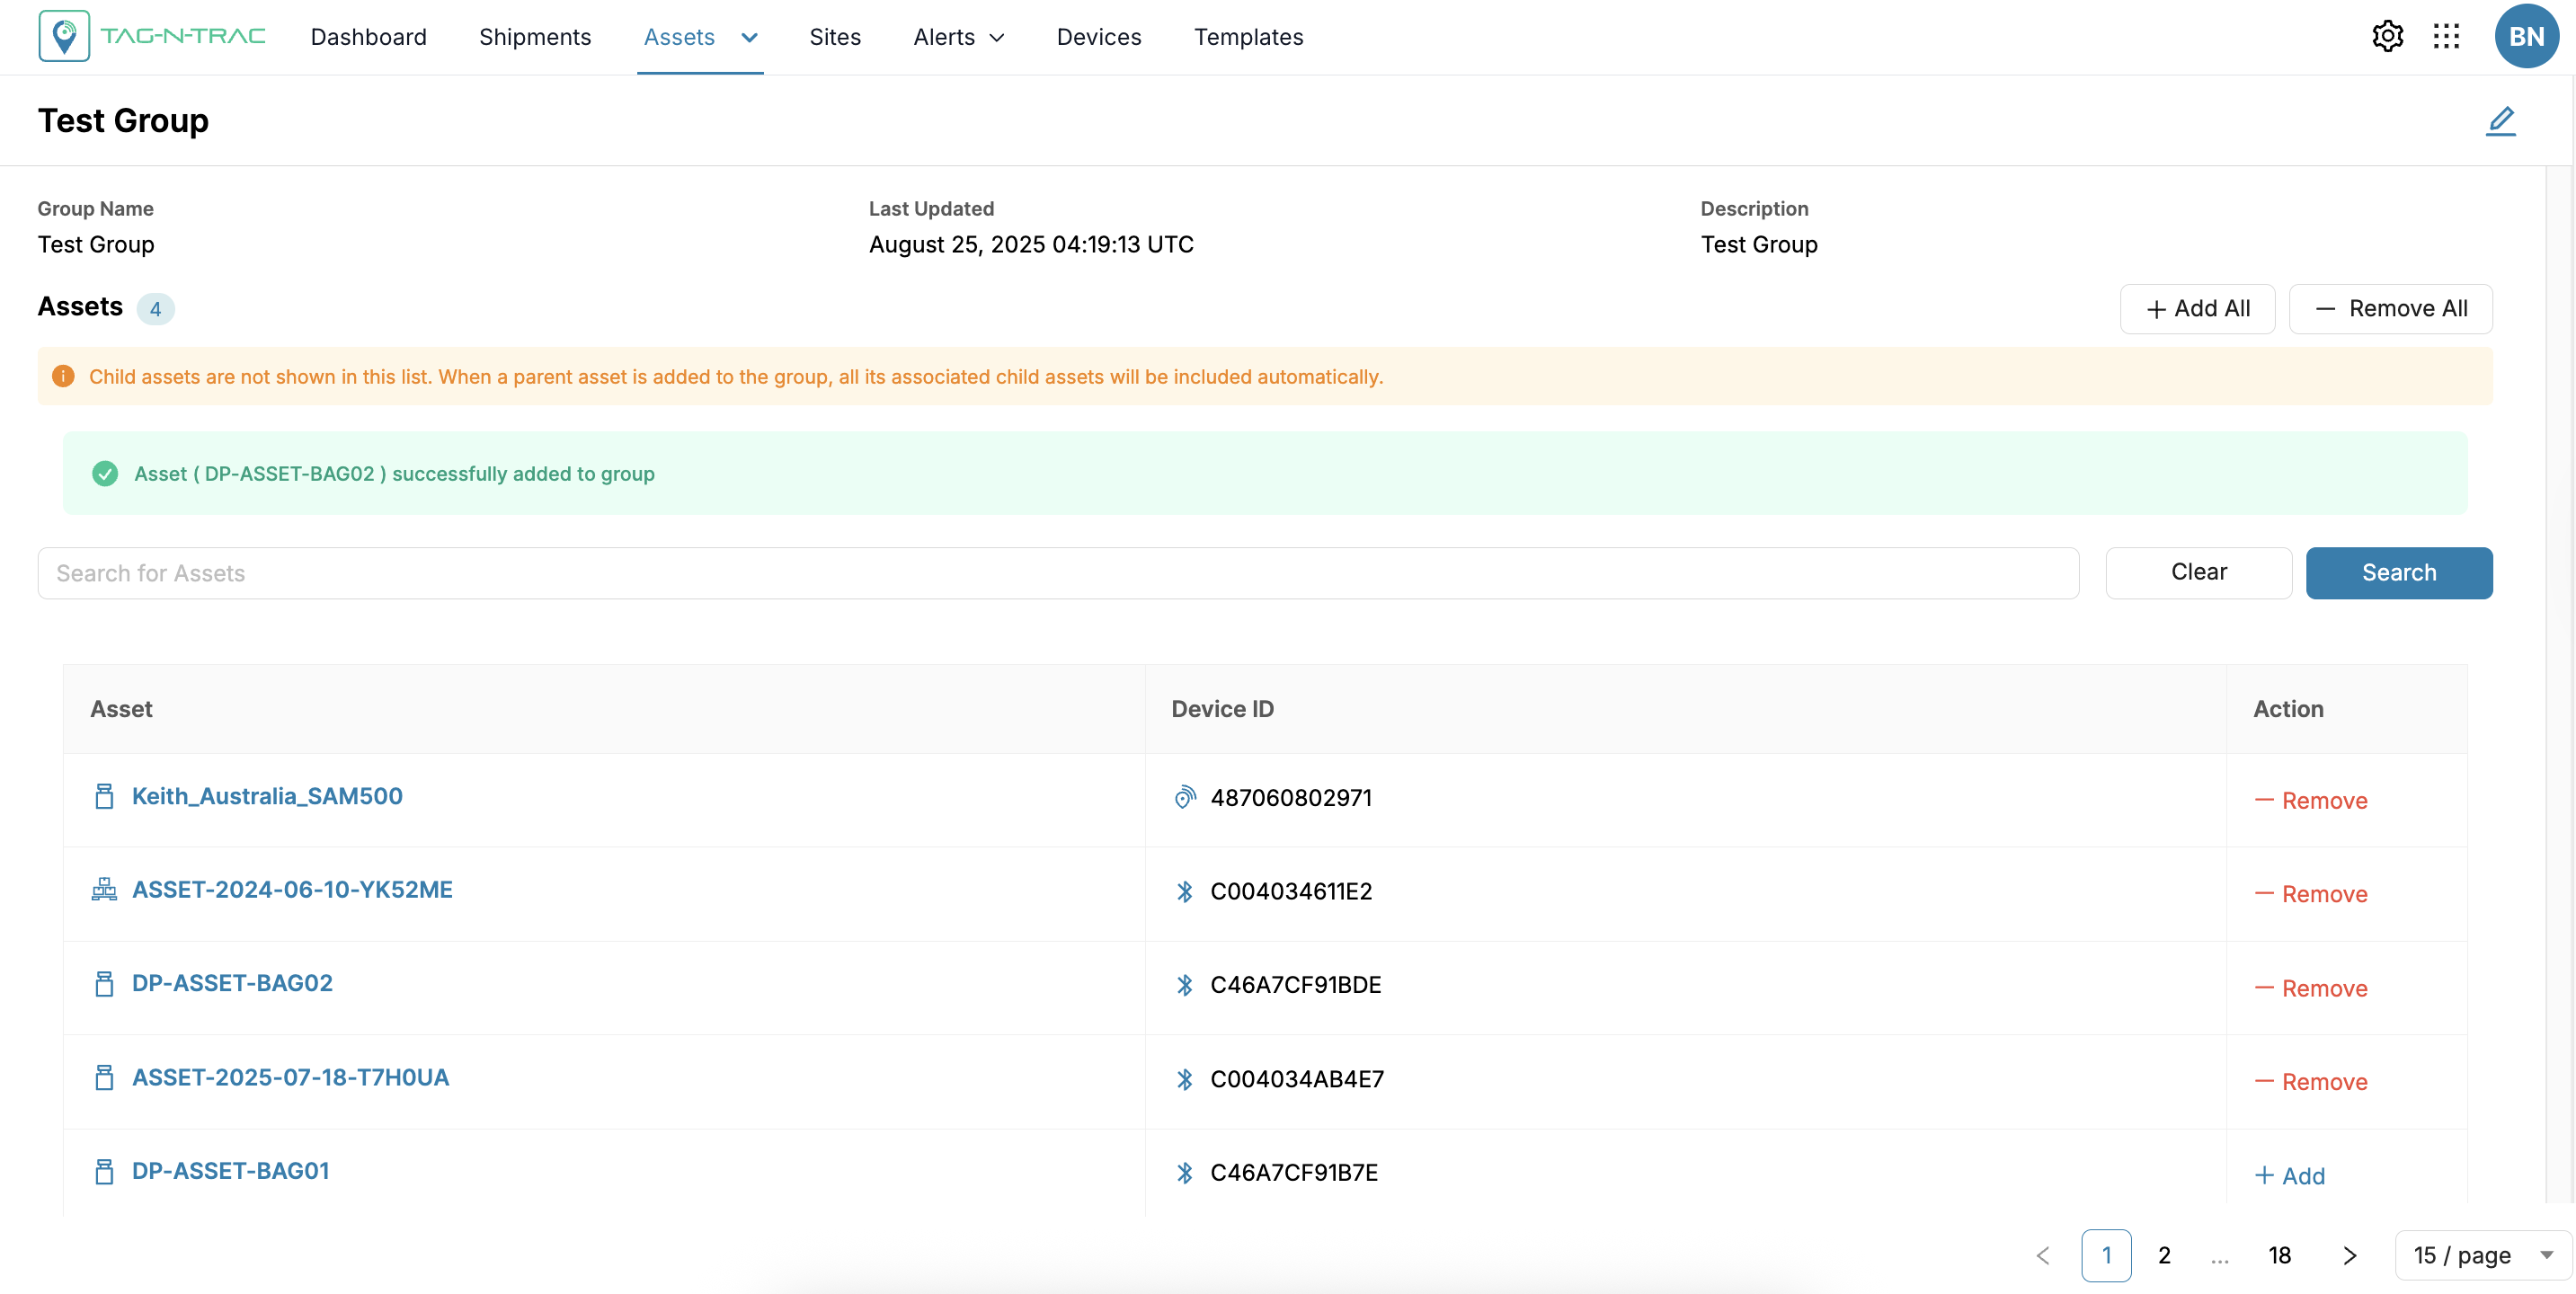
Asset Group Details page
- Basic Details: Displays the asset group name, total number of assets, last updated info, and a brief description.
- Assets Section: Lists all assets within the group, device IDs their names and identifiers.
Edit Assets in an Asset Group
To edit an asset group, click the pencil icon in the upper-right corner of the Asset Group Details page.
Note: You can edit asset group details only if the group is not associated with any shipments.
Update the information as needed, then click Update to save changes or Cancel to discard them.
Updated 4 months ago